

I had a box of seasonal items in the closet for two years. Every time I pulled something out it looked like a costume. Too bright, too themed, too random. I kept swapping pieces and nothing felt like home.
I used to think more was better. After trying a pared-back approach, the room finally read seasonal but calm. I will show the look I use that stays true to the room year-round.
I keep seeing seasonal styling pushed as full set swaps. I prefer tiny edits that still read current. The end result is a room that feels intentional, seasonal, and still lived-in. My method works for mantels, shelves, consoles, and small corners. It takes an hour or less to do the first pass.
What You'll Need
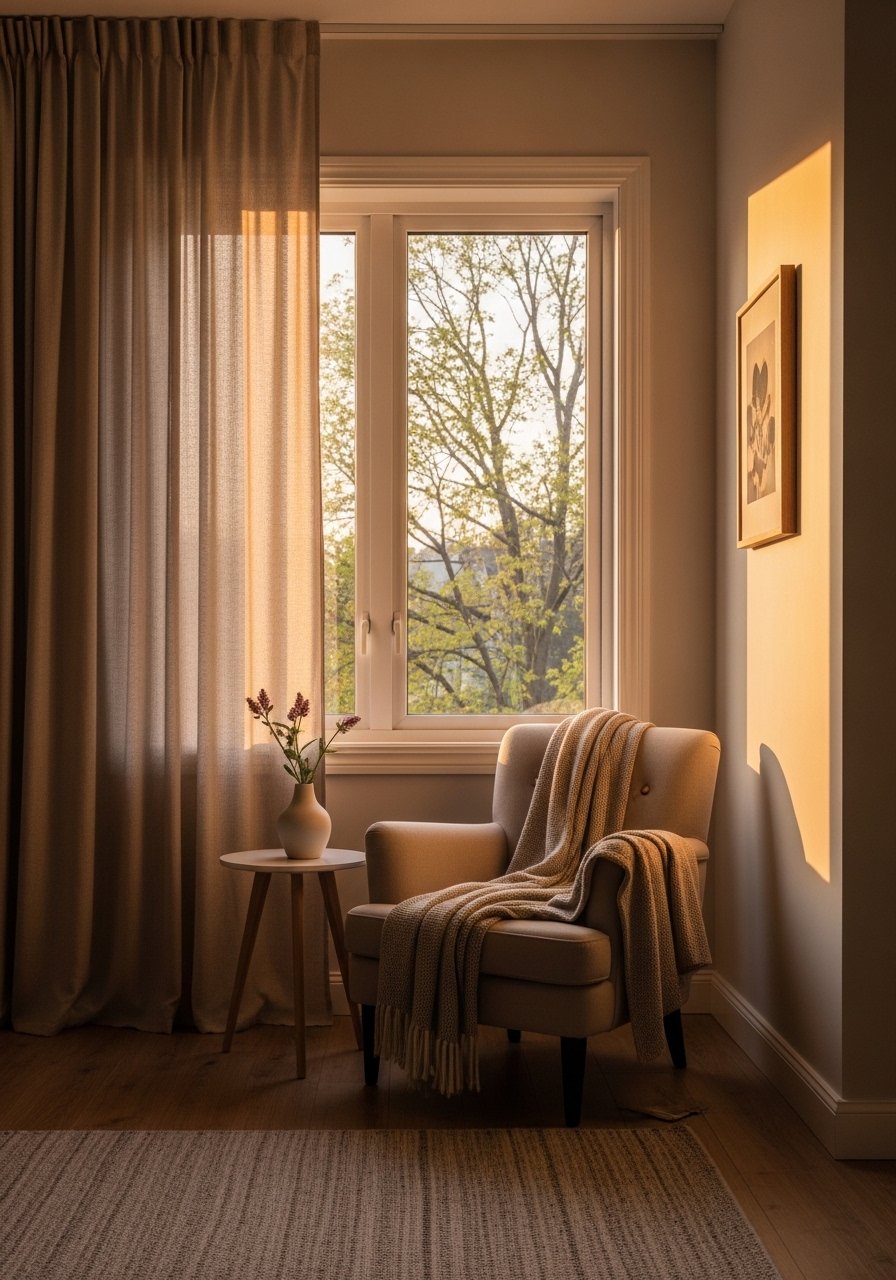
- Chunky knit throw in oatmeal, 50×60 ($40 to 65). I keep one folded on an arm or draped over a bench
- Linen pillow covers in warm beige, 20×20 ($18 to 30). Swap these for quick texture change
- Set of 3 ceramic vases, matte white ($25 to 40). Great for small clippings and odd-number groupings
- Brass picture ledges, 24-inch ($18 to 30). Perfect if I want to rotate prints without nails
- Faux eucalyptus garland, 6-foot ($12 to 25). Lightweight and reusable across seasons
- Set of tapered candles and brass holders, set of 4 ($20 to 35). Adds soft height and warmth
- Wooden serving tray, medium (not linked). I use it to anchor vignettes and corral small pieces
Step 1: Start with the soft goods, not the trinkets

I begin by swapping pillows and a throw. Pillows set the tone because they occupy the largest visual area after a rug. I pick one neutral linen cover and one seasonal texture. For sofas I use 20×20 or 22×22. On chairs I prefer 18×18. These proportions keep the seating balanced.
The visual change is immediate. The room reads quieter. Most people grab five patterned pillows at once. That is too busy. One patterned pillow and a neutral anchor are enough. Avoid buying one-off novelty pillows tied to a single season. They look out of place in March.
Step 2: Build one focal vignette on a flat surface
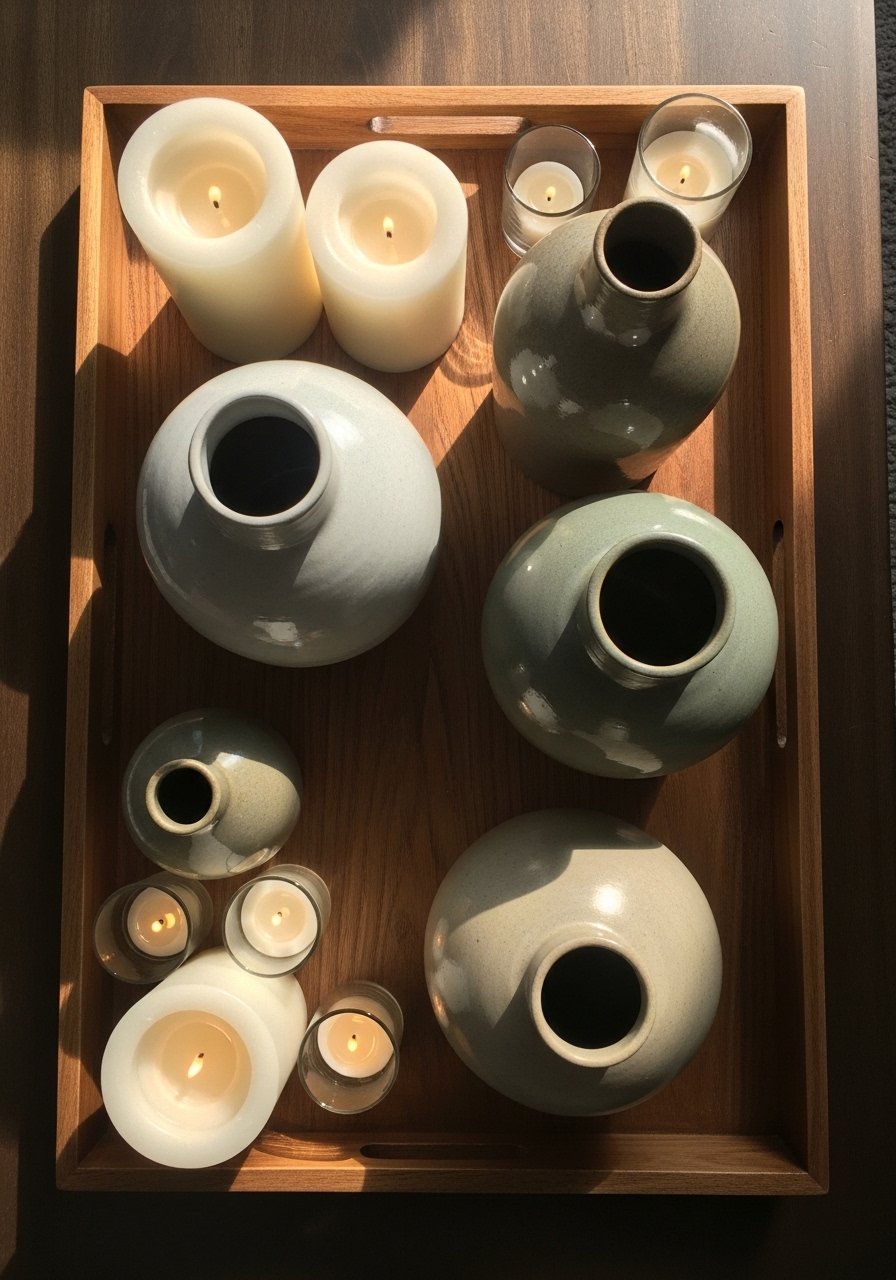
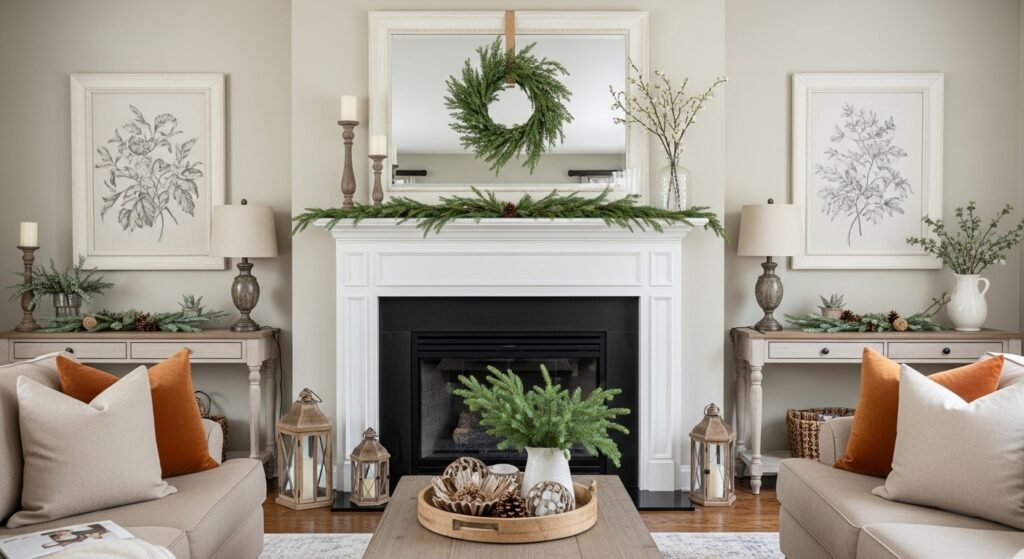
I choose a single surface, like a console or coffee table. Everything comes off it. I place a wooden tray as the base. Then I add a tall item, two medium items, and one low item. The tall item should be roughly 2 to 3 times the height of the low item. That proportion reads intentional.
When done wrong everything looks the same height. When done right there is movement. People forget negative space. Leave 2 to 3 inches between grouped objects, not more. The tray keeps pieces from floating on the surface. I often tuck a sprig of faux eucalyptus into a vase for a seasonal note.
Step 3: Layer greenery and seasonal accents sparingly
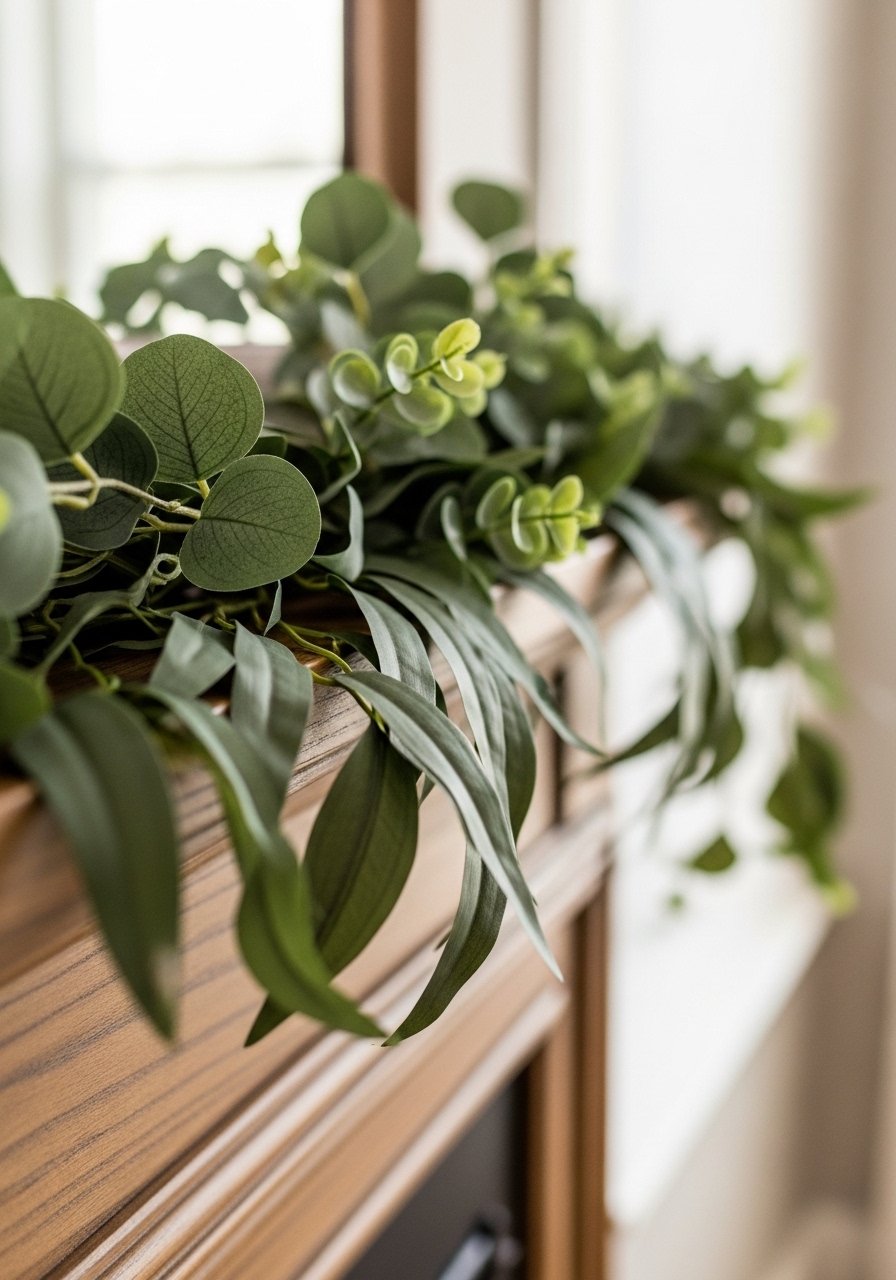
I drape a 6-foot garland on a mantel or weave clippings through a console display. For a standard 60-inch mantel I stop the garland 6 to 12 inches from each edge. That breathing room prevents the look from feeling forced. Small wreaths or single clippings in a ceramic vase add a personal touch.
Most people pile every seasonal item they own onto the mantel. That reads cluttered. The insight I learned is that one organic element plus two crafted pieces is enough. Avoid plastic-looking greenery. Faux eucalyptus with a matte finish reads more natural.
Step 4: Swap art or lean seasonal prints on picture ledges
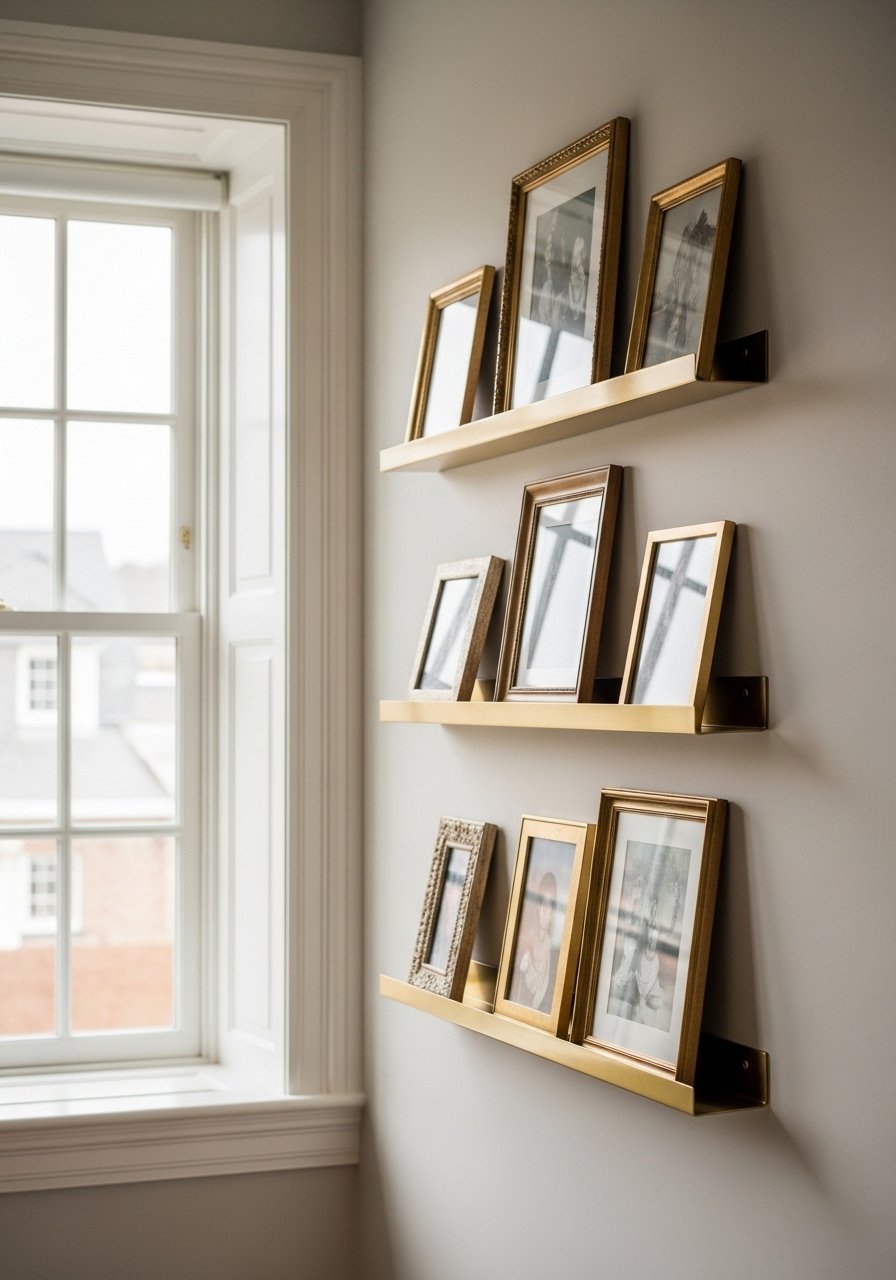
I use picture ledges to rotate prints and postcards. Ledges let me stagger frames without new holes. For a 24-inch ledge I place a large frame slightly off-center and tuck a smaller one in front by 1 to 2 inches. Overlap creates depth. Leave 2 inches between the shelf edge and the nearest frame base.
The usual mistake is hanging everything at eye level and leaving no layering. Leaning frames gives an instant casual feel. For small rooms I choose smaller frames and keep one large anchor frame. Brass ledges help match existing hardware and give a subtle seasonal update.
Step 5: Edit, live with it, then tweak
I step back and live with the change for at least a day. I check traffic flow and sightlines. For rugs I follow the front-legs-on rule. Sofa and chairs should have front legs on the rug to anchor the seating area. That shifts how the whole room reads.
Temptation is to add one more ornament right away. I wait. Editing is the visual step most people skip. If something still feels off I swap one item only. Small swaps over weeks keep the room feeling seasonal but not themed.
Why Seasonal Decor Can Still Look Like Home
I've noticed that seasonal pieces sell best when they read like edits, not costumes. I choose materials that match what is already in the room. Linen, matte ceramics, brass, and natural jute work across seasons. The key is texture and finish, not holiday imagery.
When I bring in color I pick one or two accents and repeat them in small doses. A rust pillow, a terracotta vase, and a trimmed garland will read cohesive. Repetition of one color or material ties the room together. I avoid novelty items with bold graphics. They dominate the mood.
Making This Work in a Small Room
The last three rooms I styled all had limited square footage. I used these rules each time:
- Anchor with soft goods only. One throw and one pillow swap goes far
- Keep tabletop vignettes small. Use a 12×16-inch tray for coffee tables
- Use vertical space. Picture ledges and tall vases draw the eye up
- Keep one permanent piece dominant. A neutral rug or large sofa should remain unchanged
Scaling down is about restraint. Small rooms reward fewer, better-placed items.
Mixing Seasonal DIY with Permanent Pieces
A friend asked me about blending handcrafted accents with her permanent furniture. I recommend choosing one handmade item per vignette. For example, a simple clay ornament on a ceramic vase reads thoughtful and personal. If the sofa is cool gray I add warm textile accents in natural tones. If the room already has brass finishes I echo that with candle holders or frames.
I often reuse the same ceramic vases year after year. I change what goes inside them. One winter they hold dried grasses. In spring they hold simple green clippings. Recycling the same base objects keeps the look consistent and saves money.
Start with One Corner
Pick a single corner or surface and make one swap. Change the pillow, add a small tray, or drape a short length of garland. Give it 24 hours before changing anything else.
When I start this way the room gradually becomes seasonal instead of crowded. Small edits keep the space familiar and intentional. That first corner will show whether the color, texture, and scale are working together.
