


My living room had nice furniture and decent lighting but it still felt like a waiting room. Took me embarrassingly long to figure out it was missing texture. Every surface was smooth, every color was flat, and nothing invited you to actually sit down.
These ideas lean modern farmhouse with a bit of lived-in eclecticism. Most projects land under $50, with a few splurges around $100 to $150. Works for living rooms, bedrooms, stairways, and small rental walls that have been staring back at you for months.
Butcher Paper Template Hack for Perfect Spacing
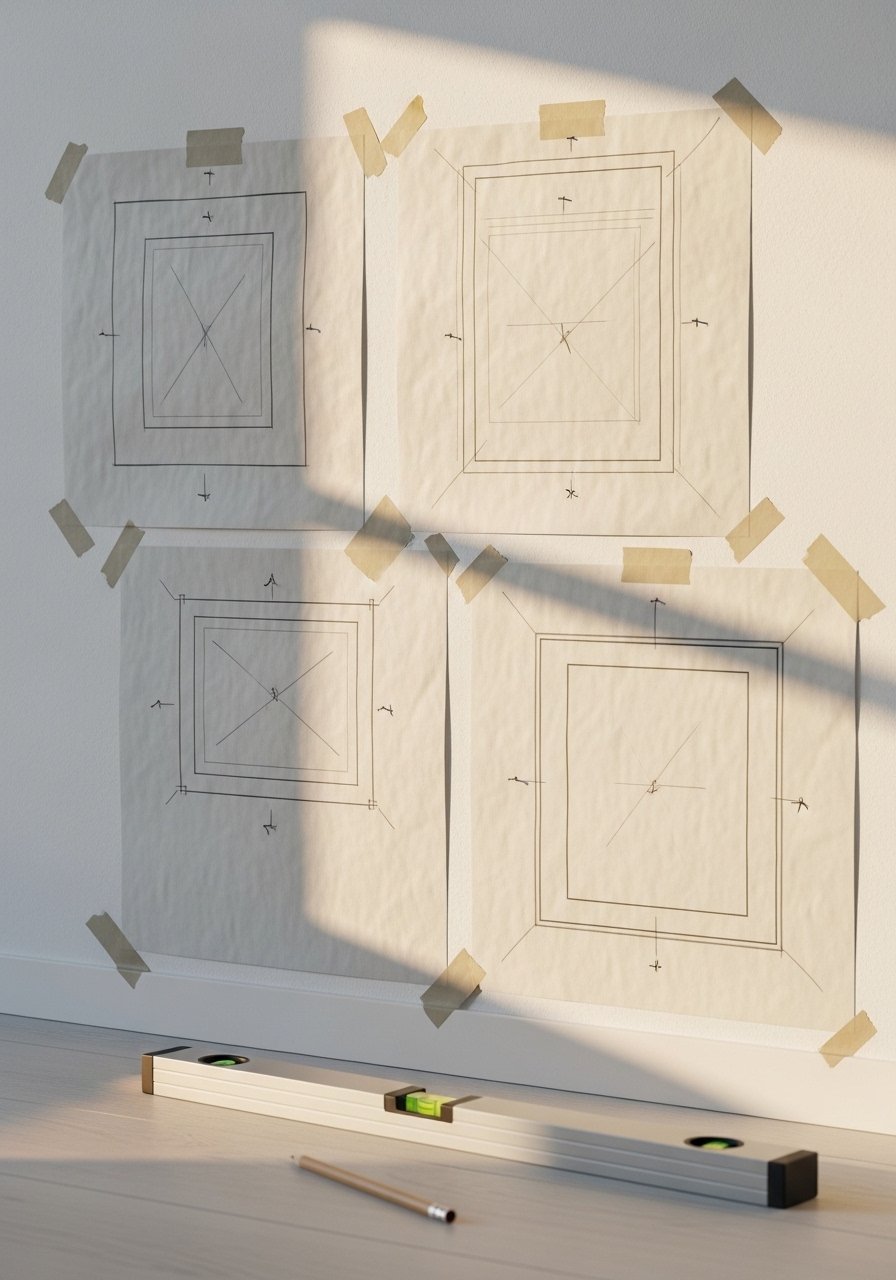
I learned this trick when I kept leaving extra holes in the wall. Trace each frame onto butcher paper and tape that sheet to the wall to place nails first, not the frames. It saves patching and keeps you from guessing the 2-inch spacing that actually makes a layout breathe. Use this for a 6-frame small wall or a larger cluster. I buy a roll of butcher paper and a pack of painter’s tape for under $15, like butcher paper roll for crafts. Common mistake is measuring only from the center of a frame, which throws everything off when you include matting. One extra detail most guides skip, do a quick photo of the paper template on your phone at eye level so you can check balance before you hammer.
Thrifted Frame Mix with Personal Photos for Eclectic Living Rooms

Thrifting frames feels like treasure hunting, and spray painting them the same color makes them read as one collection. I spent about $30 on frames then bought a single can of spray paint. People drop about $75 on their first wall. Mix 8×10 and 5×7 pieces to create movement, and keep 2 inches between frames. For photo prints, I upload to a local lab or use matte photo paper packs to keep color consistent. A mistake I see is keeping wildly different frame depths without accounting for thickness, which makes leaned frames wobble. If you have pets, use wipeable mats or acrylics over photos so fur and sticky fingers are easy to clean.
Ikea Ribba Frames with DIY Mats for Modern Bedrooms
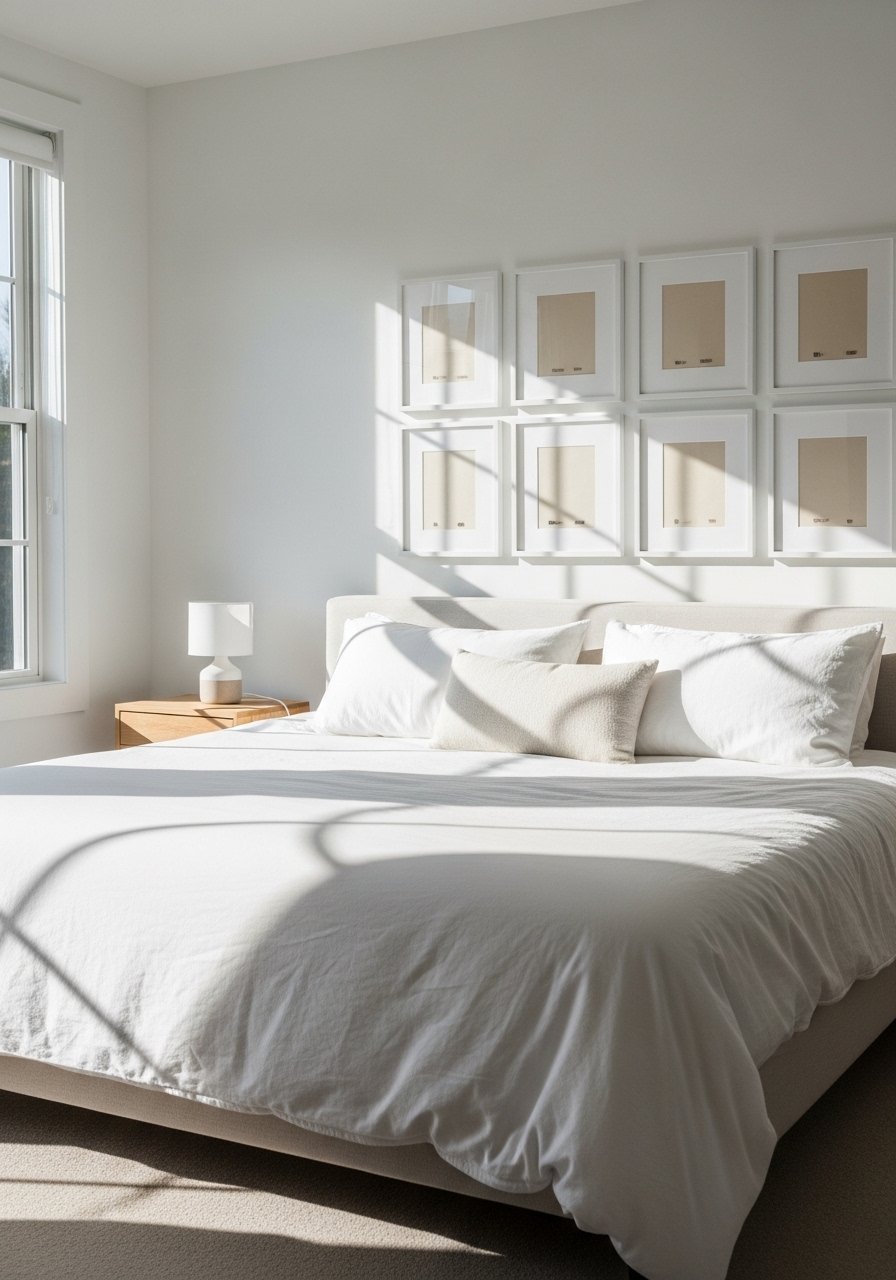
Cheap frames look custom once you add a mat, and cutting your own from heavy cardstock is fast. I use a mix of 8×10 and 11×14 Ribba-style frames and cut mats to fit family photos. For tools pick up a metal ruler and an x-acto mat cutter. The visual win is the white margin that makes small prints feel gallery-sized. A common slip is trimming too narrow a mat. I go at least a 1.5-inch visible border, and odd numbers in a cluster read better than even ones. Most renters skip nails altogether so swap to command strip-friendly frame hangers when needed.
Stairway Vertical Stack for Narrow Hallways
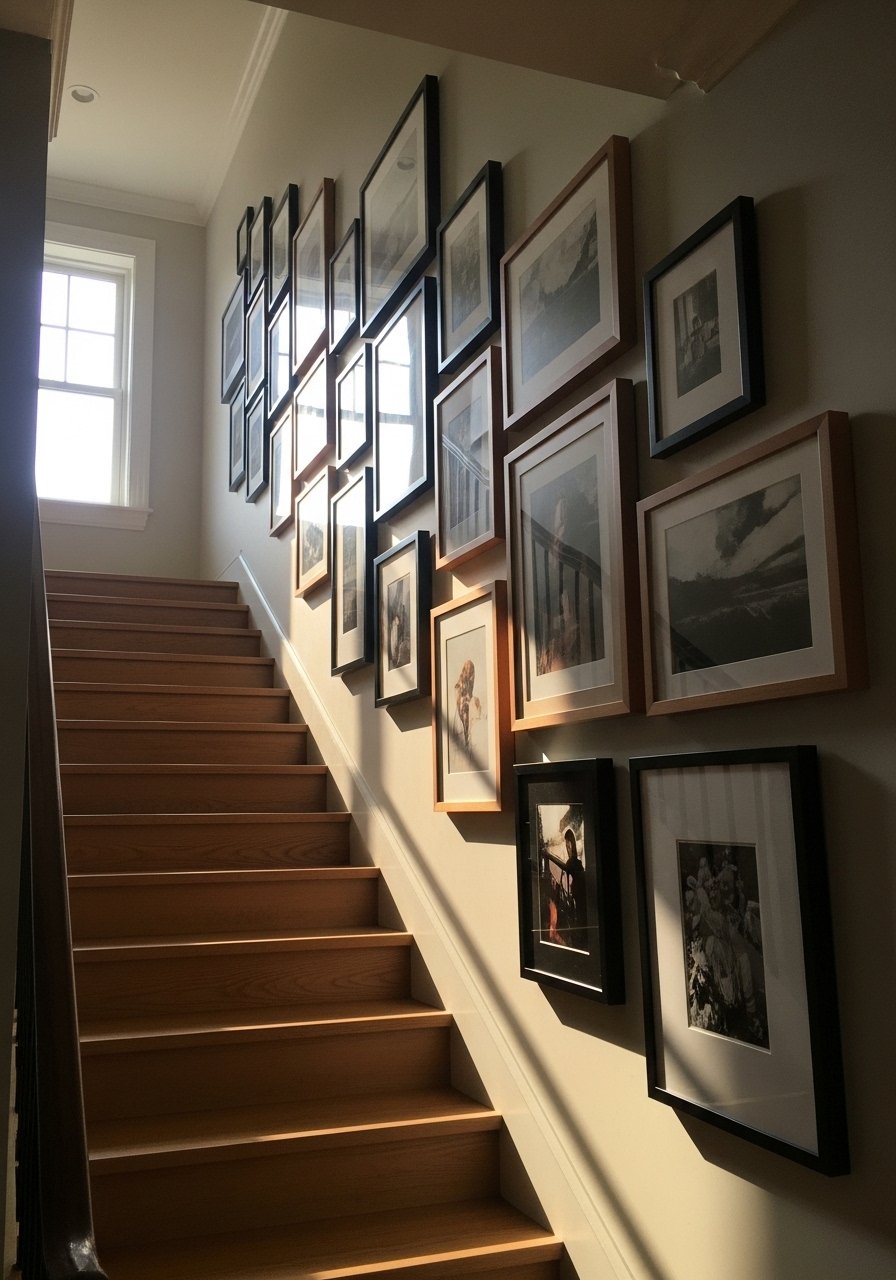
Putting art parallel to the slope of the stairs is the trick that made my ceilings feel taller. Mix 5×7 and 8×10 sizes and stagger them about 2 inches apart, and start the lowest frame at eye level when standing on the step, not the floor. Command strip hangers rated per weight saved me from drilling into plaster. Use heavy-duty command strips if you must avoid nails. A mistake is centering the whole cluster on the landing rather than aligning with the staircase line. For a tight hall, stick to 6 frames max so it does not feel crowded and so the stair light can still travel up.
Shelf-Layered Photo Display for Renters and Switchers

Picture ledges are my go-to when I want to change art every month. I have two 36-inch shelves where I lean 8×10 frames, small canvases, and a mirror. Swap pieces without new holes, and layer objects in front for depth. I use brass picture ledges that hold a mix of frames and a vase. Avoid the mistake of lining everything up perfectly edge to edge, which reads flat. Instead, stagger heights and leave 2 inches between leaning frames. One detail many guides miss, use a thin strip of felt behind frames so they do not scratch the shelf finish.
Grid-Within-Grid Mini Collections for Bedroom Nooks

When your wall needs structure, make a grid of small matching frames inside a looser overall layout. A 3×3 or 2×2 mini grid anchors the eye and keeps the rest of your pieces from looking chaotic. I used nine 5×7 frames in one cluster and then scattered larger 8x10s around it, keeping about 2 inches between frames. For matching frames try wood frame sets. The trick most people miss is balancing color weight, not frame size. Make sure the grid carries a color that appears in two other pieces on the wall, and odd numbers outside the grid help the whole composition breathe.
Mirror-Mixed Art Wall to Brighten Small Rooms
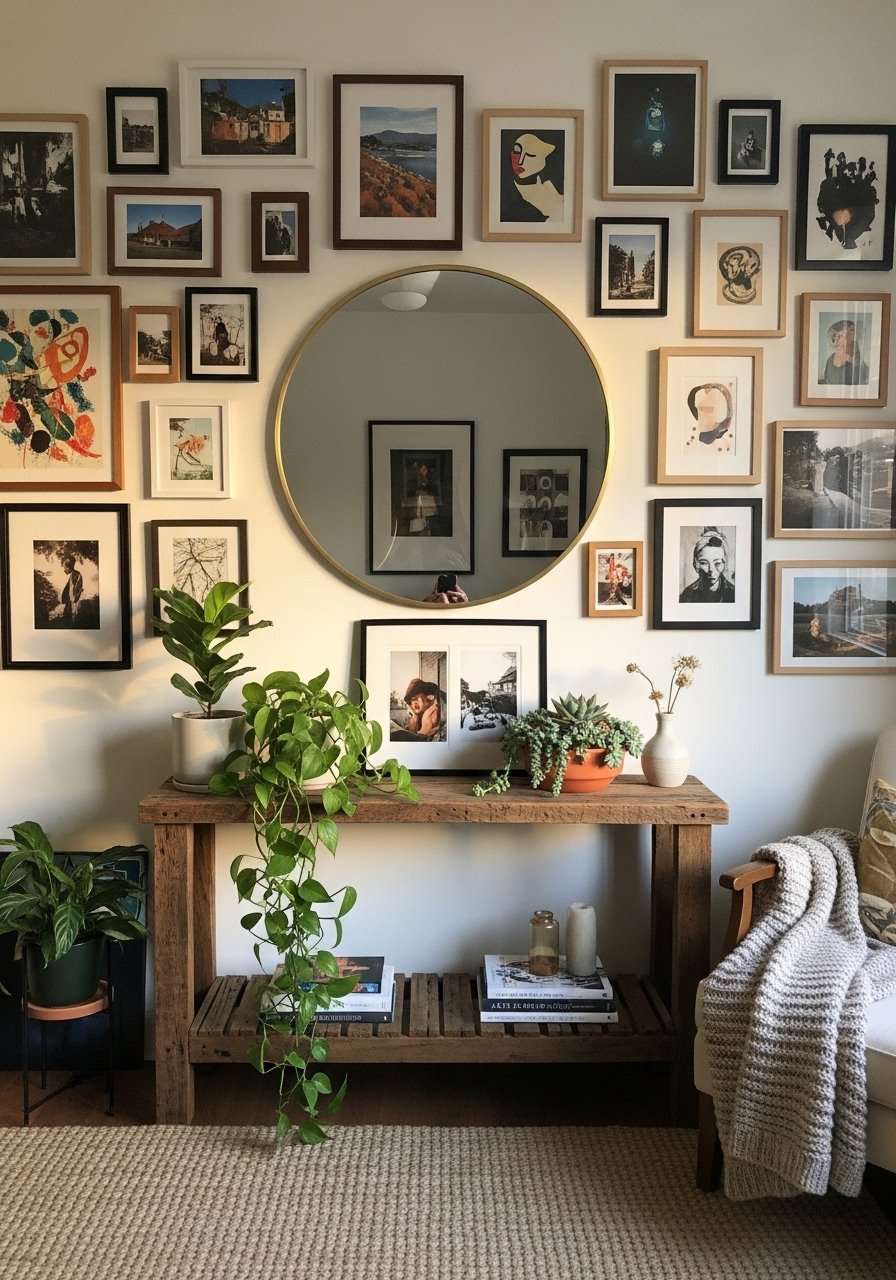
Adding one mirror to a gallery wall bounces real light and makes the room feel larger. I like a 24-inch round mirror as a focal point, then arrange 8×10 frames and a couple of smaller prints around it with 2-inch spacing. Use 24-inch round brass mirror for that warm pop. People often put mirrors too high so they reflect the ceiling, which wastes the benefit. Hang it at eye level and make sure at least two picture frames are matched in scale so the mirror does not overwhelm. If you rent, use adhesive mirror hangers rated for the mirror weight.
Custom Canva Prints in Mismatched Frames for Color Control

Designing prints on Canva allowed me to pick exact palette swatches that matched a throw and a rug. Print them on heavy cardstock, mat them, and slide into thrift frames for a high-end look under $50. Use matte heavy cardstock 8×10 for consistent prints. A common mistake is matching every print color exactly to room textiles, which can read forced. Instead, choose one dominant color and two accents that repeat in small textiles. Over half go personal photos not prints, so mixing personal images with one or two custom prints keeps the wall personal and styled.
Wood Panel Texture with Photo Clusters for Minimalist Rooms

Introducing a wood texture panel adds a tactile backdrop that makes flat prints pop. I installed a 24×36 carved wood panel and arranged 4 photos in white mats next to it, spaced 2 inches apart. The panel hides nail mistakes and gives a sculpture-like anchor. Look for a lightweight wood panel like decorative wood wall panel 24×36 if you plan to hang on drywall. Many tutorials forget to mention frame depth against uneven wall textures, so shim frames with folded cardboard at the top corners so they hang flush.
Polaroid and Shadow Boxes for Memory-Filled Entryways

A wall of small shadow boxes is perfect for an entry that tells short stories. I taped polaroids to charcoal backings and tucked concert tickets behind them in 4×4 shadow boxes. Use acrylic shadow box frames 4×4 so you can swap items without disassembling. The mistake is centering every tiny box; instead offset a couple for visual interest. One piece people miss is including a small object that sticks forward by about 1 inch to add real depth, like a pressed key or coin.
Black Frame Only Gallery for Modern Living Rooms

Using only black frames suddenly makes an eclectic mix look intentional. I collected black frames in 5×7, 8×10, and 11×14 and kept the mats the same width to unify everything. For this look pick frames that have similar moldings and keep 2 inches between pieces. I used black gallery frames set to speed things up. A common error is mixing glossy black with matte black, which reads like an accident. If you have pets, use acrylic glazing instead of glass to avoid paw prints that are a nightmare to clean.
Textile Hanging with Frames to Soften an Entry or Bedroom

A woven hanging breaks up rows of rectangles and softens a gallery. I centered a 24-inch jute handwoven piece and flanked it with 8×10 frames, spacing 2 inches from the textile edge. Textiles also hide minor alignment issues if frames shift. I bought a neutral woven piece, similar to this 24-inch jute wall hanging. Many guides forget maintenance, so I brush dust off textiles weekly to avoid pet hair settling, and I use cloth-friendly spray if it needs freshening. Pair this with the shelf-ledges idea if you want a less permanent install.
Your Decor Shopping List
Textiles
- Honestly the best $40 I have spent. Chunky knit throw in cream 50×60 inches, great for draping over a sofa.
- 22-inch linen pillow covers, down-filled insert recommended in warm gray and rust, swap seasonally.
Wall Decor
- Butcher paper roll for wall templates 18-inch by 100-foot.
- 24-inch round brass mirror for small rooms.
Shelving and Ledges
- Brass picture ledges 36-inch for layered displays.
Frames and Prints
- Black gallery frame set, mixed sizes includes 5×7 to 11×14 options.
- Acrylic shadow box frames 4×4 for polaroids and small objects.
Budget Finds
- Command strip picture hanging heavy duty packs for renters, rated per weight.
Shopping Tips
White oak beats dark wood in 2026. Design feeds have shifted completely. These white oak floating shelves look current, not dated.
Grab these velvet pillow covers for $12 each. Swap them every few months and the whole room feels different.
Curtains should puddle or kiss the floor, never hang halfway up. These 96-inch linen panels are right for standard 9-foot ceilings.
Everyone buys five small succulents. One single 6-foot fiddle leaf fig faux tree has ten times the visual impact.
Frequently Asked Questions
Q: How do I stop my gallery wall from looking crooked right after hanging?
A: Use the butcher paper template method and take a photo of the taped template at eye level before you drive any nails. If one frame tilts after hanging, nudge the bottom corner gently with a pencil eraser to pivot. For renters, use adhesive hangers rated for the frame weight so nothing slides down.
Q: Can I mix polaroids with framed prints without it feeling mismatched?
A: Yes. Create a small shadow-box cluster of polaroids and keep the color palette limited to two tones. Place that cluster near a group of framed prints that pick up one of those tones. The grid-within-grid idea works great with tiny polaroids next to larger art.
Q: What are realistic budgets for a first gallery wall?
A: People drop about $75 on their first wall. You can do a basic look under $50 using thrift frames and DIY mats, or spend $100 to $150 for nicer prints and a focal mirror.
Q: Are command strips really safe for frames?
A: Most renters skip nails altogether. Use heavy-duty command strips for frames under the weight limit listed on the package. For anything larger than 16×20, consider two strips per side or a single small nail if your lease allows.
Q: How do I choose frame sizes so the wall does not feel boring?
A: Mix 8×10 and 5×7 sizes and aim for 2 inches between frames. Use odd numbers in clusters and anchor with a larger piece or a mirror so the eye has a starting point.
Q: My cat rubs against frames and leaves fur and smudges. Any tips?
A: Use acrylic glazing instead of glass and wipe weekly with a microfiber cloth. For mats, choose wipeable or sealed backings so sticky paw prints do not soak in.
