


My living room had nice furniture and decent light but it still felt like a waiting room. Took me forever to realize everything was the same height and the wood tones were all shouting the same thing. After I painted one side table with chalk paint and added texture, the whole space finally asked you to sit down.
These ideas lean modern farmhouse with a few vintage and coastal notes. I worked on a small budget for most projects, around $15 to $60, with one or two splurges near $100. These tricks work for entryways, living rooms, bedrooms, or small pieces that feel like they are not pulling their weight.
Stippled Vintage Base For Rustic Buffets

The stippled base is my shortcut to that old-world patina without heavy sanding. I thin each small section with about 1 teaspoon of water, dab the brush on a paper towel, then work the paint on in a light tapping motion. You end up doing two coats on most pieces anyway, so keep both thin and wait 30 minutes between coats. For flats I use a foam roller and then a rounded fusion-style brush for the details. If you try to cover everything in one thick coat you get splotches and drips. I like Fusion-style oval brushes for stippling, they wear well with chalk paints and make the texture predictable. Try a test plank first to see how much water your paint needs.
Soft Off-White Layer For Coffee Tables

Off-white softens harsh wood tones and makes a room breathe. I used a drop-cloth shade over a darker base, then wet-wiped the edges while the top layer was still tacky to get natural wear spots. That wet-wipe distress beats sandpaper every time because sandpaper can pull too much color or reveal the wrong underlayer. Foam roller on the tabletop keeps brush marks away. If you want a fuss-free paint, try a pint of neutral chalk paint such as Dixie Belle, and pair it with a lint-free rag for the distressing step. Budget here was under $50. The common mistake is slathering on thick coats. Thin coats look like real age.
Pink Vanity With A Roller For Smooth Tops

Painting a vanity with a foam roller hides brush strokes on the top while a small artist brush gets into the legs and crevices. I used a pastel pink that reads soft and lived-in rather than candy bright. A trick I learned was to roll the top in long passes, then immediately smooth any drips with a dry brush. Two thin coats, drying 30 minutes between each, gave solid coverage. For rental-friendly options skip primer if the surface is clean. For older varnished vanities use a light Zinsser water-based primer first. I spent about $30 on paint and a roller. The most annoying mistake is rushing the second coat before the first is touch-dry.
Distressed Chair With Natural Wear Spots
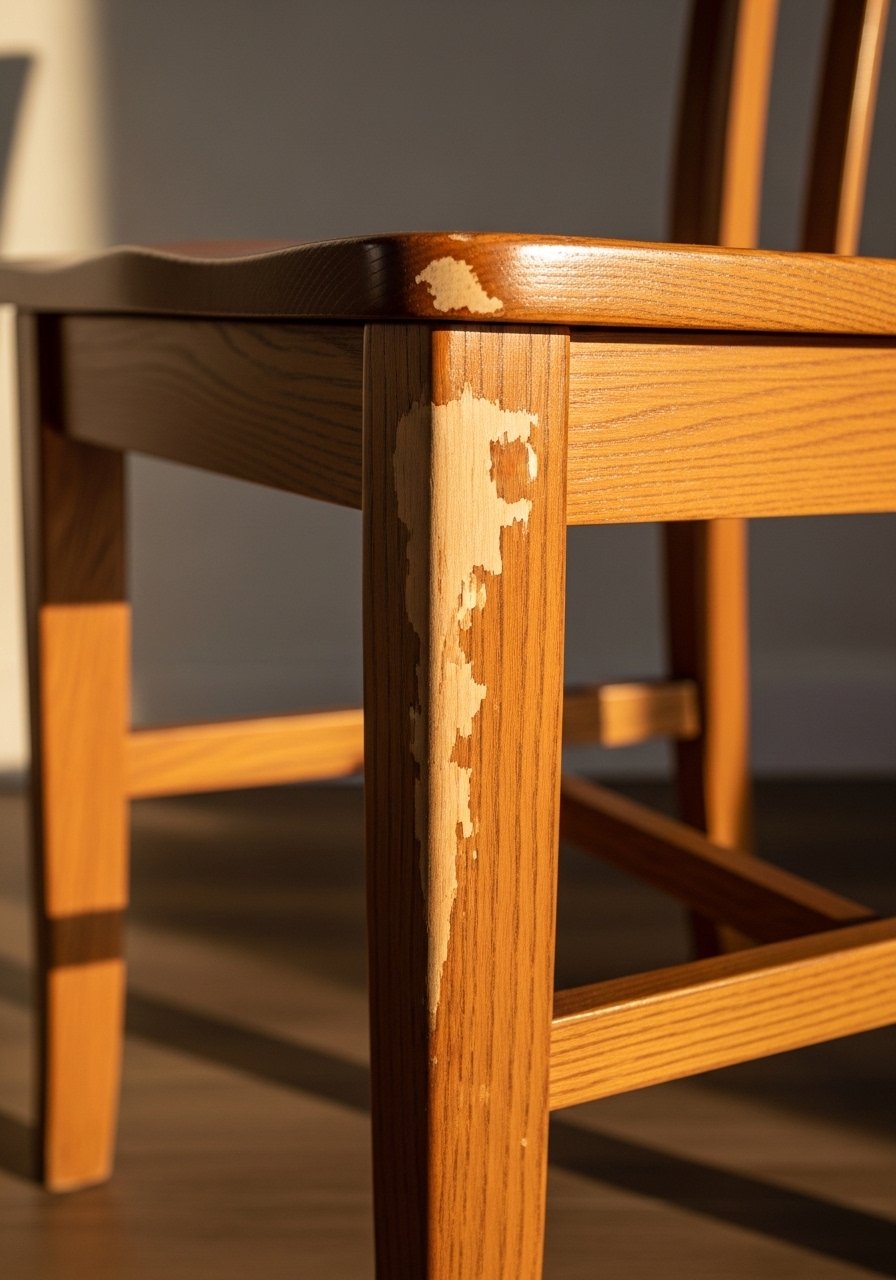
Distressing looks best where things would naturally rub, like chair arms, seat edges, and top rail. I rub those spots with a damp paper towel while the paint is still wet. Sandpaper pulls off too much color and can leave odd scratch patterns that read fake. If you want a bit of contrast, paint the seat one shade darker and then distress to show the lighter edge. Budget here was under $35 using a small jar of chalk paint and a sanding pad only for rough spots under finish. Most folks go for that worn edge right away, so lean into subtlety. Test one spot first so you do not overdo it.
Sage Hardware Skip For Dressers

I hated removing knobs, so I learned to paint around them with an artist brush. It saves time and keeps the hardware patina intact. Use a tiny round brush and steady your hand with your pinky on the drawer face. If your knobs will stay, rub them with a bit of Rub 'n Buff afterwards to freshen metal tones without removing them. Painting around hardware is renter-friendly and usually under $20 for supplies. The mistake people make is painting heavy near the knob and getting bulges. Keep that area thin and wipe away excess right after application.
Two Thin Coats For Solid Color Confidence

Two coats and a 30-minute dry time changed how many projects turned out for me. The first coat is a base and the second builds opacity without streaks. I always work in small sections, thinning the paint slightly per section so it goes on even. If you fight splotches on your first pass, that is normal. You end up doing two coats on most pieces anyway. Foam roller on flats, brush into crevices, and keep lint-free rags handy. For extra protection on tabletops follow with a clear furniture wax worked in with a cloth, then buff for a durable finish.
Dry-Brush Accent For Raised Details

Dry-brushing a second color makes trim pop without full repaint. Load paint on a dry brush and wipe most of it off on a towel first. Lightly stroke the raised edges to catch texture. One part I rarely see mentioned is using the same base color slightly darkened for the brush coat, which creates depth that reads natural, not fake. This trick works great in bedrooms and hall chests. Keep a small jar of mixed paint for touch-ups and paint only the high points. The common error is pressing too hard and covering the base tone completely. Aim for suggestion, not saturation.
Wax Seal And Buff For Everyday Durability

Wax is what makes chalk paint liveable around kids and cups. Work wax into small sections with the brush or cloth, then buff with a clean lint-free cloth. Two cloths helps, one to work the wax and one to buff off the excess. Waxing while the paint is fully dry avoids sticky residue. If your wax goes sticky, it is usually because you did too large an area at once or did not buff properly. A little goes a long way, and wax also deepens color. I keep a tin of clear furniture wax and old t-shirts for the rub-on step. Waxed surfaces are surprisingly durable if you do not rush the buffing.
Homemade Chalky Mix For Cheap Dressers
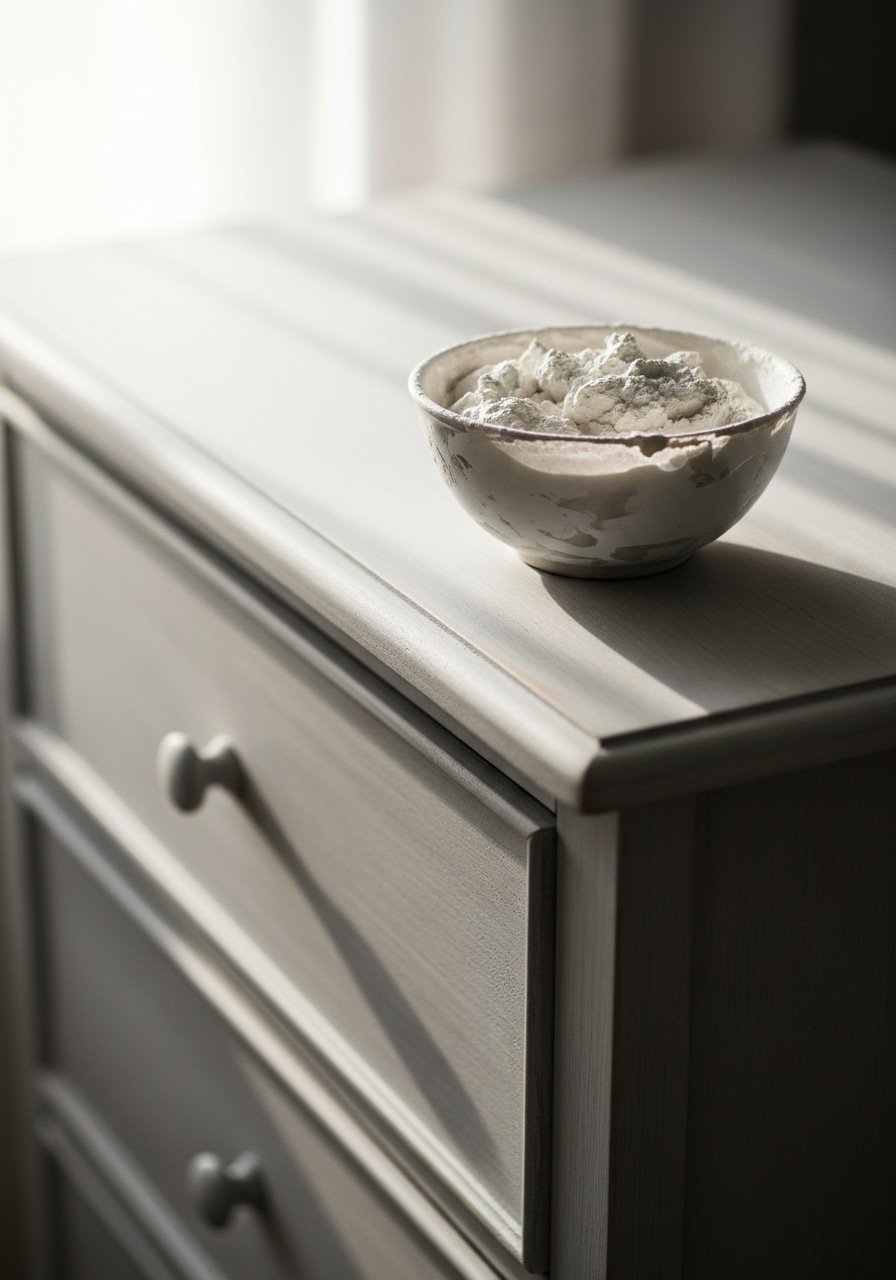
If you want to save money, mix your own chalky paint. I use one cup of latex paint, one third cup cool water, and one third cup plaster of Paris. It thickens and gives that chalky body for good coverage. One coat covered a six-drawer dresser in my test when I primed first. Stir well and use within an hour. This method is great for budget modern looks and when you need one solid color on a large piece. The trap is making it too thin. Start with the recipe above and do a small test panel. You can always thin more.
Degrease And Prime For Sticky Old Finishes

Old varnish and kitchen grime are why paint peels. I clean surfaces with a degreaser like Krud Kutter, then lightly sand any flaky spots before a water-based Zinsser primer. That extra prep costs time but halves rework later. Skip heavy sanding unless the piece is rough. For laminate or smooth melamine you can often clean and paint without sanding, which will cut project time in half. People rush to paint and then come back upset about peeling. Test a small area to confirm adhesion before committing to the whole piece.
Hardware Glam With Rub 'n Buff

Updating knobs with Rub 'n Buff adds polish without new hardware costs. Apply a thin coat with a stiff brush, wipe the excess, and buff once dry. It takes ten minutes and reads like a small splurge. If your knobs are brass and look tired, this trick updates them without the hassle of replacing. Avoid thick layers or you will see brush lines. I like to paint drawers first and then refresh knobs last so they match the worn edges. This step alone made my old dresser feel more intentional.
Power-Sand For Salvage Projects

When a piece is dented or the finish is badly flaking, a palm sander with 120 to 220 grit progression gets you to a playable surface fast. Sand to smooth, fill big dings with wood filler, then prime with Zinsser. Power tools add time but save frustration versus patching on the paint. If you lack power tools, focus on light cleaning and primer, but know the finish will show imperfections. My rule is save sanding for pieces you love and plan to keep. For curb finds that are structurally fine, try the clean-and-paint route first and you will likely halve project time.
Your Decor Shopping List
Textiles
- Honestly the best $40 I have spent. Chunky knit throw in cream in a 50×60 size for sofa draping
- 22-inch down-filled linen pillow covers in oat and sage, swap colors seasonally
Paint & Tools
- Dixie Belle chalk paint pint for off-white and pastels
- Foam mini roller set to avoid brush marks
- Artist round detail brush set for hardware and crevices
Finishing Supplies
- Clear furniture wax tin and a pack of lint-free rags
- Rub n Buff metallic paste small tube for knobs and accents
Hand Tools & Prep
- Plaster of Paris 1-pound bag for homemade chalky mixes
- Krud Kutter cleaner spray for degreasing before primer
Similar at Target or HomeGoods for textiles if you prefer to see fabrics in person.
Shopping Tips
White oak beats dark wood in 2026. Design feeds have shifted. White oak floating shelves look current and warm.
Grab foam mini roller set for $10. You will avoid brush marks on tabletops and save time.
Curtains should puddle or kiss the floor, never hang halfway up. 96-inch linen panels work for 9-foot ceilings.
One tall plant beats five small succulents. Artificial fiddle leaf fig 6-foot gives scale without upkeep.
If you want shiny hardware without new pieces try Rub n Buff metallic paste and a small brush for under $15.
Frequently Asked Questions
Q: How long should I wait between chalk paint coats?
A: Let it be touch-dry, usually about 30 minutes, before adding the second coat. Two thin coats build even coverage. Full cure takes longer so avoid heavy use for 24 hours.
Q: Can I distress chalk paint with a damp paper towel instead of sandpaper?
A: Yes. Distressing wet paint with a damp paper towel reveals underlying wood or stain without the harsh lines sandpaper makes. Do a small test so you know how much paint will lift.
Q: Do I need to wax every chalk-painted piece?
A: Not always. Wax protects surfaces that see cups and hands. Work the wax into small sections and buff with a lint-free cloth. If you skip wax expect more scuffs on high-contact pieces.
Q: What is the homemade chalk paint recipe that actually covers?
A: One cup latex paint, one third cup cool water, one third cup plaster of Paris. Stir thoroughly and test on a scrap. You end up doing two coats on most pieces anyway so plan for that.
Q: My first coat looks splotchy and drippy. What did I do wrong?
A: You probably applied paint too thick or worked too large an area at once. Thin the paint per small section, dab excess from the brush, and use a foam roller on flats. Working in small areas prevents runs.
Q: Can I paint around hardware instead of removing knobs?
A: Yes. Use a tiny artist brush to paint cleanly up to hardware and keep the paint thin by the knob. Finish hardware with a quick Rub 'n Buff refresh if you want them to match the new finish.
