


My entryway used to be a landing zone for stray hammers and sunglasses. One Saturday I hung a slim wall organizer and suddenly I stopped tripping over screwdrivers. It sounds small, but organizing tools changed how I use the whole space and made cleanup actually happen.
These ideas lean modern-rustic with practical touches. Most projects are under $50, with a few splurges around $100. They work in garages, small apartment utility closets, mudrooms, and even under-stair storage where every inch matters. Paint matches land about 90% right off the bat. Most scanners split light into 16 to 31 bits, more is tighter. Fancy brand shades often dodge perfect copies.
Wall-Mounted Pegboard For A Modern Garage Vibe
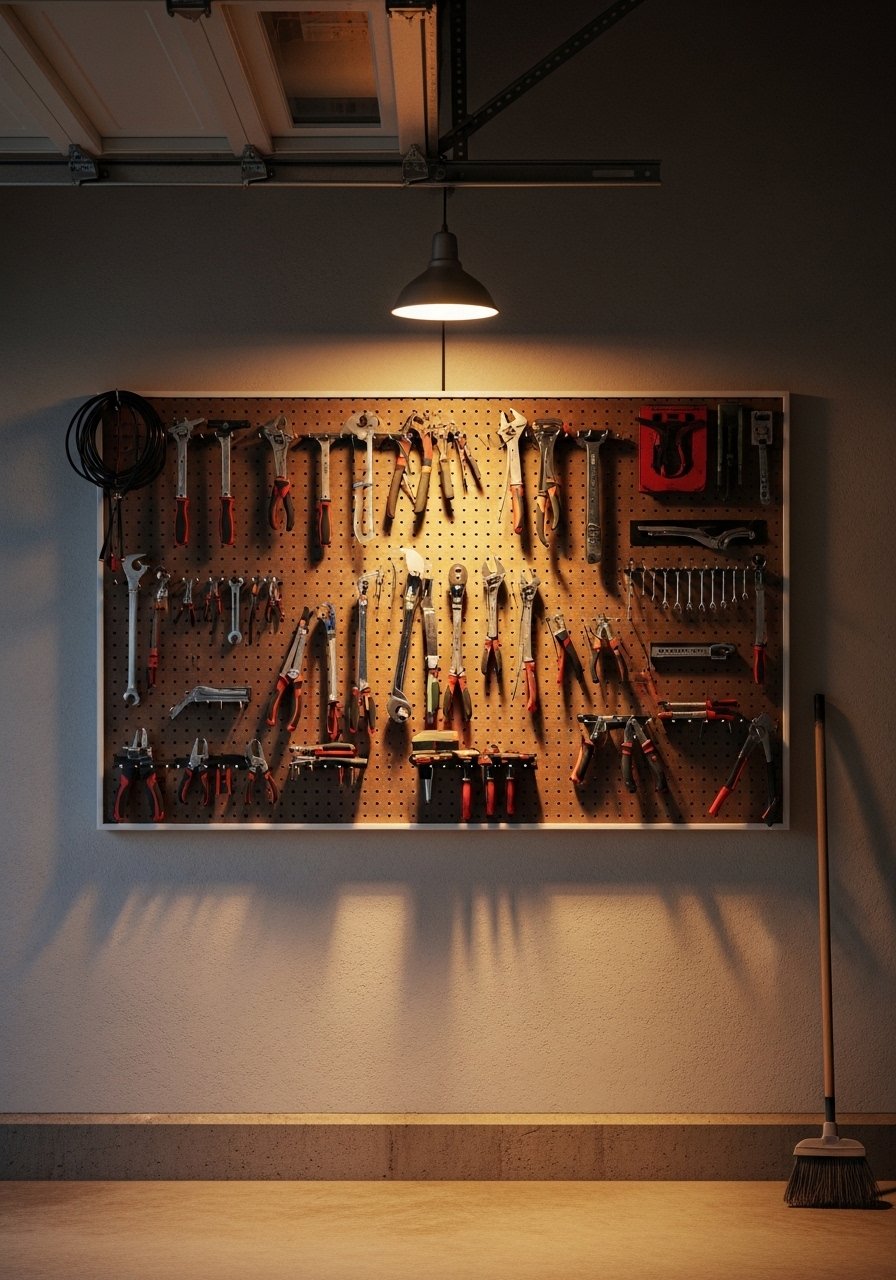
A pegboard is the classic beginner win because it turns tools into decor. I screwed a 24×48 perforated pegboard to my studs and used a mix of hooks and small shelves to keep pliers and tape measure visible. Budget is under $40 for the board plus $15 for a hardware kit. I like these pegboard hooks for swapping tools quickly pegboard-hooks-set. Common mistake is crowding the board. Leave breathing room and keep heavy items on the lower third. Measure your largest tool first so you know spacing before you drill.
Magnetic Strips For Quick Metal Tool Access
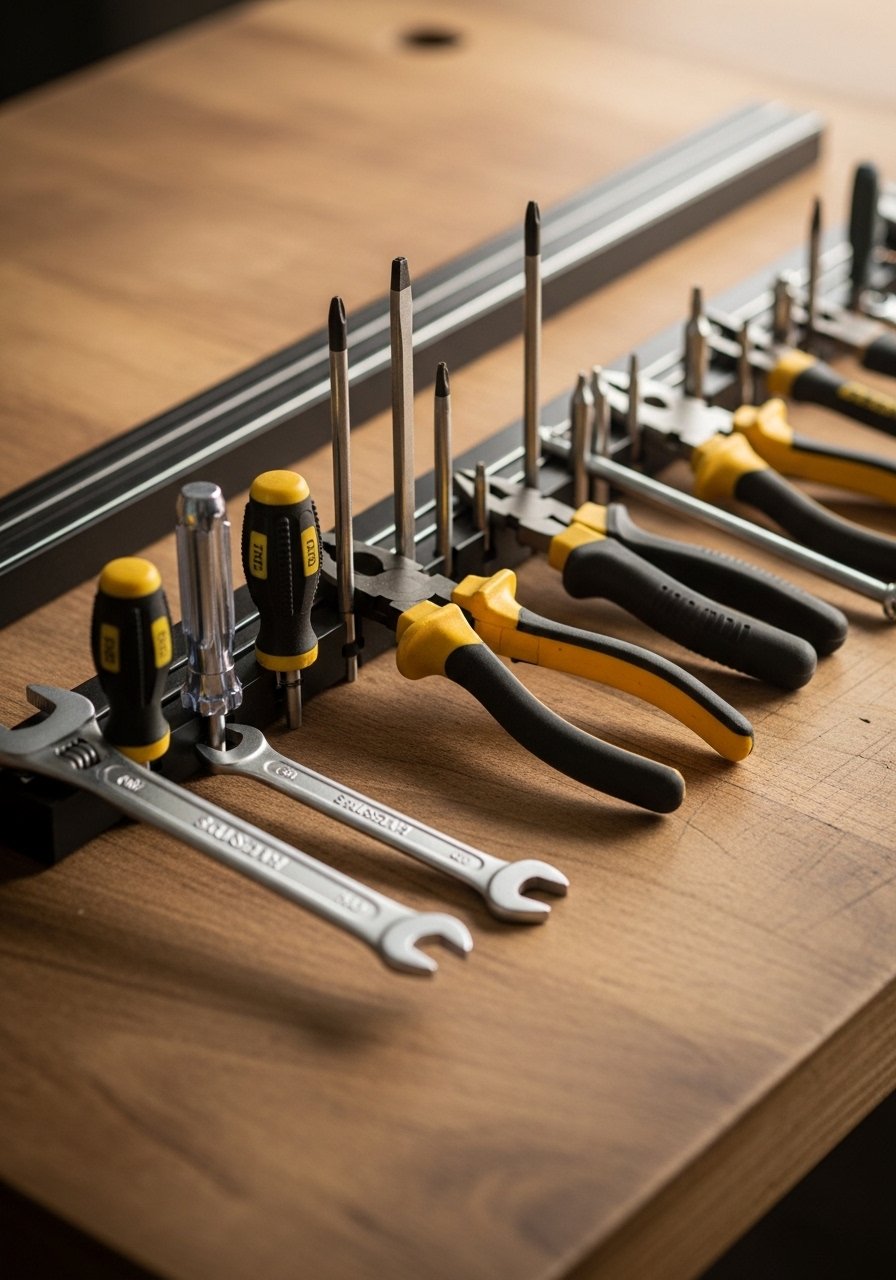
A few magnetic strips make screwdrivers and wrenches vanish from drawers. I mounted a 16-inch strip above my bench at eye level. Cost was about $12. I use this magnetic-tool-strip because it holds heavy wrench sets without sliding. Don’t mount them too high. If kids live here, place them above 5 feet. The detail most articles skip is magnet placement: space strips 2 to 3 inches apart when holding long tools so they do not overlap and fall.
PVC Pipe Bit Organizer For Bench Drawers
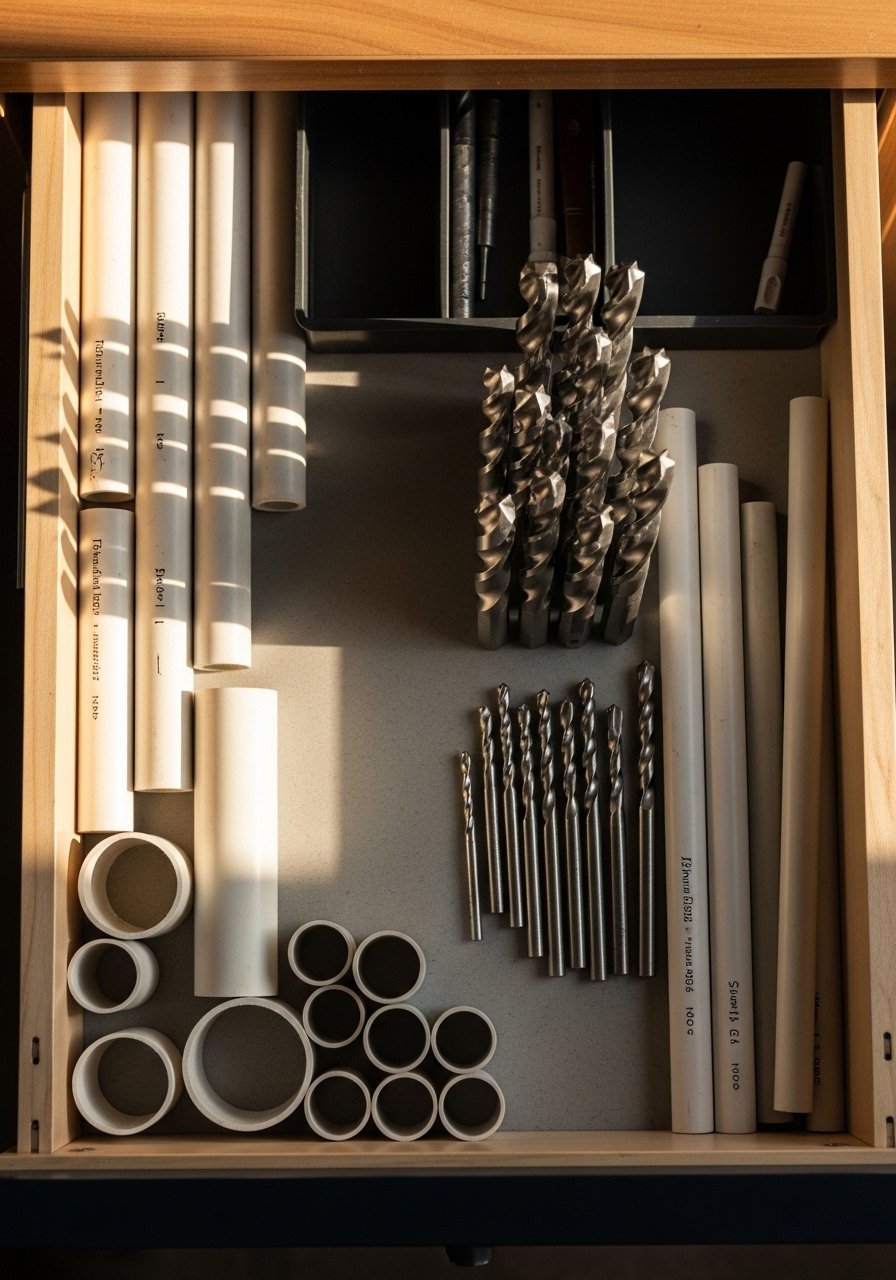
I cut 1-inch PVC into 2-inch tall sections and glued them into a shallow drawer for drill bits and driver heads. It cost me under $10 and the pieces stay put. If you prefer premade options try this PVC-drawer-organizer-set. Avoid gluing directly to particleboard drawers if you might change layout. A detail I use is to label the front edge with a sharpie and clear tape so bit sizes are obvious at a glance.
Mason Jar Wall Rack For Small Parts In A Cozy Workshop
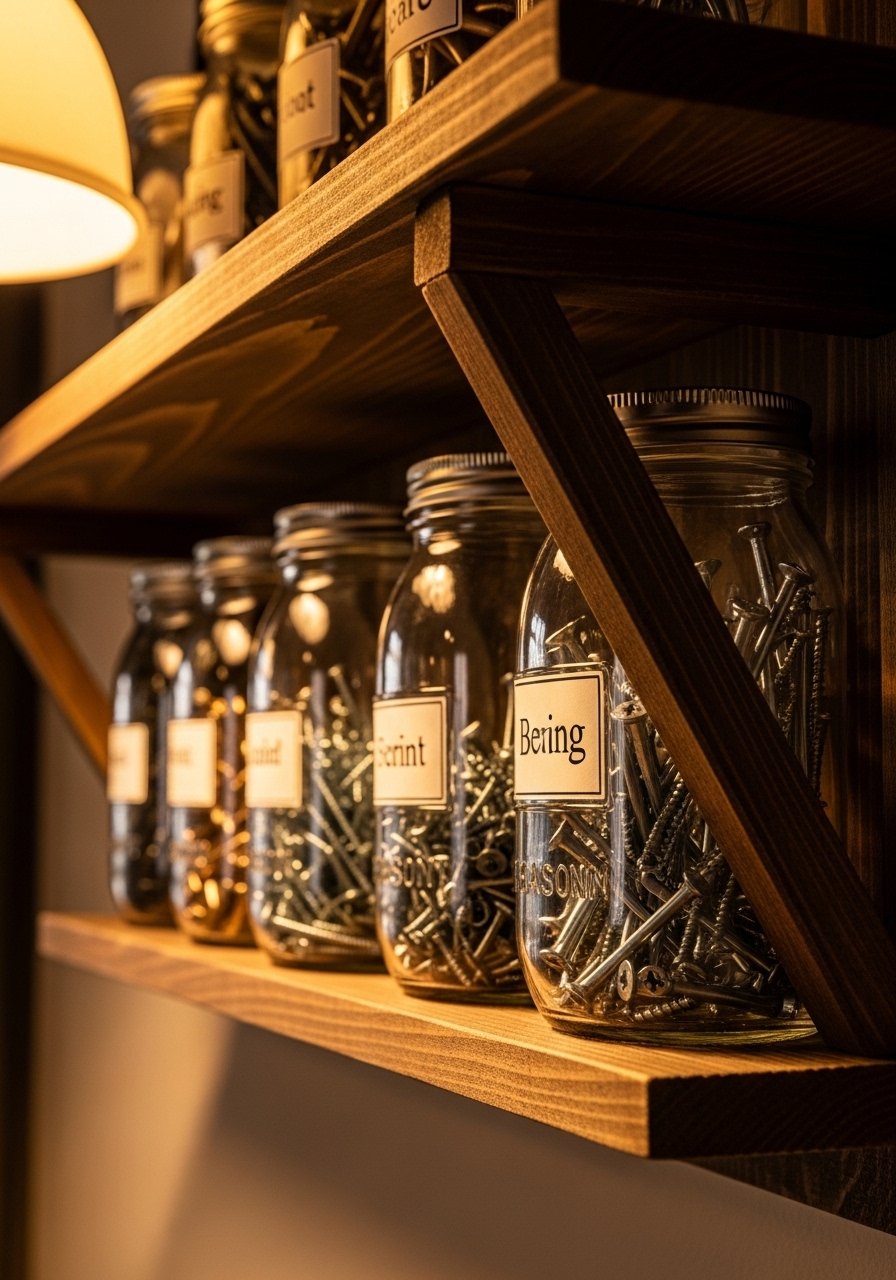
Turn mason jars into a visible hardware system by screwing jar lids to a reclaimed wood board. Each jar holds washers, nails, and anchors. Total cost was about $15 for jars and screws. I like these wide-mouth jars best for small hands. mason-jar-storage-set works if you are not into thrift hunting. People cram too many tiny items into one jar. Keep like with like and limit each jar to one type so you do not waste time sorting.
Rolling Tool Cart With Dividers For Portability
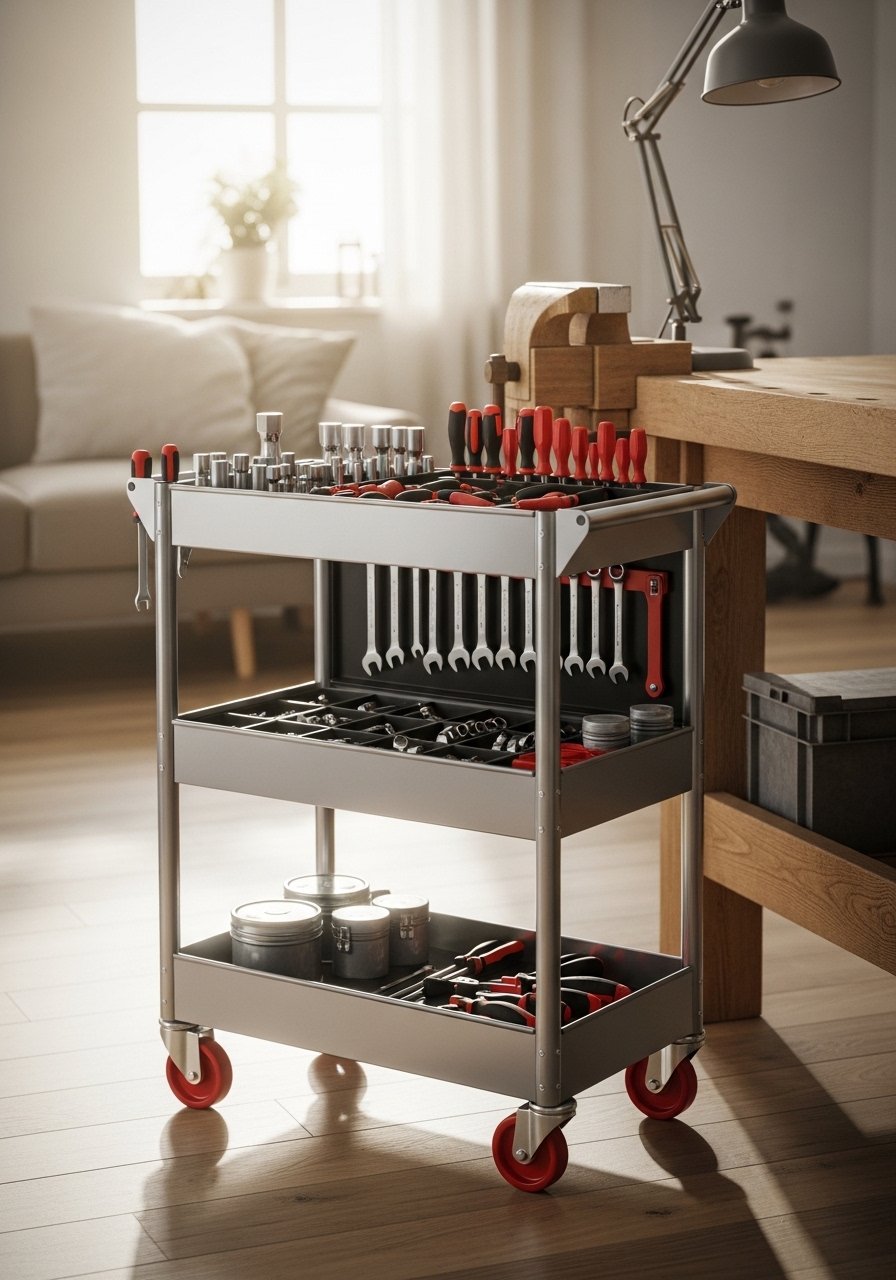
A rolling cart solves garage-to-kitchen projects. My cart has three tiers and I added plastic dividers in the top tray for bits and tape. Expect $60 to $120 depending on metal or plastic. I keep this rolling-tool-cart under the bench when not in use. Common mistake is overfilling the top tier which makes it tip. Keep heavy tools on the bottom two shelves and lock the casters when parked.
Pegboard Shadow Board For Fast Visual Checks
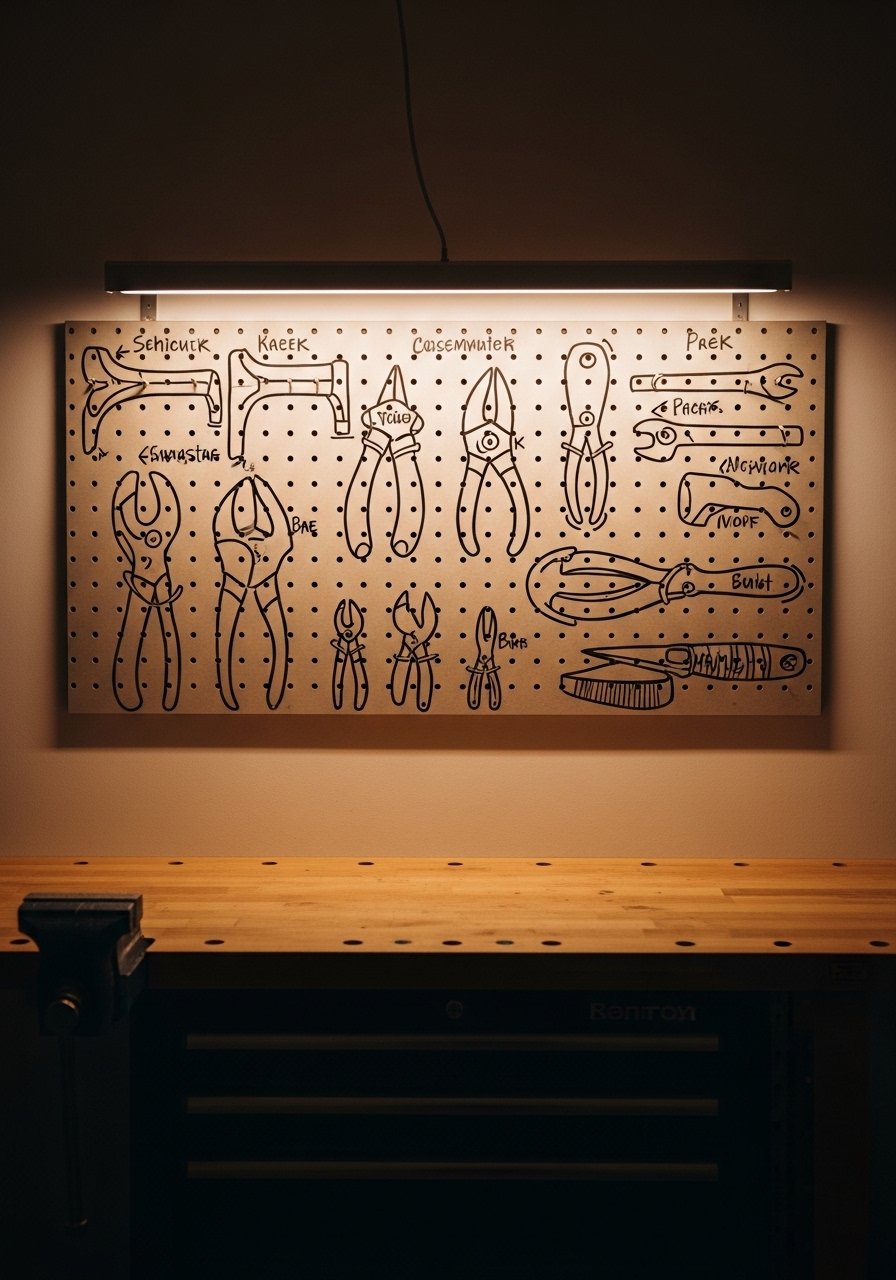
I traced outlines of my most-used tools on pegboard so missing tools are obvious. The process took 20 minutes but saved time every project. Use a permanent marker and a straight edge for crisp silhouettes. For hooks try this pegboard-hook-kit. Mistake to avoid is tracing on a crowded board. Start with 8 to 10 essentials only. A small detail I learned is to draw the silhouette with the tool in its resting angle so it hangs naturally when returned.
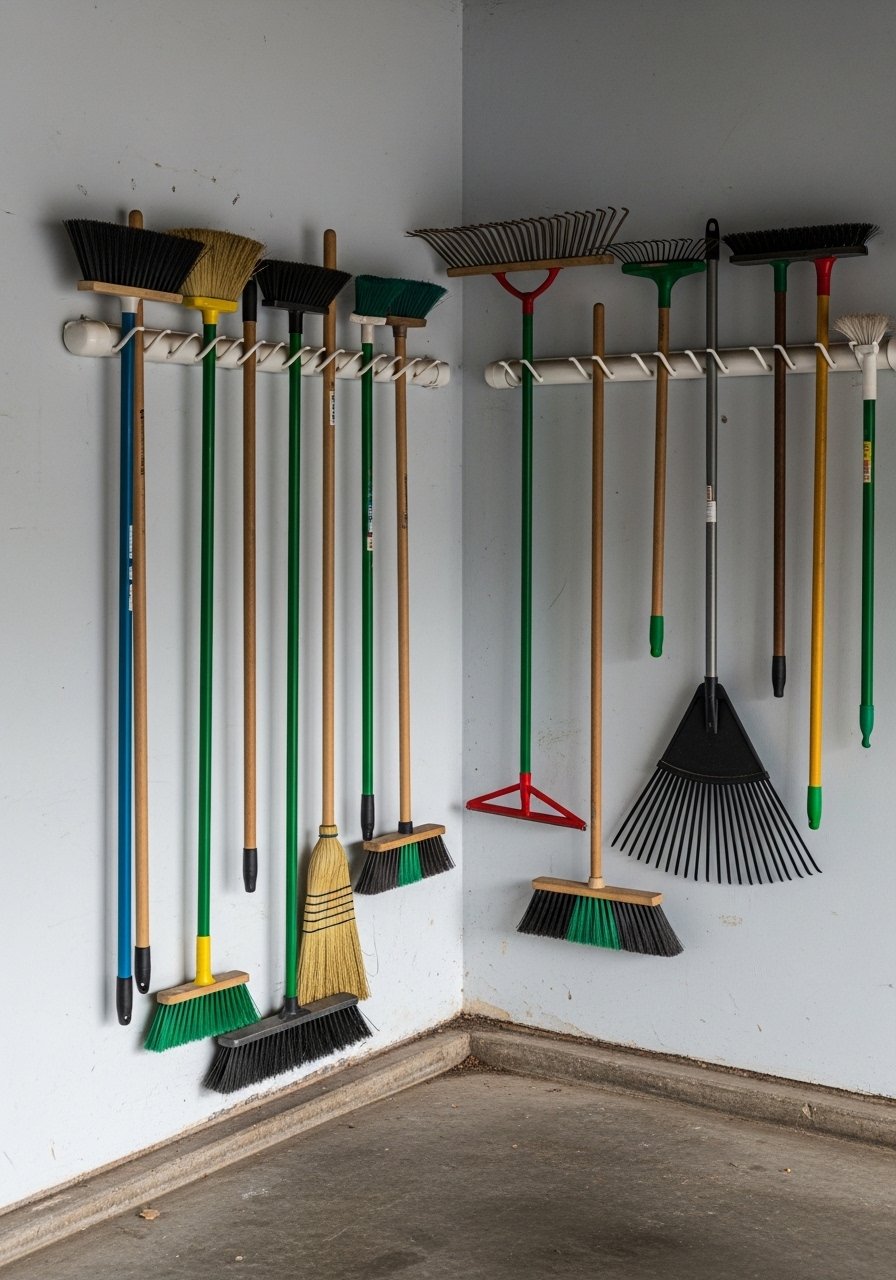
Reclaimed Wood Slat Tool Rack For Rustic Mudrooms
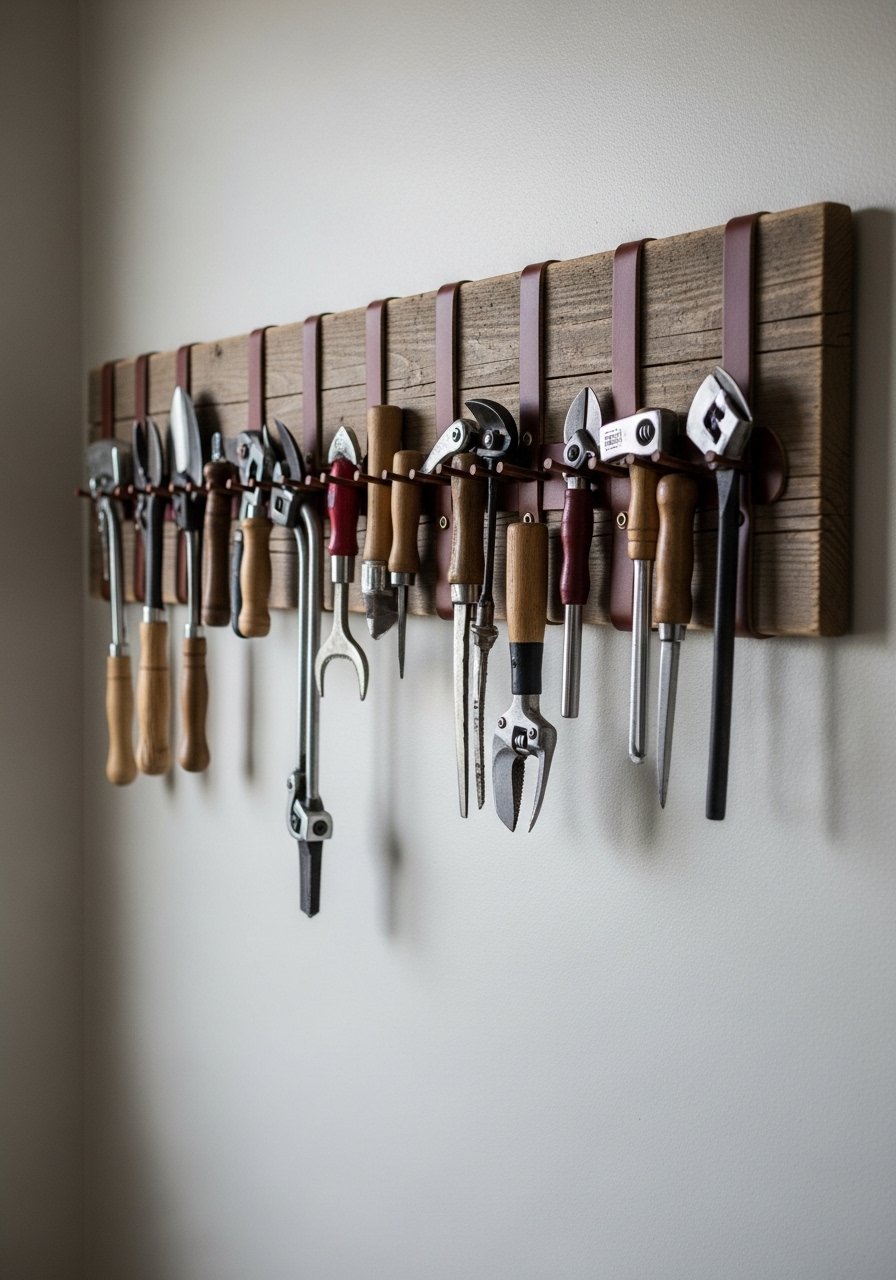
I built a slat rack from a 1×8 reclaimed board and added leather straps as holders for garden shears and small saws. It cost under $30 and gives the space a lived-in look. I used heavy duty leather straps from this leather-strap-pack. Don’t forget to pre-drill holes to avoid splitting. A detail most guides miss is to leave a 1-inch reveal from the wall for handles to clear and not rub paint.
Over-Door Organizer Repurposed For Long Hand Tools
An over-door shoe organizer becomes brilliant for hand tools. I hang it inside a utility closet and store gloves, sandpaper, and small hand tools in the pockets. Cost was about $15 for a heavy canvas pocket organizer. I use this over-door-pocket-organizer. Mistake is hanging it on an outward swinging door. Use a sliding or inside door to avoid snagging. Measure pocket size before buying so hammers do not poke through.
Ceiling Grid For Large Seasonal Tools
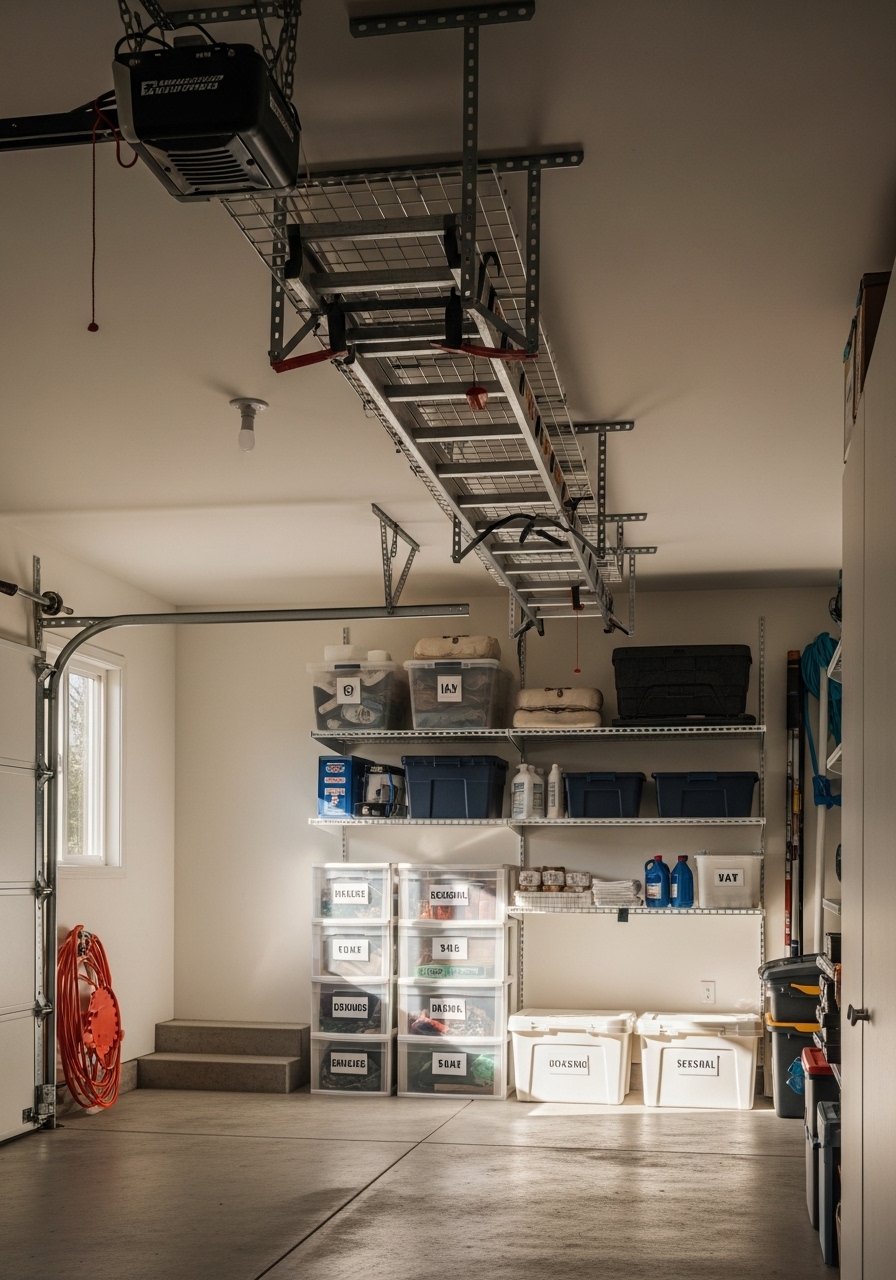
I installed a ceiling grid to hold ladders and kayaks out of the way. The grid uses furring strips anchored into joists and a few ratchet straps. Budget varies from $40 to $200 depending on load. These ceiling straps ceiling-storage-straps worked well. People forget to locate joists and use drywall anchors. Always screw into joists and double-check weight limits. I add bright tags to heavy items so guests know not to pull them down.
French Cleat Wall For Heavy Power Tools
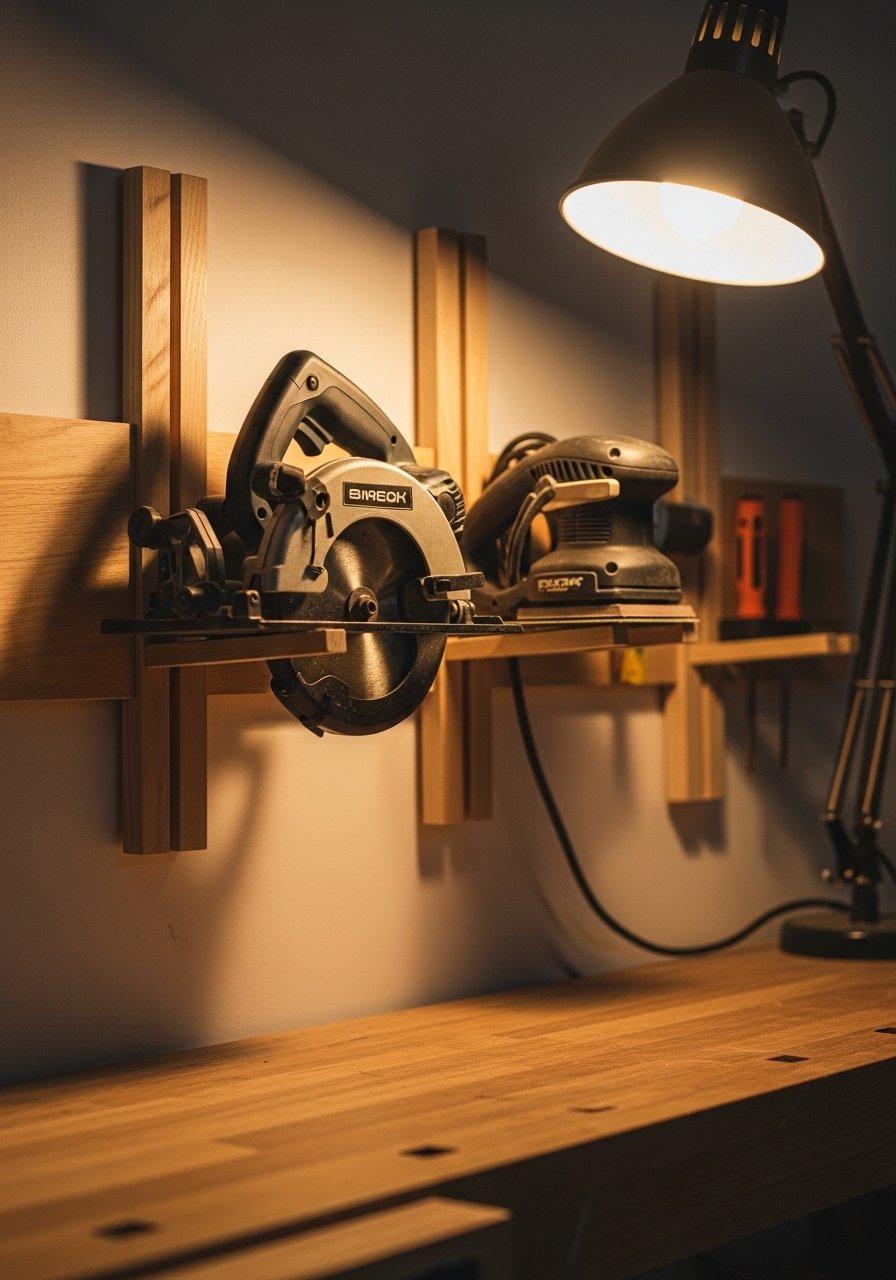
French cleats are the sneaky pro method for swapping heavy items. I cut 1×4 cleats at a 45-degree angle and made modular holders for a circular saw and grinder. Expect $20 in lumber. I mount these holders with carriage bolts and use this 1×4-lumber-pack for consistent sizing. Common mistake is misaligned cleats. Use a level and clamp both cleats and test with the actual tool before final screws. Leave a 2-inch lip for safety so tools do not slide off.
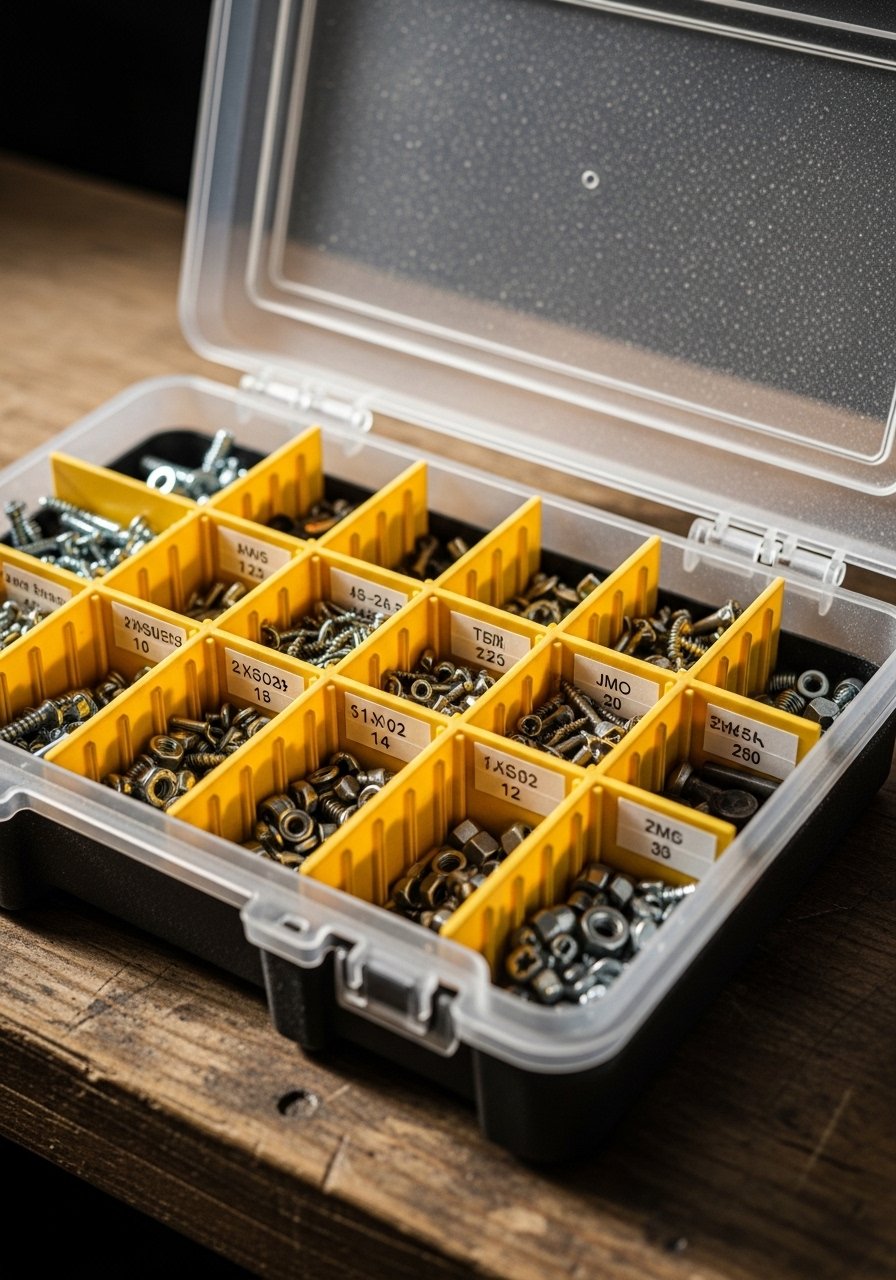
Foam Drawer Dividers For Small Parts That Stay Put

I cut craft foam to create snug sockets for my ratchet set. It keeps pieces from rolling and costs under $10. I used this high-density foam drawer-foam-sheet. The rookie mistake is using too thin foam that compresses. Buy 1-inch thickness and test with one socket before cutting the whole tray. A tiny tip is to number the slots and match them to socket sizes so kids can return them correctly.
Screwdriver Wall Strip With Finger Notches
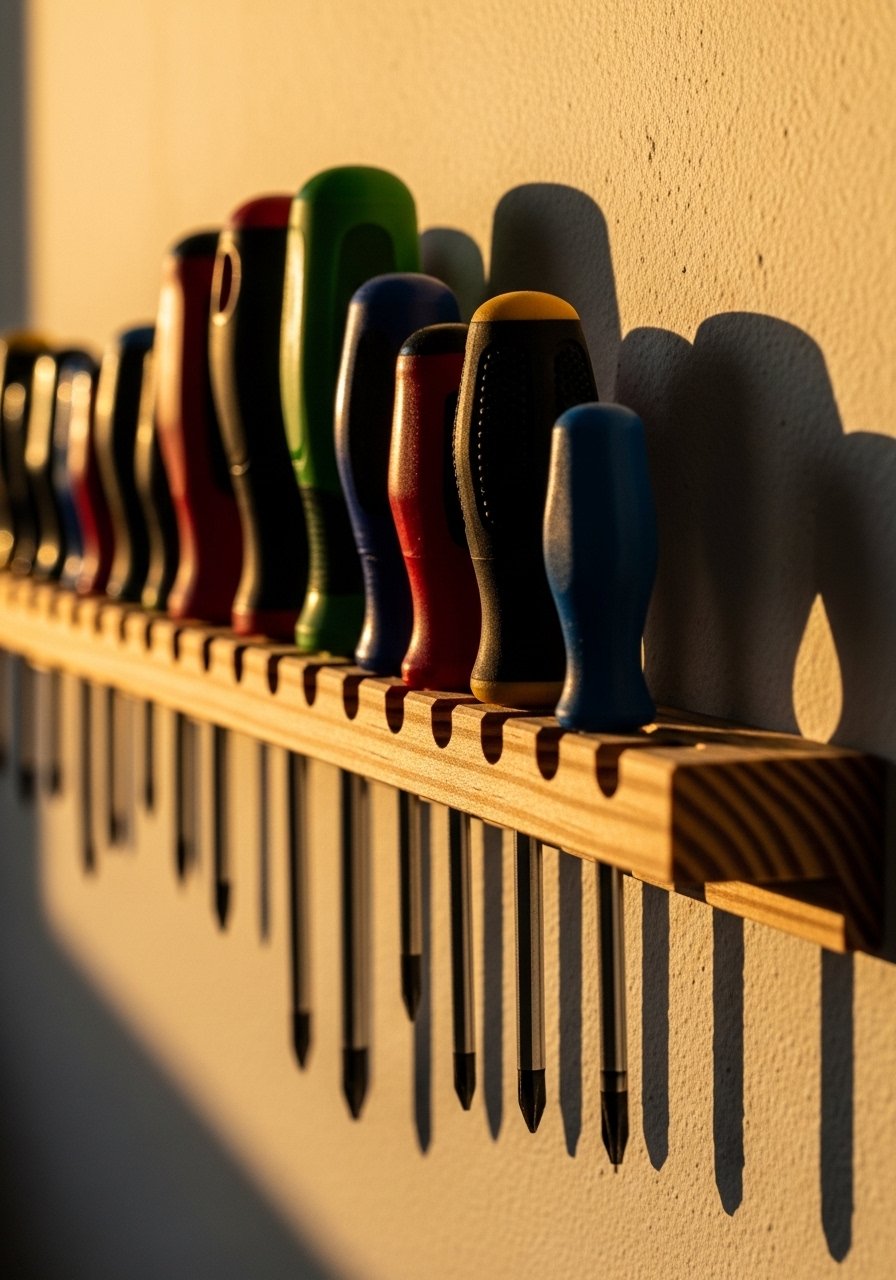
I milled a 3-inch poplar strip and cut 1-inch notches spaced 1.5 inches apart for screwdrivers. It looks neat and puts tools within reach. Total cost under $12. For a ready-made option try this wood-screwdriver-rack. Mistake is spacing not based on handle size. Measure the widest handle and leave an extra quarter inch so grips paste in easily. This system works well by the front door in a mudroom for quick fixes.
Portable Caddy From A Hardware Tote For Projects
A portable hardware tote means no more trips back to the garage mid-project. Mine has deep compartments for a hammer and nails plus smaller bins for bits. I like this portable-tool-tote because the dividers snap in. People overpack them. Keep only the tools for your current project to avoid a heavy, awkward carry. I tape a small note with the project name so my spouse knows which caddy to return where.
Magnetic Wristband Station For Hands-On Work
I keep a spare magnetic wristband on a peg near my bench so I can grab it when working on a ladder. It holds screws and small nails right where you need them. This wristband is around $10 and I recommend this magnetic-wristband. The mistake is leaving it on while running power tools. Only use it for manual tasks. A useful detail is to clip a small ziplock pouch to it for items that are nonmetal like anchors.
Mixed Peg Shelves For Battery-Run Power Tools

I added small 6×3 inch shelves to pegboard to store drills and battery packs. Each shelf has a notch for a charger cable to exit. Cost was about $5 per shelf. I use these shallow shelves from this pegboard-shelf-set. Don’t stack batteries without separating them with foam to avoid scratches. A detail others skip is routing a single power strip into the pegboard zone so all chargers rest in one place and you do not create spiders of cords.
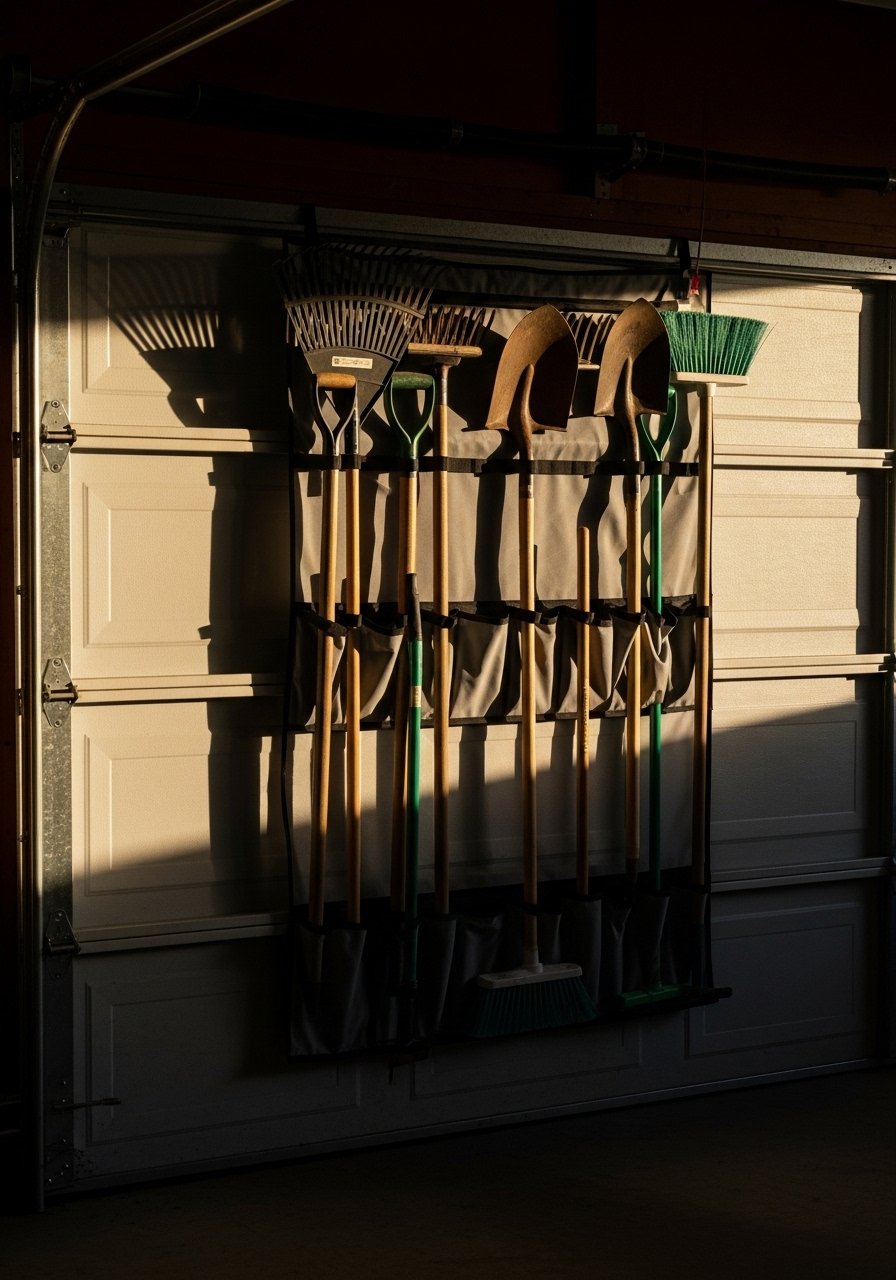
PVC Garden Tool Holder For Long-Handled Items
Cut 3-inch PVC on angles and mount them horizontally to the wall for rakes and shovels to slip into. I spaced each holder 8 inches center-to-center to keep tool heads from colliding. Cost was about $12 for pipe and brackets. These PVC elbows pvc-tool-holders are sturdy and cheap. Avoid mounting into drywall only. Fasten into studs or use strong anchors. I painted mine to match the trim so it feels intentional, not a last-minute fix.
Foldable Rolling Workbench For Small Garages
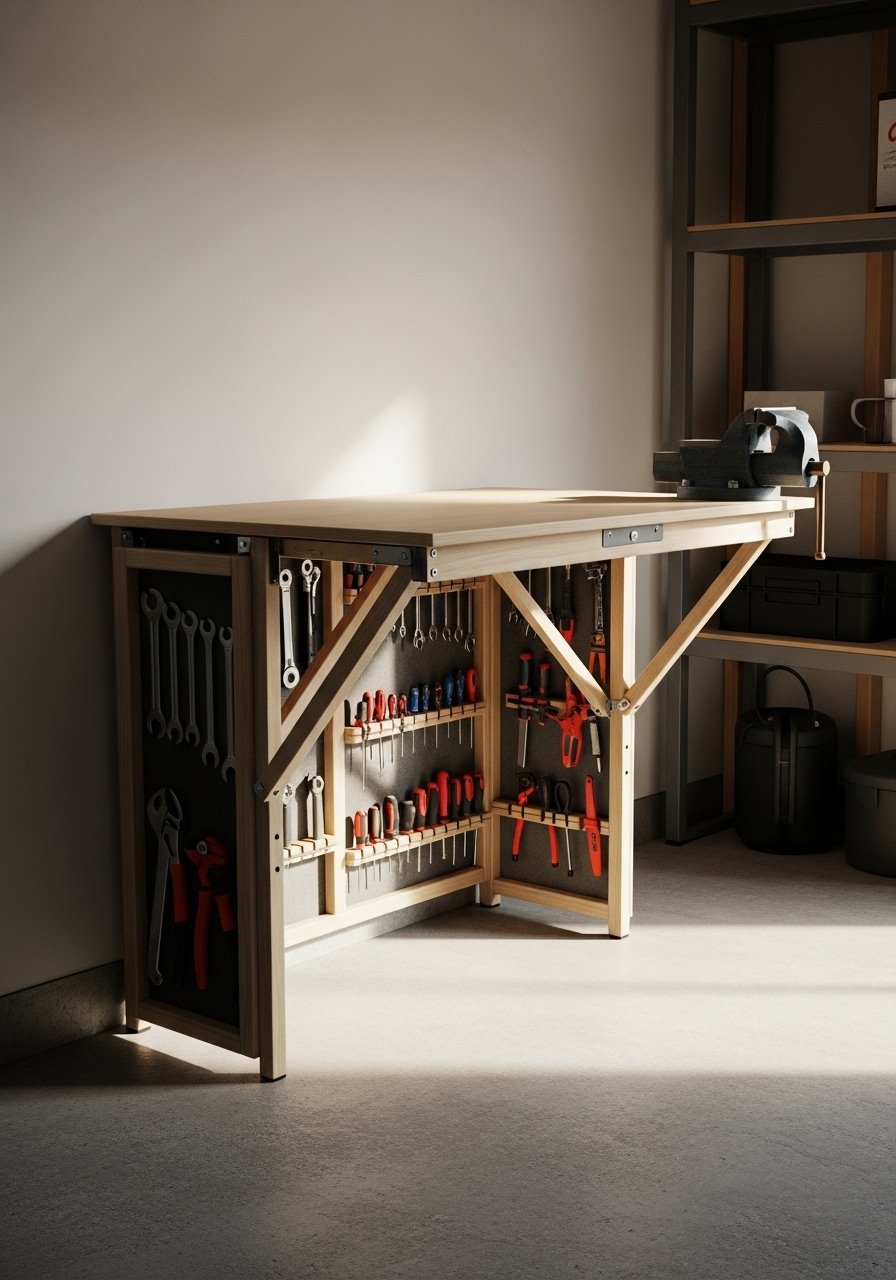
A folding workbench gives you a sturdy surface that disappears when you need floor space. Mine folds against the wall and has built-in slots for clamps. Expect $80 to $200 depending on wood and hardware. I recommend this compact model folding-workbench-kit. Mistake is mounting to a non-stud wall. Use toggles rated for dynamic loads or better yet mount into studs. I sketch the bench footprint on the floor beforehand so doors and cars do not hit it.
S-Hook Rail With Floating Shelves For Paint Storage
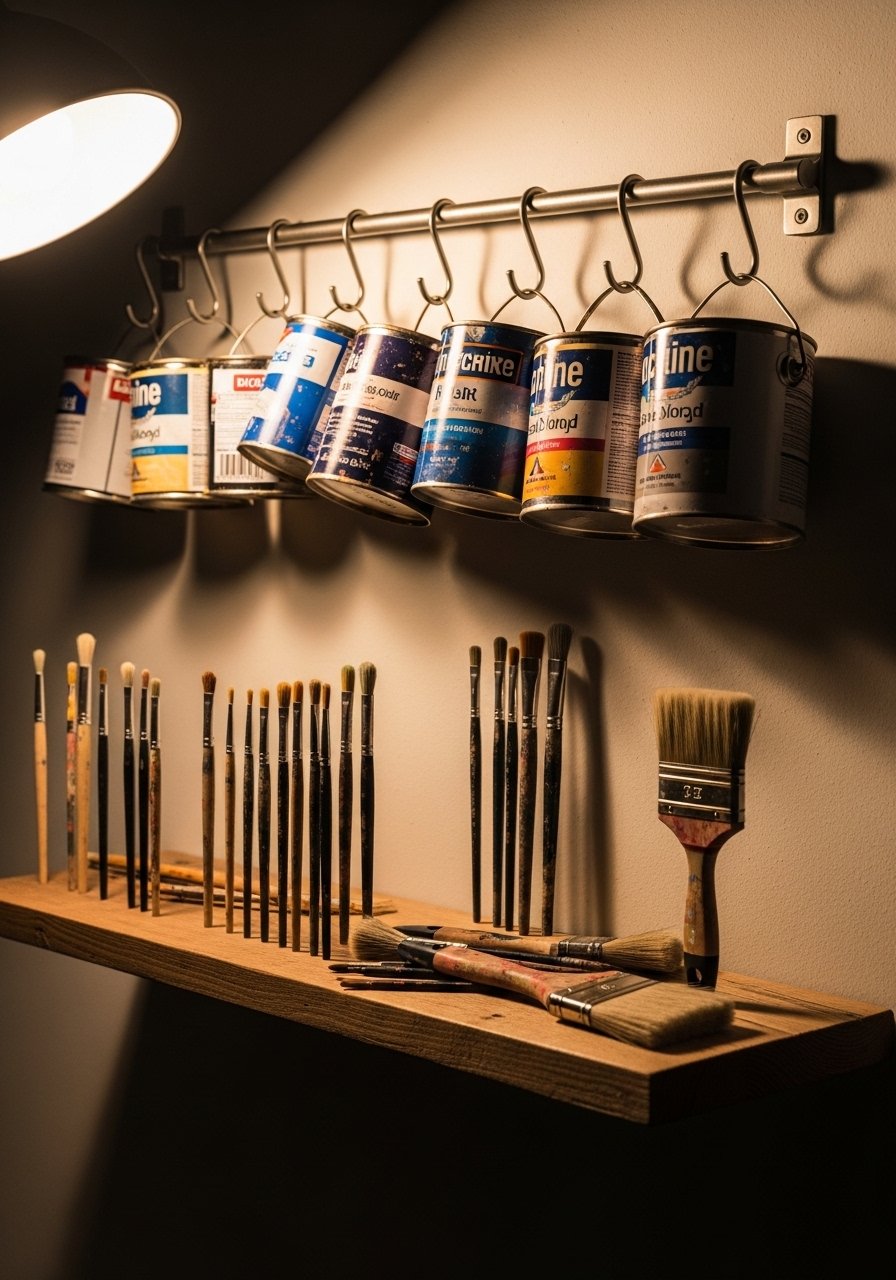
A simple S-hook rail keeps paint cans off the floor and visible. I paired it with a 12-inch floating shelf for brushes and stirring sticks. Cost was under $30. These heavy duty S-hooks s-hook-rail-kit hold multiple cans. The common mistake is hanging cans with dried lids that stick. Keep a hammer handy to gently pry lids so you can avoid spills. Label the shelf edge with color names if you have many cans.
Picture Ledge Repurposed As Hand Tool Display For Entry Workshops
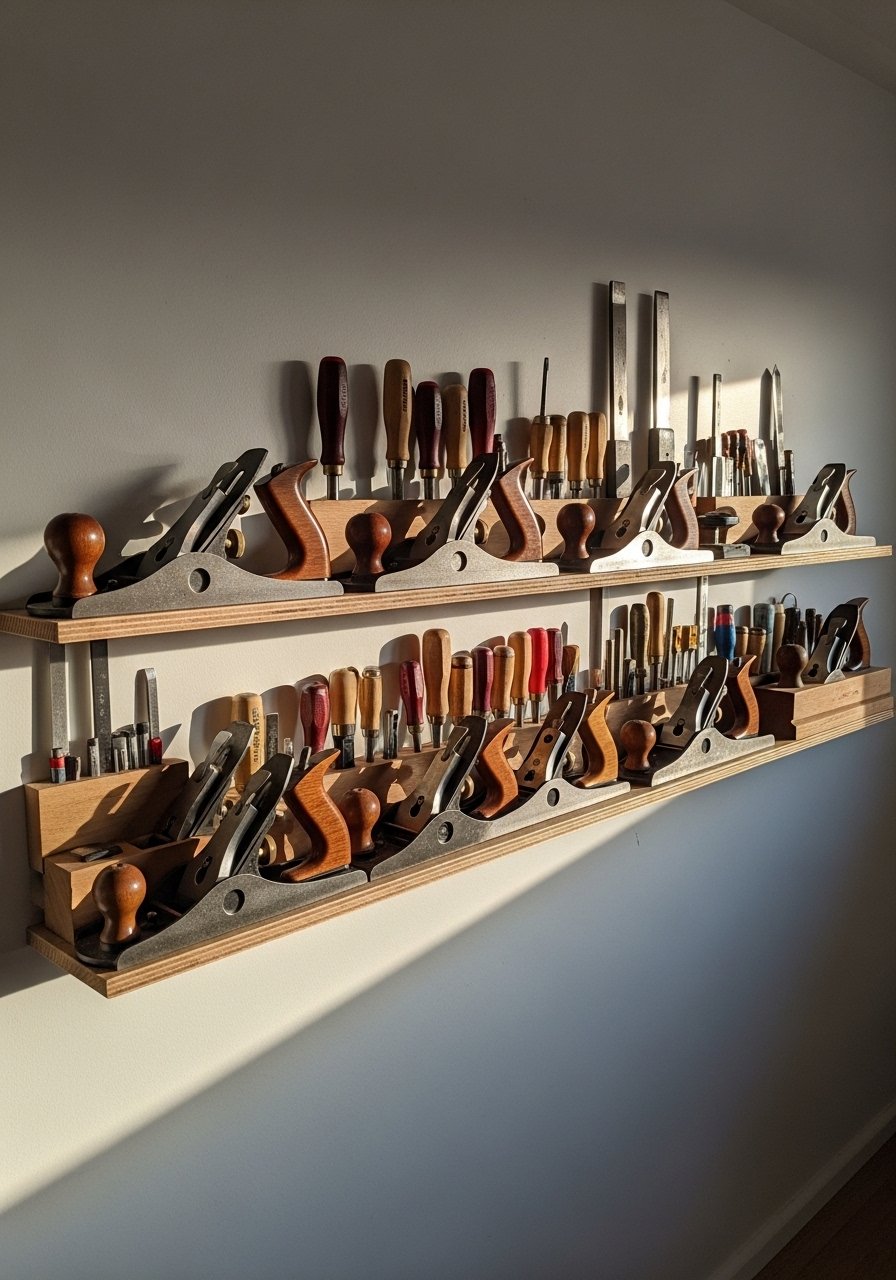
A shallow picture ledge becomes an elegant place for hammers, small plans, and a vintage toolbox. I used a 36-inch ledge that holds items without nails. It cost about $25. I like this leadge option picture-ledge-36-inch. Many people place heavy tools on too shallow a ledge. Choose a 3 to 4 inch depth so handles do not fall forward. This trick makes tools look collected rather than dumped on a shelf.
Recycled Metal Grid For Yard Tool Organization
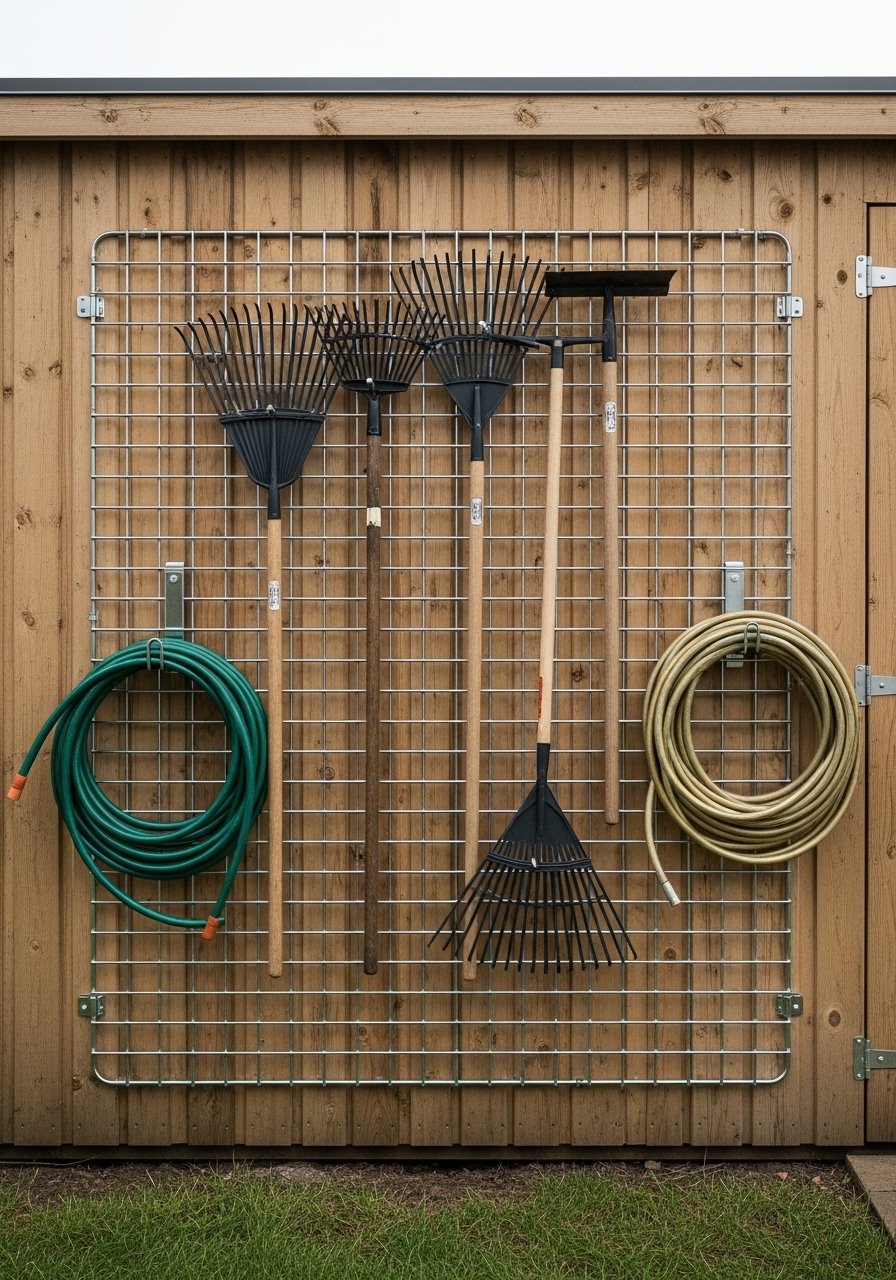
I used a recycled metal grid from a donor shelf to hang heavy landscape tools. It cost nearly nothing and stood up to weather. I spray painted it rust-resistant black and anchored it into studs. For a finished option try this metal-grid-panel. People forget to add protective caps to sharp ends. I cover cut edges with rubber caps to avoid snagging gloves or clothes. This works great in sheds where space is tight.
Color-Coded Shadow Board For Family-Friendly Storage
I assigned colors to family members so each person returns their own tools. The board has blue for gardening, green for bikes, and yellow for small toys. It cost a bit more because of paint but saves arguments. These pegboard paints pegboard-paint-sample stick well. A mistake is choosing similar shades that read the same from a distance. Pick colors separated by hue so empty spots are clear from across the room. This is perfect for shared garages.
Hanging Baskets For Soft Gear And Gloves

Woven hanging baskets are great for gloves, safety glasses, and sandpaper. I mounted three at staggered heights so each family member can reach one. Cost was about $8 per basket. I use these woven wall baskets woven-hanging-baskets. Mistakes are pulling full baskets down with wet gloves. Line them with a plastic pouch if you store damp items. I like to rotate baskets seasonally to keep winter items separate.
Battery Charging Station For Power Tool Ecosystems
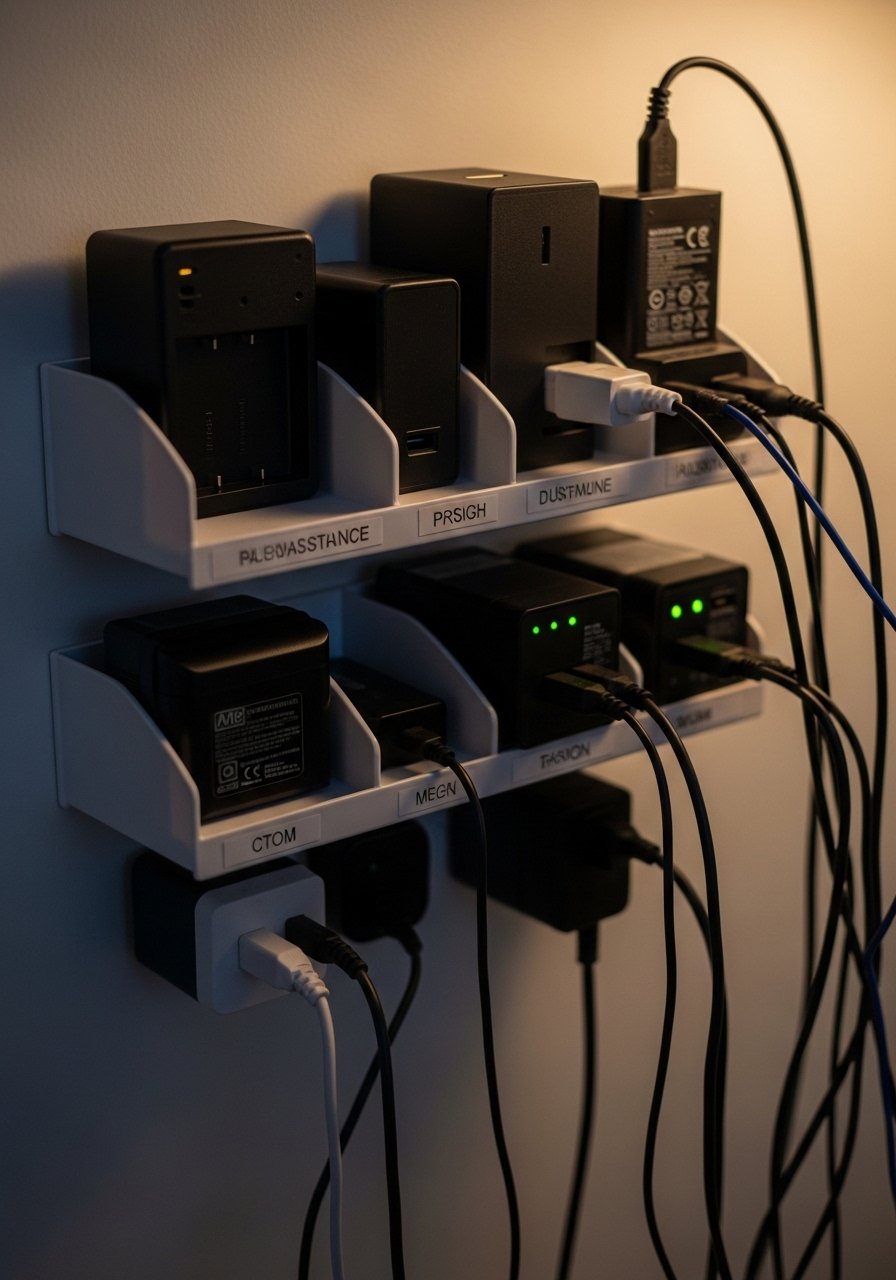
I built a charging station with a shelf and labeled slots for each battery. A single power strip with surge protection keeps chargers tidy. My strip cost under $20 and I used cable clips to route cords. This surge strip surge-protecting-power-strip has individual switches which helps. The common error is stacking batteries while charging. Give each battery its own slot and airflow so they do not overheat. Label chargers by tool so they do not wander.
Ladder Shelves Repurposed For Tool Display In A Workshop Nook
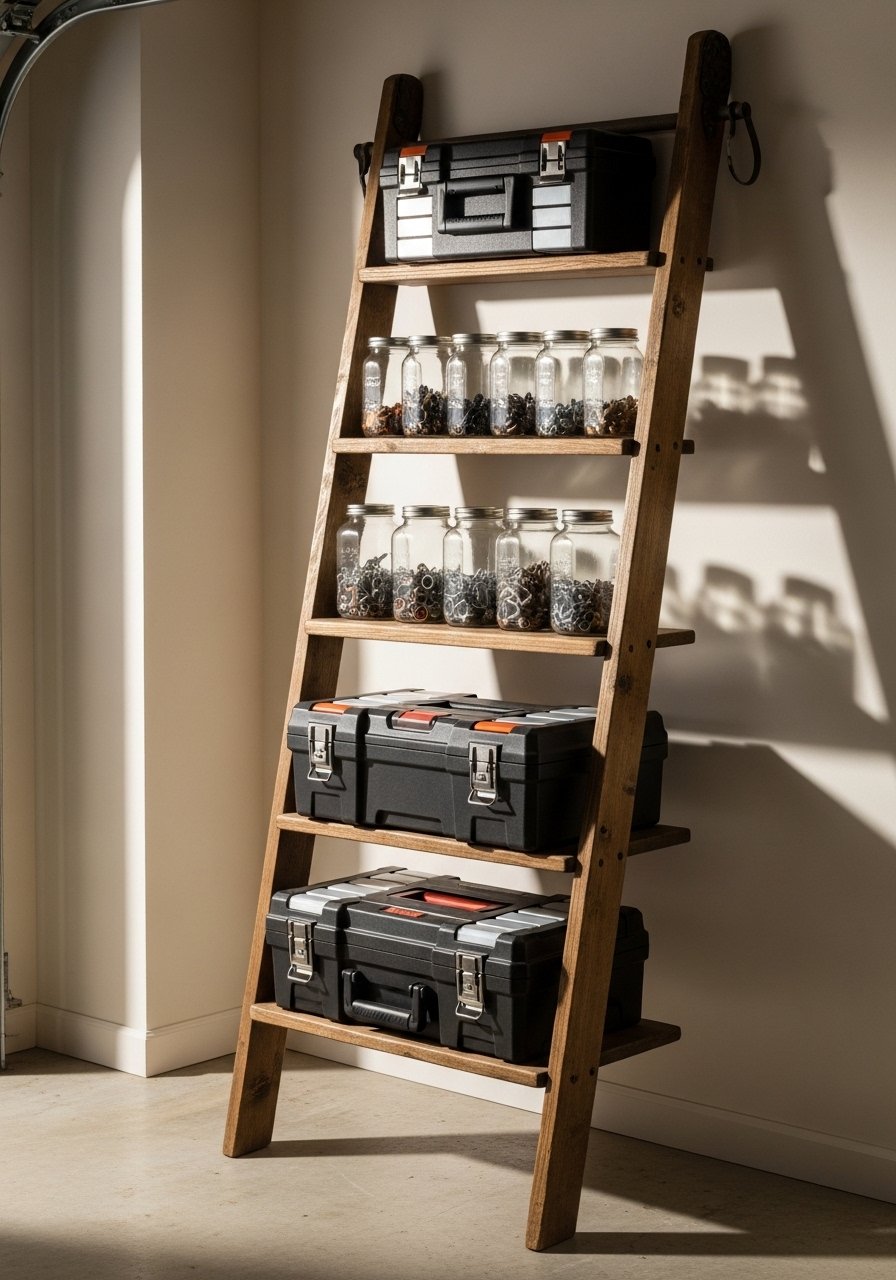
A leaning ladder shelf provides tiered storage without mounting. I placed toolboxes on lower rungs and jars on upper ones. Cost was under $70 for a solid pine ladder shelf. I recommend this model leaning-ladder-shelf. Mistake is overloading the top. Keep heavy items low and use a strap to secure the top to the wall if you have kids. This piece doubles as decor so choose a finish that matches your room.
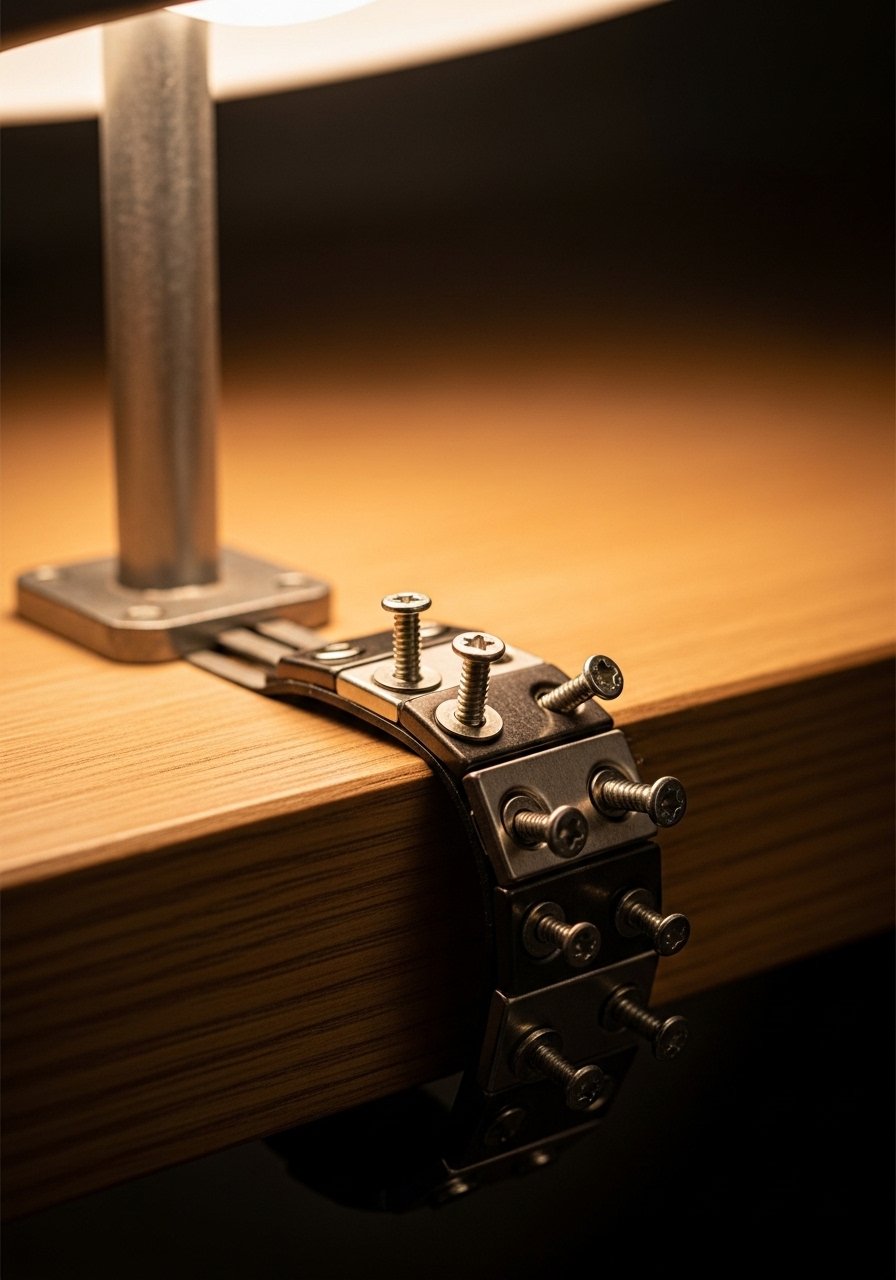
Wall-Mounted Fold-Down Workbench With Built-In Slots
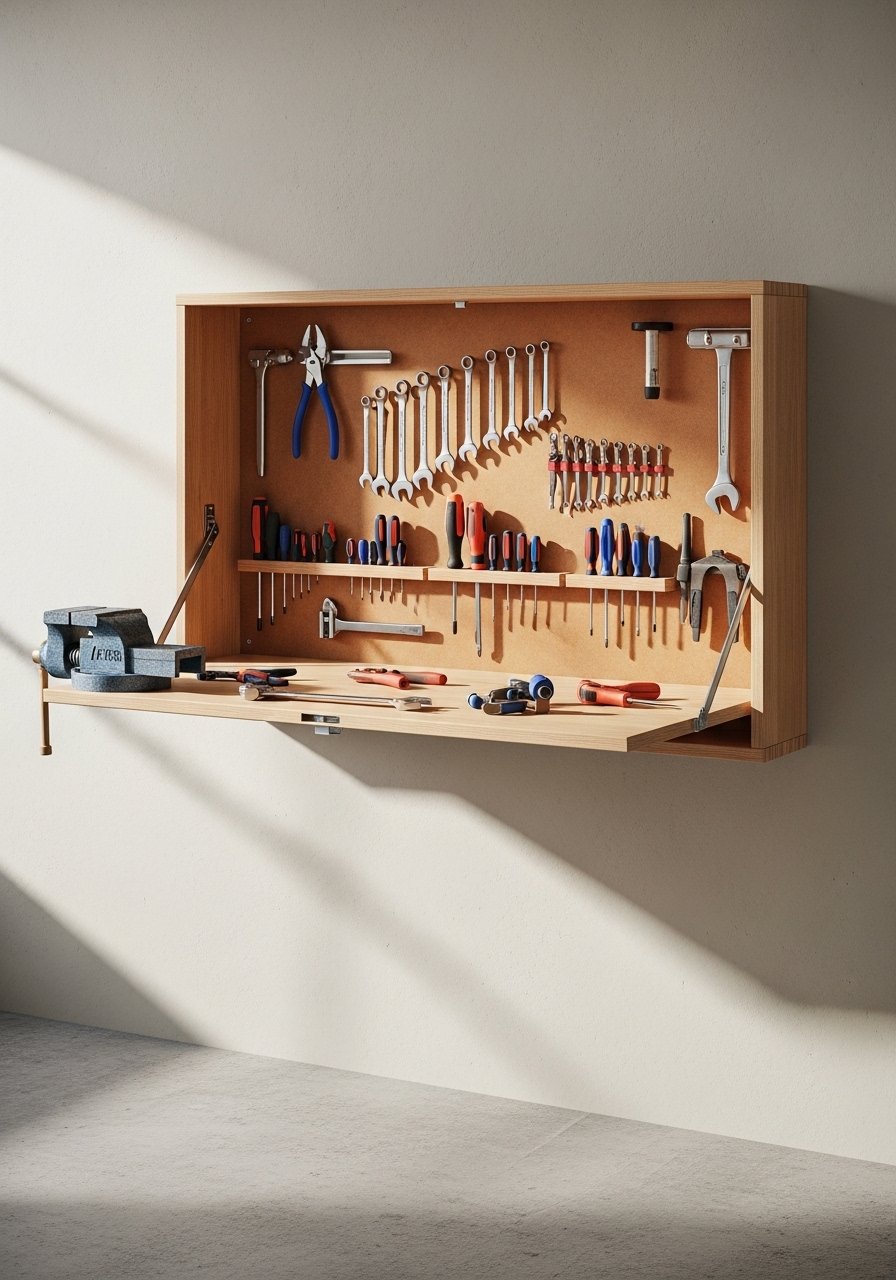
My fold-down bench tucks away when not needed and has cutouts for a clamp and drill. I used European hinge hardware and a piano hinge for durability. Expect $80 to $150 for materials and hardware. These heavy-duty hinges piano-hinge-kit made the difference. The big mistake is not reinforcing the mounting area. Use a cleat or stud-mounted backing and test with a 50-pound load before putting power tools on it.
Your Decor Shopping List
Textiles
- Rubber-capped tool handle covers, pack of 12 (~$12). Keeps grips clean
- Woven hanging baskets, set of 3 (~$24). Use for gloves and rags
Wall Decor & Organizers
- 24×48 pegboard kit (~$35). Core for tool walls
- Pegboard hook kit (~$18). Mix hooks and shelves
- Picture ledge 36-inch (~$25). For hand tool display
Storage & Mobility
- Rolling tool cart (~$90). Portable project station
- Portable tool tote (~$25). Caddy for single tasks
Hardware & Small Parts
- Mason jar storage set (~$12). Cheap visible parts bins
- Drawer foam sheet 12x24x1 inch (~$14). Custom socket trays
Safety & Power
- Surge protecting power strip (~$22). Central charger hub
- Ceiling storage straps pair (~$30). For ladders and kayaks
- Magnetic tool strip 16-inch (~$12). Quick-access metal tool holder
Similar at Target or HomeGoods for baskets and ledges.
Shopping Tips
White oak beats dark wood in 2026. Design feeds have shifted completely. White oak floating shelves look current, not dated.
Grab pegboard-hooks-kit for $18. Start with 8 to 10 hooks and add more later so your board never looks overcrowded.
Curtains should puddle or kiss the floor, never hang halfway up. Heavy-duty utility curtain panels 96-inch are useful near open garage doors for dust control.
Lead with this idea. Rolling-tool-cart is worth the money if you move between spaces. Keep the top tray for current project bits only.
Everyone buys five small succulents. One single 6-foot faux fiddle leaf fig has ten times the visual impact and steadies an industrial corner.
Frequently Asked Questions
Q: What is the easiest tool storage for renters?
A: Magnetic strips and over-door organizers. Both mount with command-style strips or heavy-duty hooks that avoid drilling. Try a 16-inch magnetic strip like this magnetic-tool-strip-16-inch and keep heavy items off renter walls.
Q: Can I mix metal and wood storage without it looking mismatched?
A: Yes. Use a consistent finish or paint the metal black to tie it to natural wood. Picture ledges and metal grids together look curated when you repeat one accent color across the room.
Q: How do I keep batteries organized for all my cordless tools?
A: Make a charging shelf with labeled slots and a surge strip. Give each battery one slot and a charger. This surge-protecting-power-strip with individual switches helps reduce phantom drain.
Q: My garage is small. What storage wins space back fastest?
A: Ceiling storage and fold-down benches. Ceiling straps free floor space and a fold-down bench gives you work surface only when you need it. Use ratchet straps rated for the load and mount into joists.
Q: How do I keep a family from mixing up tools?
A: Color-code a section of pegboard or use labeled bins. A simple paint band across the board makes it obvious which pockets belong to which person. Kids respond well to color.
Q: Can I make tool storage look decorative and not cluttered?
A: Yes. Limit visible items to essentials and leave negative space. Use matching jars, consistent hook finishes, and repeat a material like leather or reclaimed wood to make it feel intentional rather than messy.
Q: What common mistakes should beginners avoid when mounting organizers?
A: Not finding studs and overloading drywall. Always anchor into studs for heavy items or use anchors rated for dynamic loads. Test mounts with a load before adding your tools.
Q: How do I protect storage from pet damage and wear?
A: Use capped edges, cover sharp metal, and keep chewable items like straps out of reach. If you have dogs, mount magnetic strips or shelves above five feet so they cannot paw at them.
