

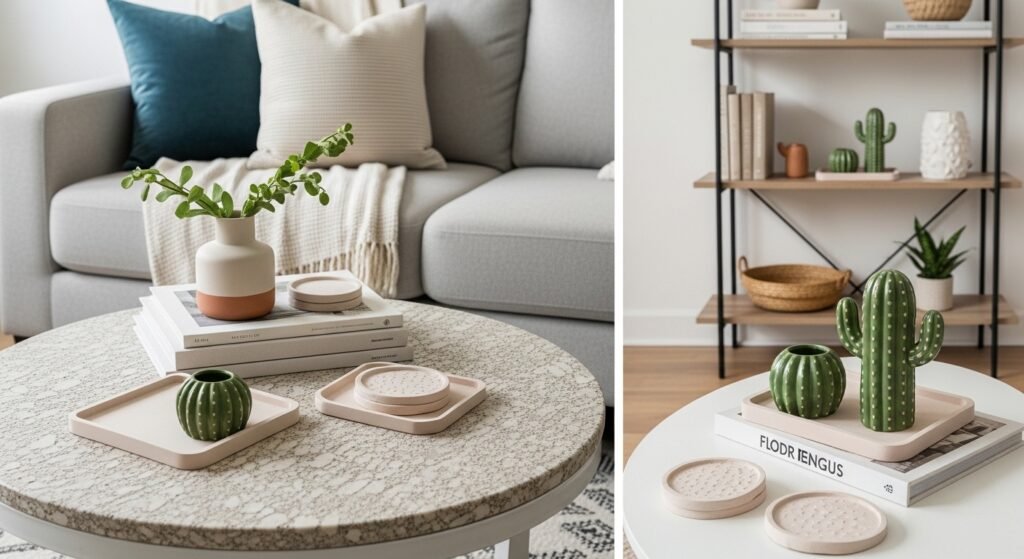
My living room had nice furniture and decent lighting but it still felt like a waiting room. Took me embarrassingly long to figure out it was missing texture. Everything was the same height, nothing invited you to actually sit down. Once I started making small air dry clay pieces, shelves and tables finally looked like someone lived there.
These projects lean toward modern farmhouse and playful minimalist. Most ideas cost between $5 and $35, with a few splurges around $50. They work for entryways, coffee tables, bathroom counters, kids desks, or a tiny apartment shelf.
Pressed Flower Trinket Tray For Entryway, Boho Vibe
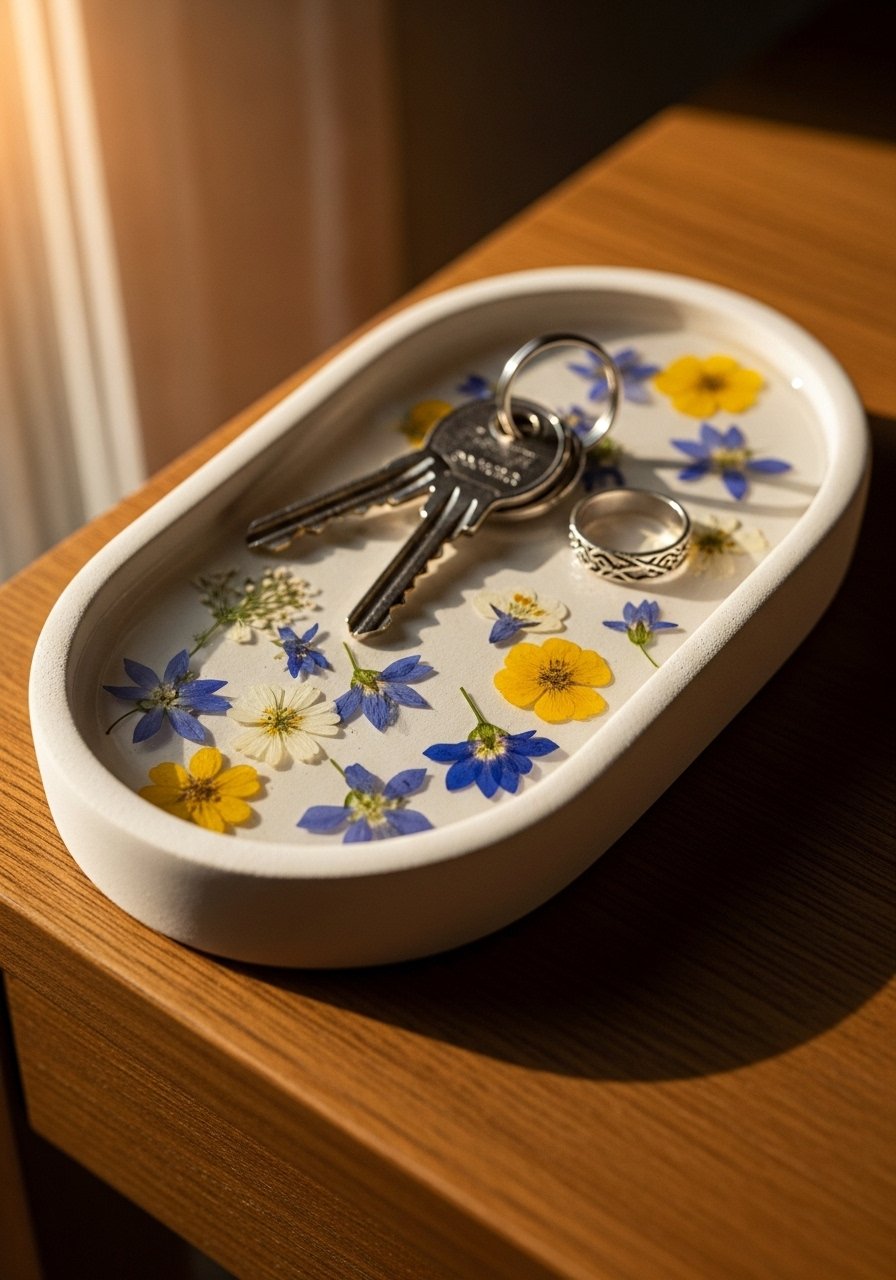
I made a 4-inch pressed flower tray that saved me from the daily keys scramble. Roll clay to 1/4-inch thick, press dry flowers gently when the clay is soft, then shape a 1-inch rim. A common mistake is pressing flowers after the clay has started to skin over, which causes smudging. Dry slowly for 24 to 48 hours in a cool spot and flip once to avoid warping. Seal with an acrylic-varnish-spray to stop white dust and make it wipeable. Budget was about $10 with a cheap clay block and leftover blooms.
Cactus Candle Holders For Table Center, Desert Casual
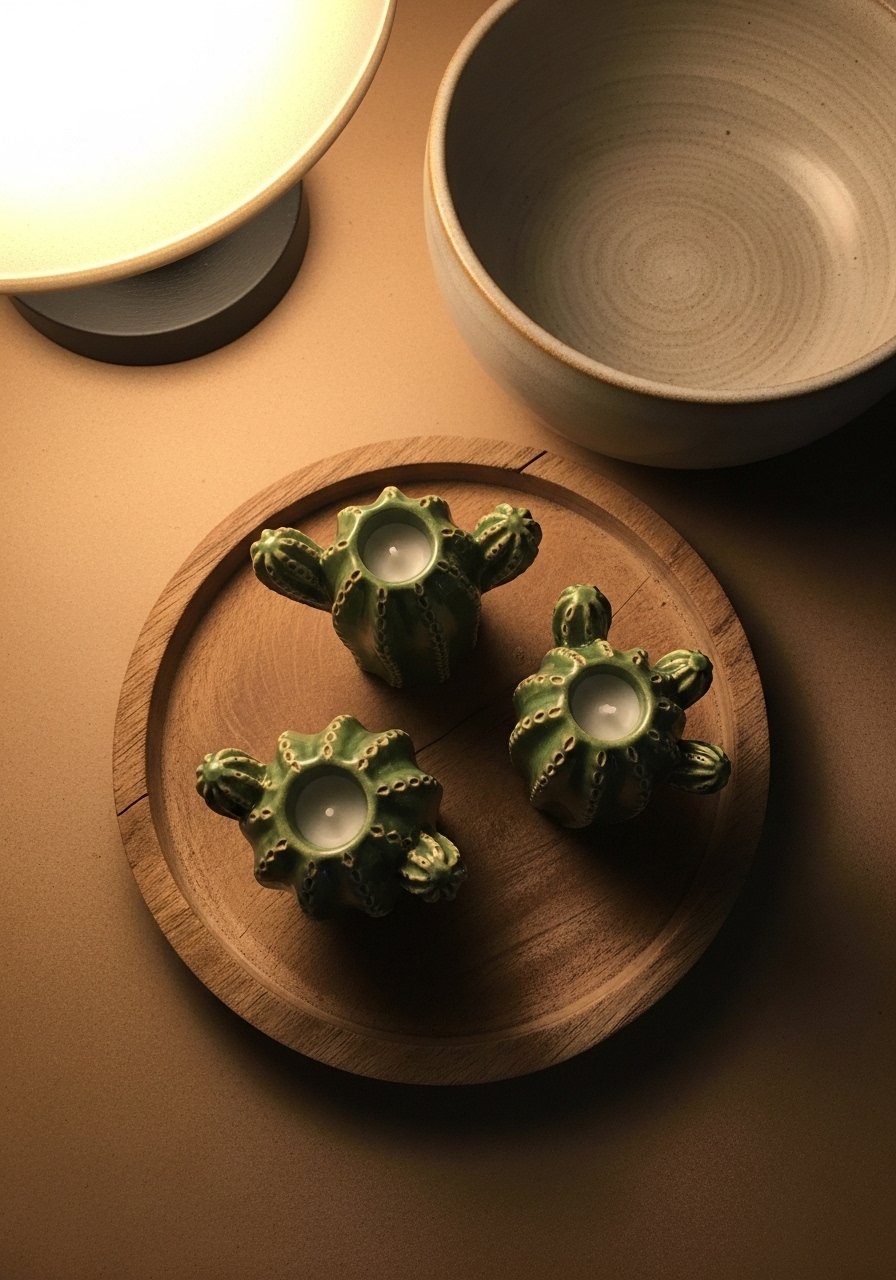
I used a simple trick to get convincing cactus shapes, roll a small cone, press vertically with a toothpick for ribs, and make a shallow well for a tealight. These look better when painted in two shades of green, dry fully, then given a glossy topcoat. A frequent issue is pieces toppling because bases are too thin. I made the base at least 1/2-inch thick so they sit steady. I used crayola-air-dry-clay and finished with clear-gloss-acrylic-medium. Budget under $15.
Citrus Slice Magnets For Fridge, Playful Minimalist
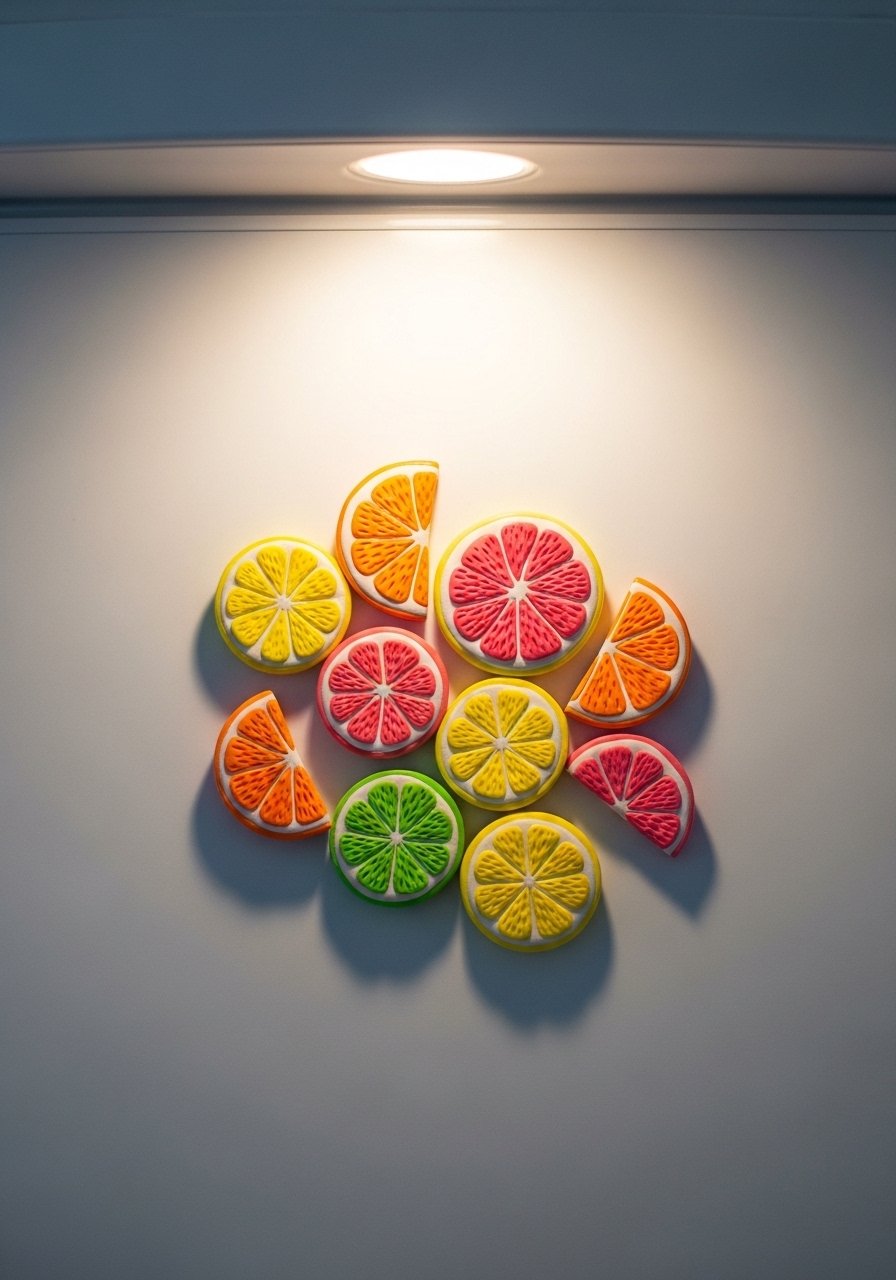
These are so simple kids can join in. Cut 2-inch circles, gently carve slices with a craft knife, and paint with two thin acrylic coats. People often make them too thin and they crack while drying. Keep them around 1/4-inch thick and dry on a flat surface for 48 hours, flipping once. Attach magnet backs with a strong glue and use magnet-discs-pack. Budget $8 to $12. They add a summer pop without taking any wall space.
Rope-Wrapped Clay Bowl For Nightstand, Modern Farmhouse
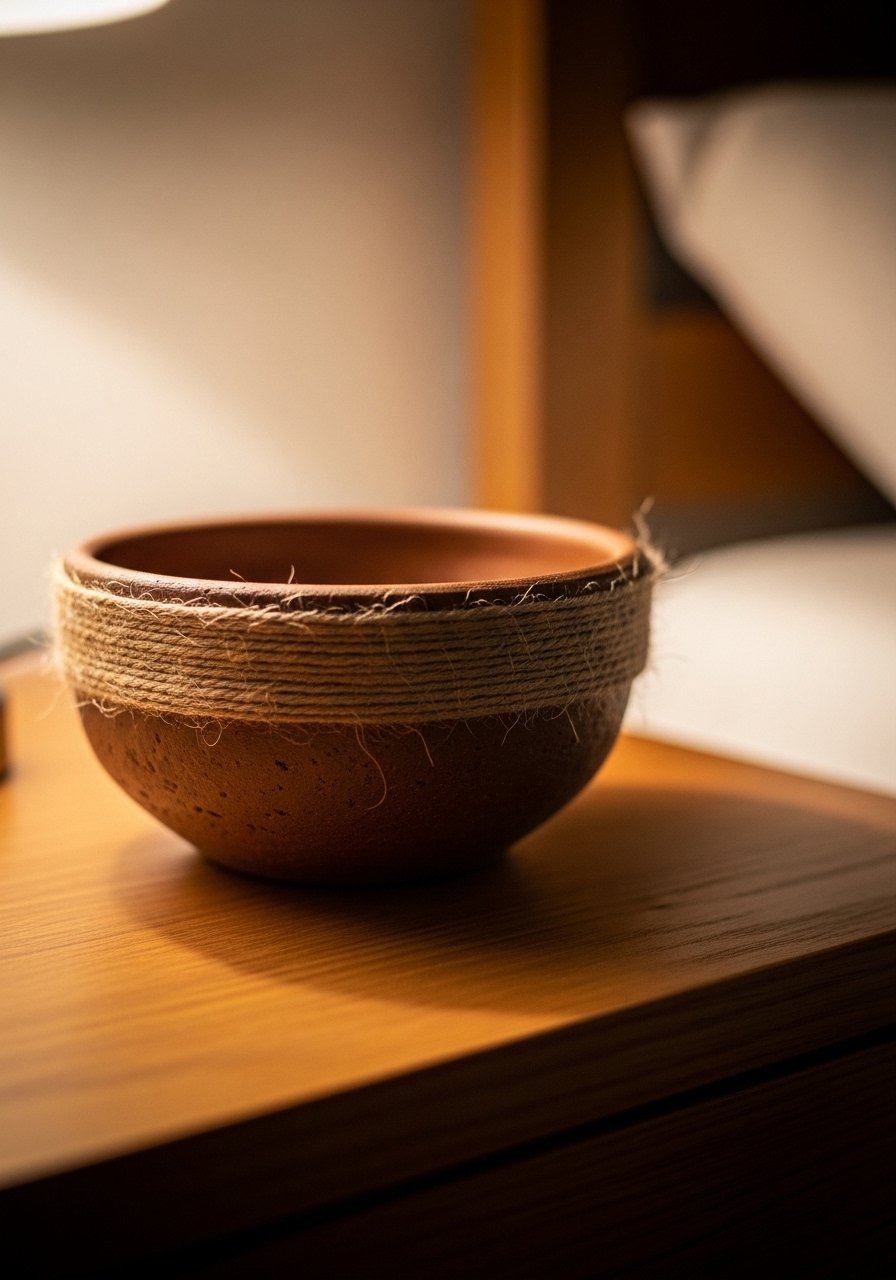
I pressed a clay slab over a 4-inch bowl mold and wrapped the rim with 1/8-inch jute rope while it was tacky. The contrast between smooth clay and rough rope makes cheap pieces look layered and intentional. Mistake to avoid is wrapping rope before clay is firm enough, which causes slipping. Let the base firm for a few hours first. I used jute-rope-3mm and an air-dry-clay-block. Budget $15 to $25. These are great on dressers for jewelry.
Embossed Star Ornaments For Wall Or Tree, Scandinavian Calm
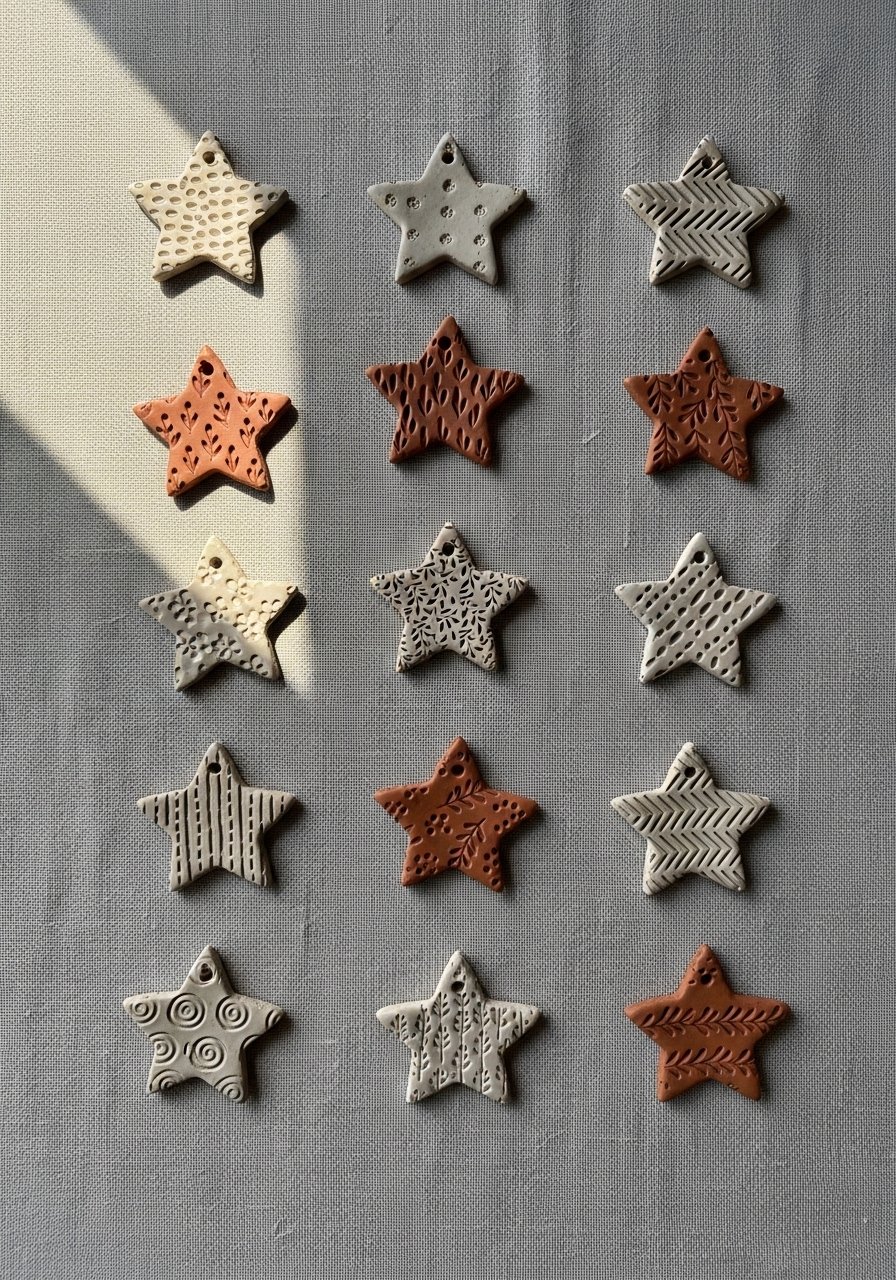
I save rubber stamps for ornament season and press them into 3-inch stars before drying. A neat trick is to add a 1/8-inch border around the star to mimic pottery rims. People often cut ornaments unevenly. Use a cookie cutter or template for consistent sizes. Dry slowly so you do not lose crisp stamp detail. Thread with thin twine and pair these on a small gallery wall or a tiny seasonal branch. I used a small-rubber-stamp-set. Budget $10 to $18.
Beaded Trinket Dishes For Bathroom, Minimalist Calm
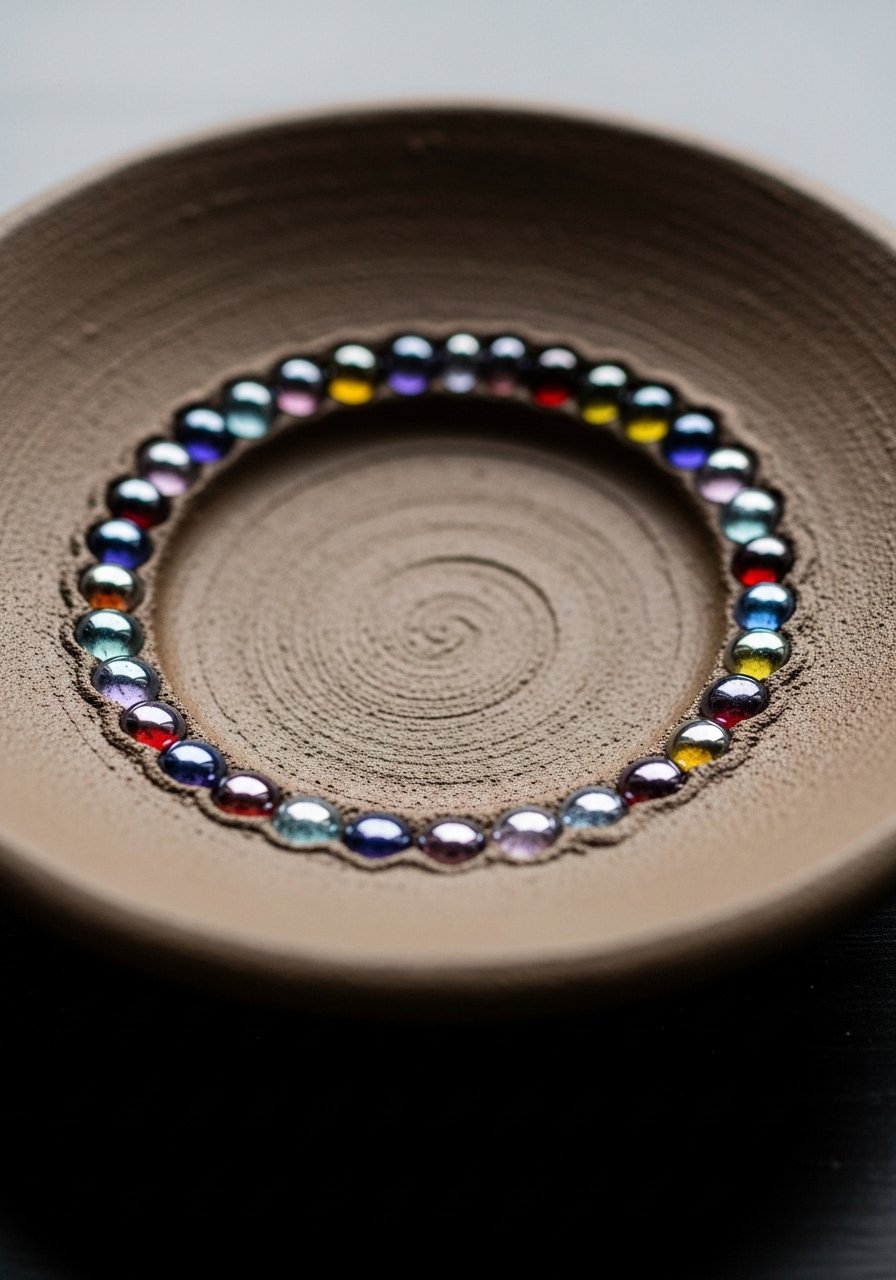
These are my go-to for bathroom counters. Roll a 1/4-inch slab, cut a 3-inch circle, press small beads into the rim for texture, then curve the edges up slightly over a bowl. One mistake is overloading with too many beads which makes drying uneven. Keep the beads confined to a single ring. Seal with a satin varnish to stop white dust from rubbing off on rings. I used glass-beads-mix. Budget $12 to $20. Pair with the pressed flower tray for a layered entry vignette.
Seashell Watercolor Palette For Studio, Coastal Boho
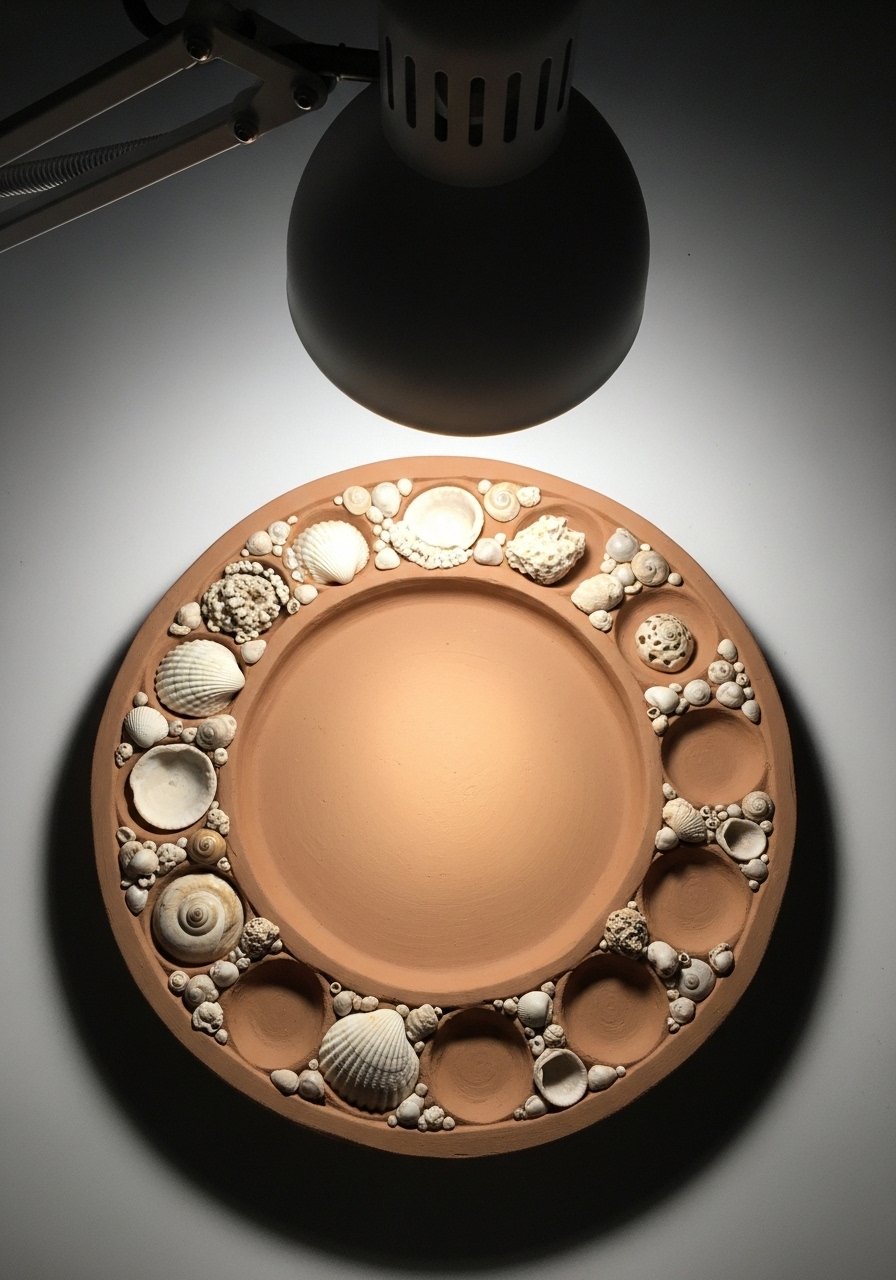
If you paint, shape a base with shallow wells and press small shells you found at the beach into one side. The shells hold water and create a pretty coastal display when dry. A common slip is adding shells that are too heavy. Pick thin shells and embed only partway so wells remain functional. Dry the palette fully for 48 hours before using. I keep one on my desk and it makes mixing easier than plastic palettes. Use air-dry-clay-pkg. Budget $15 to $30.
Bubbled Texture Coasters For Living Room, Kid-Friendly
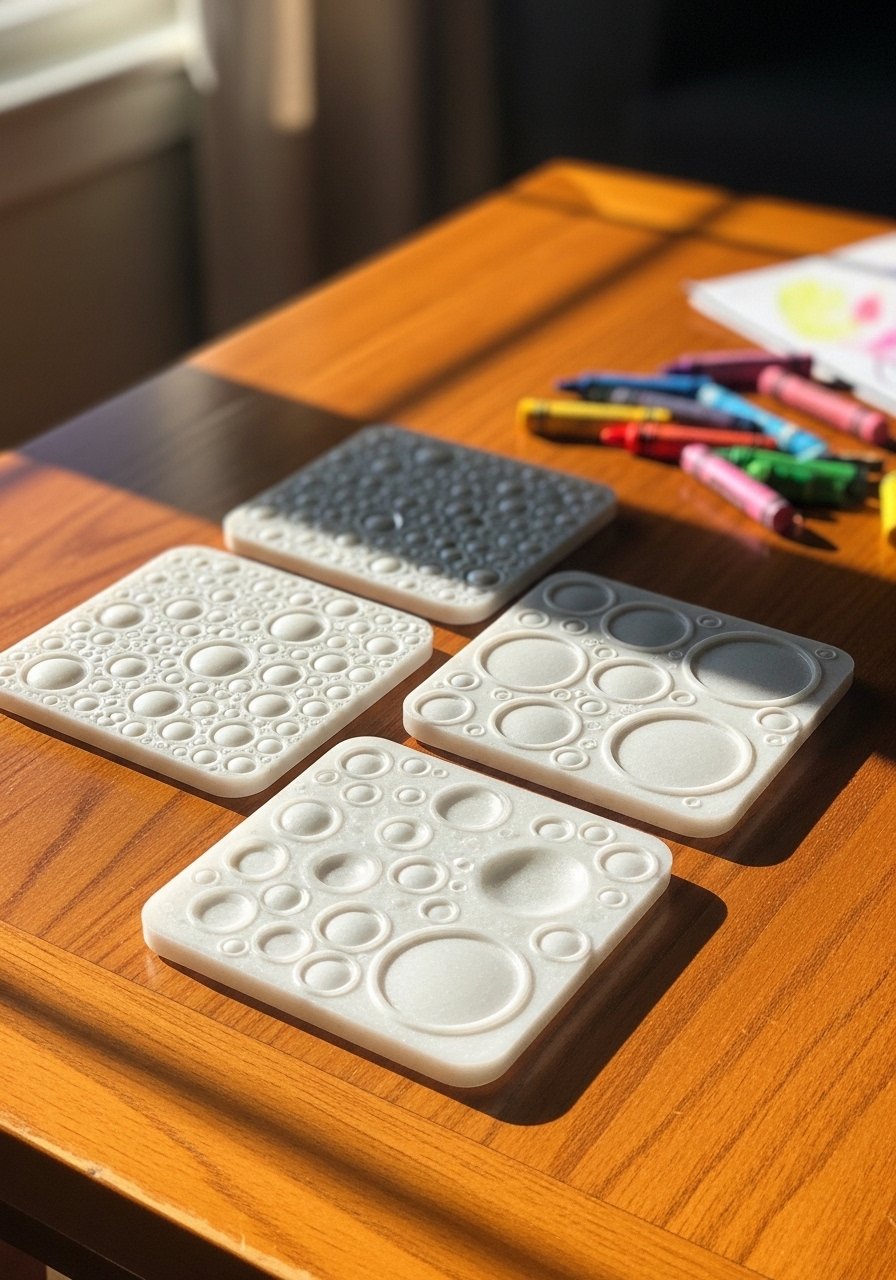
I love these because they are tactile and forgiving. Roll 4-inch rounds at 1/4-inch thickness and press small glass marbles partially into the surface to make bubbly textures. Kids can help decorate and the bumps add traction so cups do not slide. People make them too thin and the marbles punch through. Keep the base about 1/4-inch and the coaster diameter at 4 inches. Seal both sides with varnish for durability. I used glass-marbles-pack. Budget $10 to $15.
Clay Flower Frogs For Vase Arrangements, Grandmillennial Flair
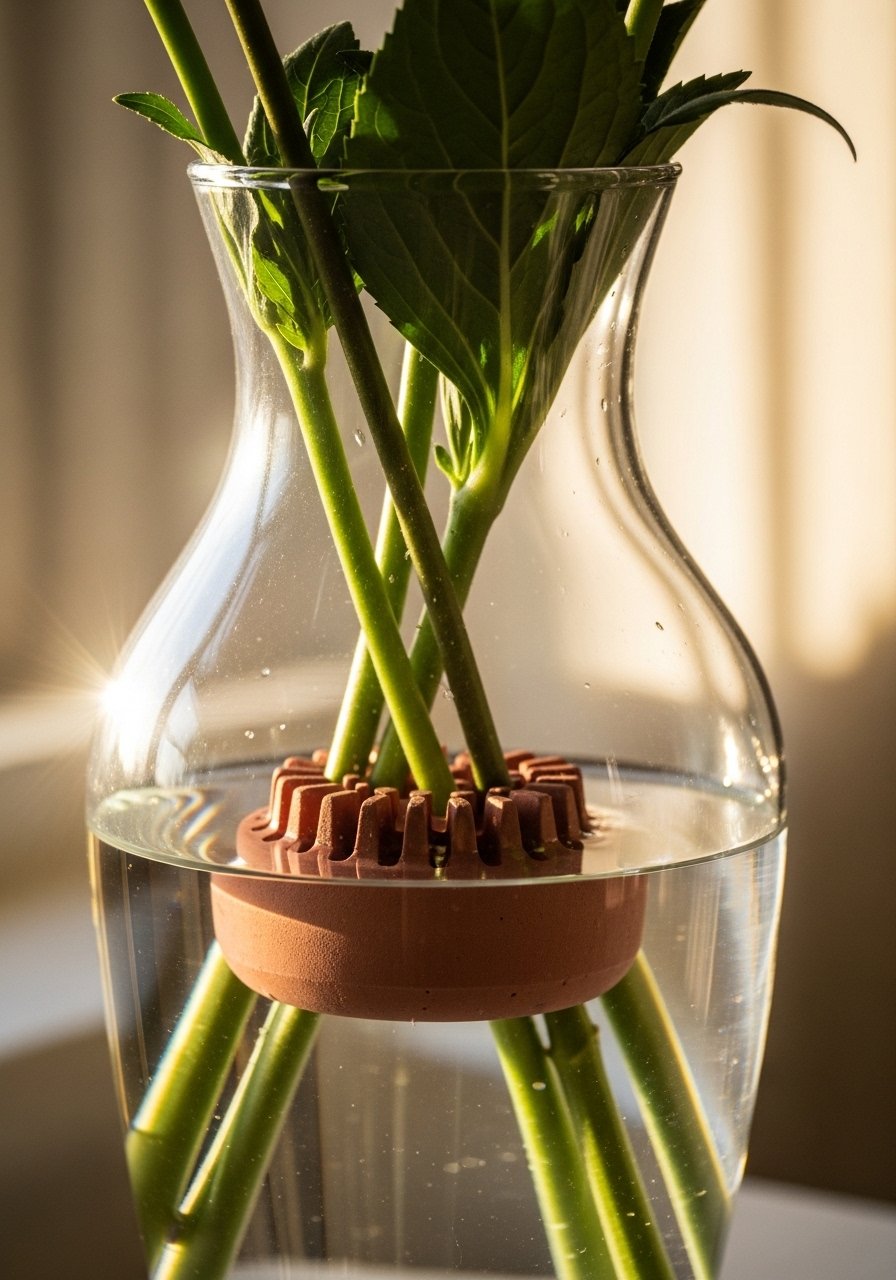
These are a simple fix for limp stems in arrangements. Sculpt a disc with lots of tiny spikes to hold stems in place, then sit it in the vase rim. Dry slow so the spikes stay straight. A common mistake is making spikes too short which fails to grip stems. Make spikes about 1/2 inch long. These work great with the stamped pots idea if you want a coordinated table. I used plastic-vase-insert-alternative for comparison. Budget $12 to $22. Renter-friendly when used with your own vases.
Stamped Herb Pots For Kitchen, Transitional Greenery
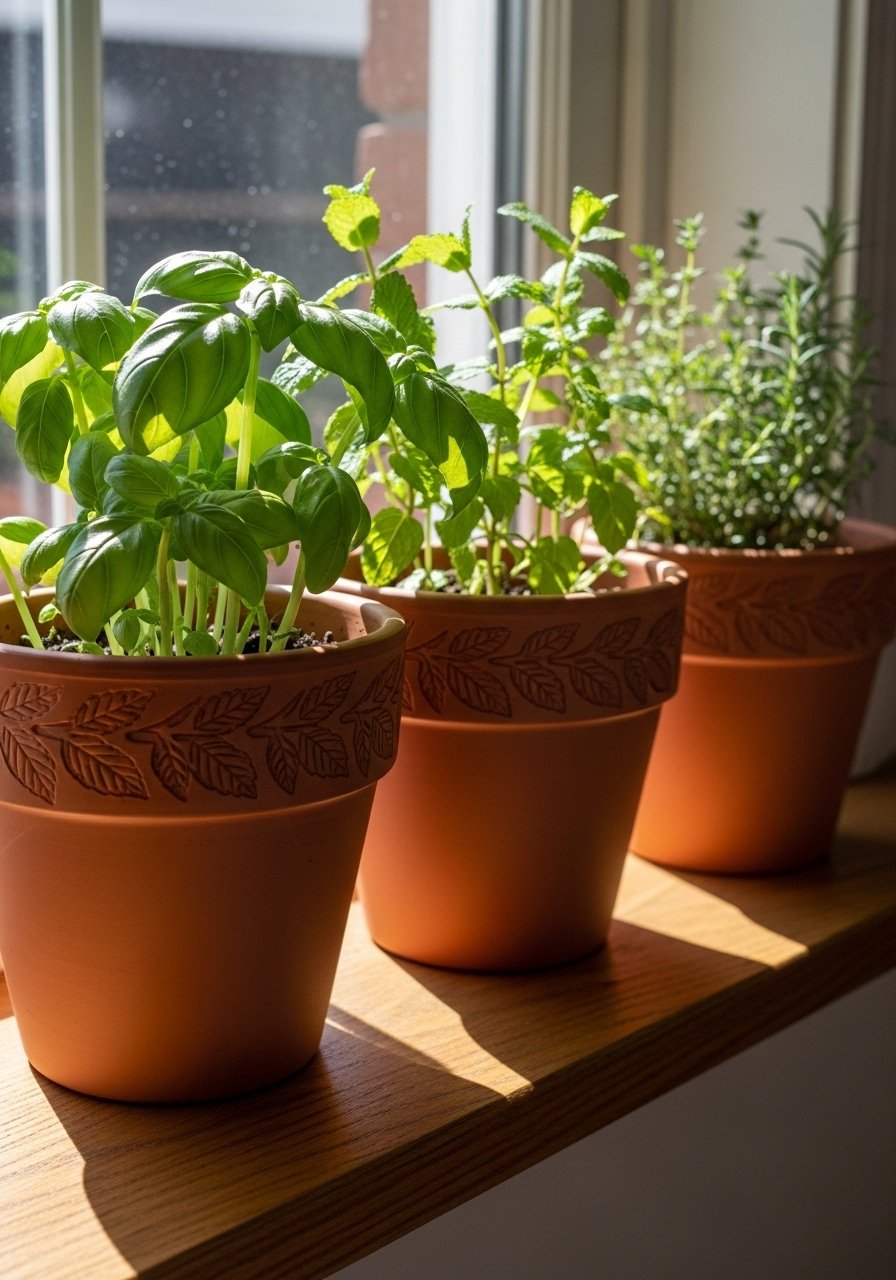
I stamped names and tiny leaves into 4-inch pots for my windowsill. Press rubber stamps evenly when the clay is tacky for the deepest impression. Many people paint before the clay is fully cured and get smudges. Wait at least 48 hours. For small kitchens, make 3-inch mini pots so you do not crowd the sill. I used small-rubber-stamp-set and mini-terracotta-look-pots for pairing. Budget $20 to $35.
Chunky Abstract Bookends For Shelf, Industrial Pop
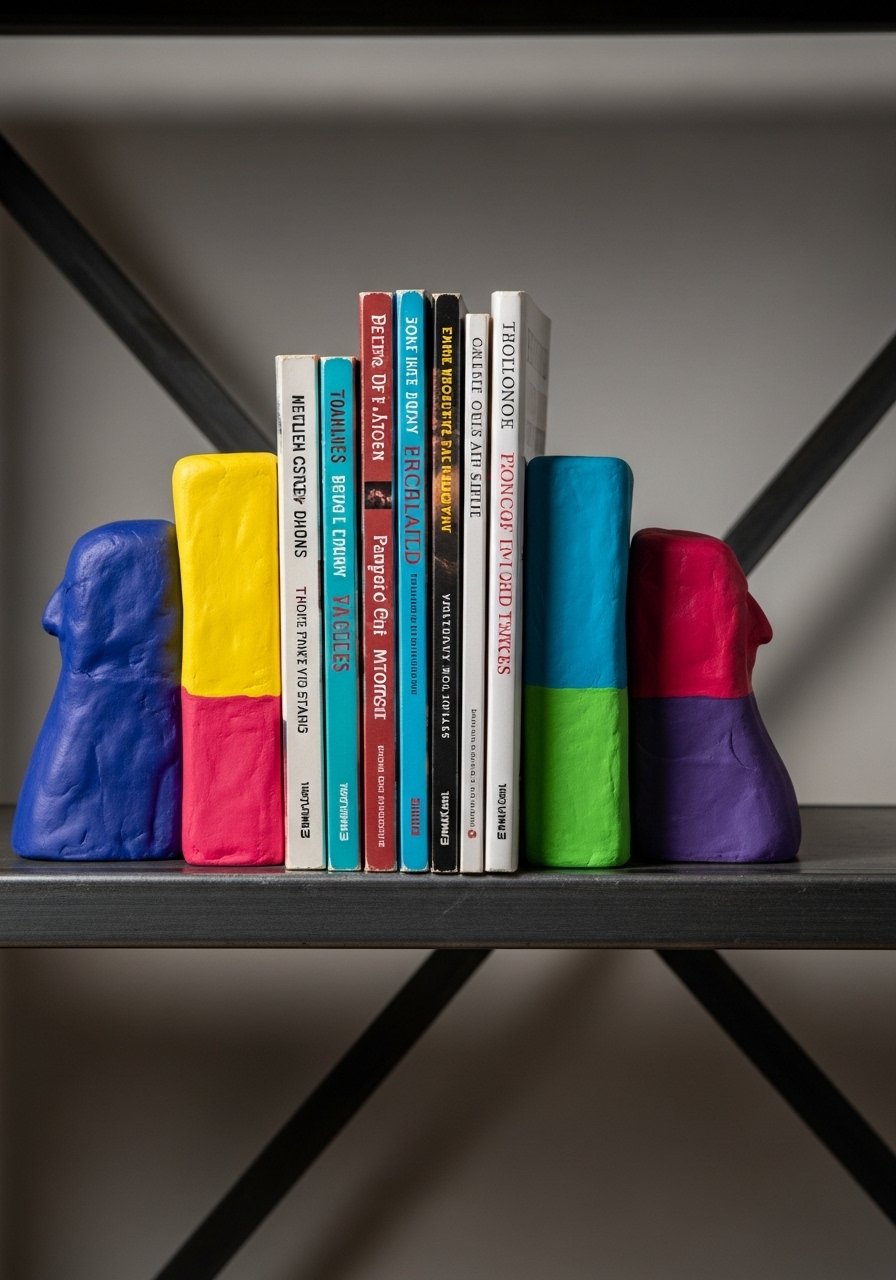
These were my first attempt at functional clay pieces. Build forms at least 6 inches tall and weight the inside with a flat stone before clay sets. Lightweight bookends tip over, so add a thicker base at 1/2-inch and embed a small smooth stone for heft. Paint with bold colors to get that playful, modern look. Dry slowly and seal well. I used an air-dry-clay-block and acrylic-paint-set. Budget $25 to $40.
Alphabet Initial Gift Tags For Presents, Minimalist Gift Wrap
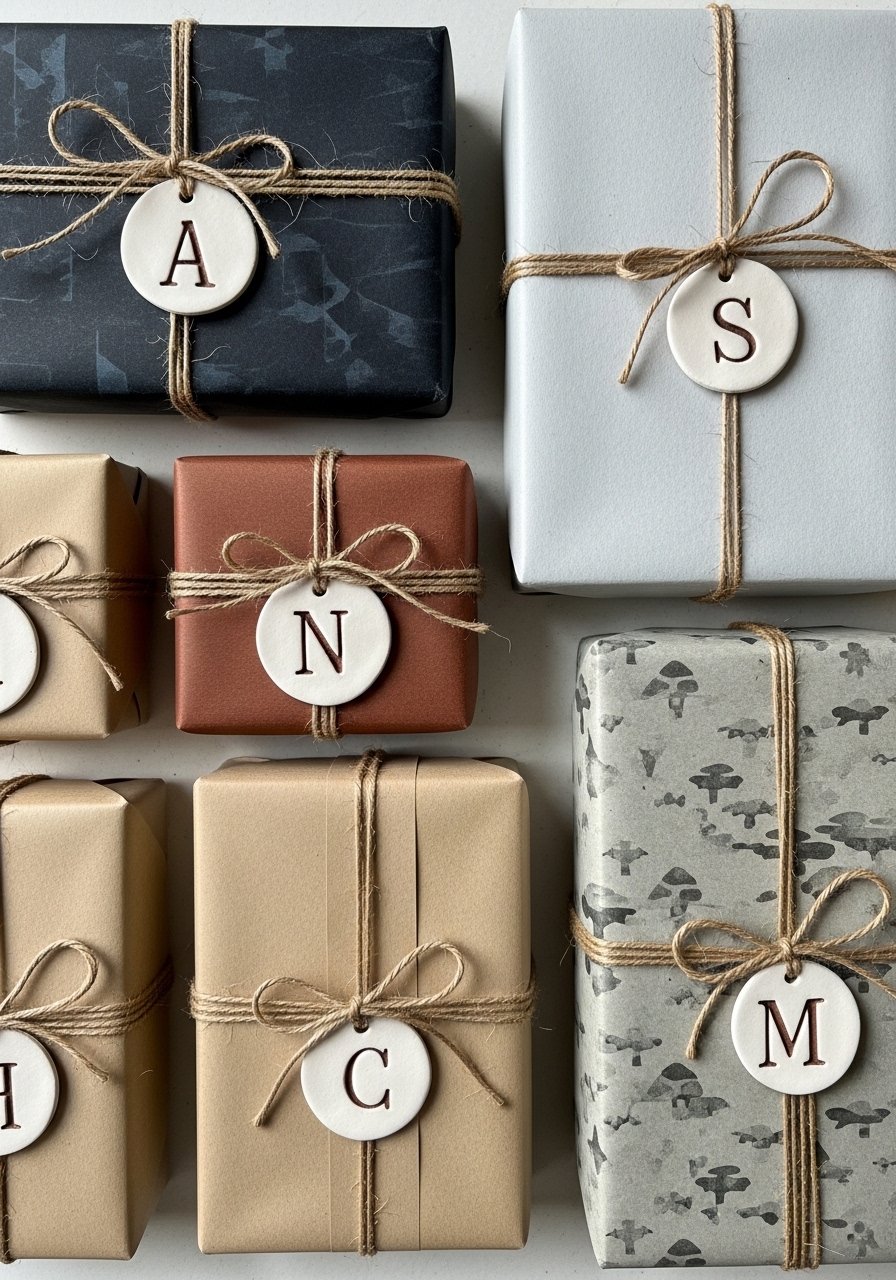
Cut 2.5 to 3-inch letters, press a hole at the top for twine, and stamp or paint a small pattern. I give these as gift tags and people keep them as ornaments. Beginners often make letters fragile by going too thin. Keep letters at least 1/4-inch thick. Thread with hemp twine and write a name on the back with a fine marker. I used letter-cookie-cutters and hemp-twine-roll. Budget $10 to $20.
Dinosaur Egg Sculptures For Kids Room, Playful Decor
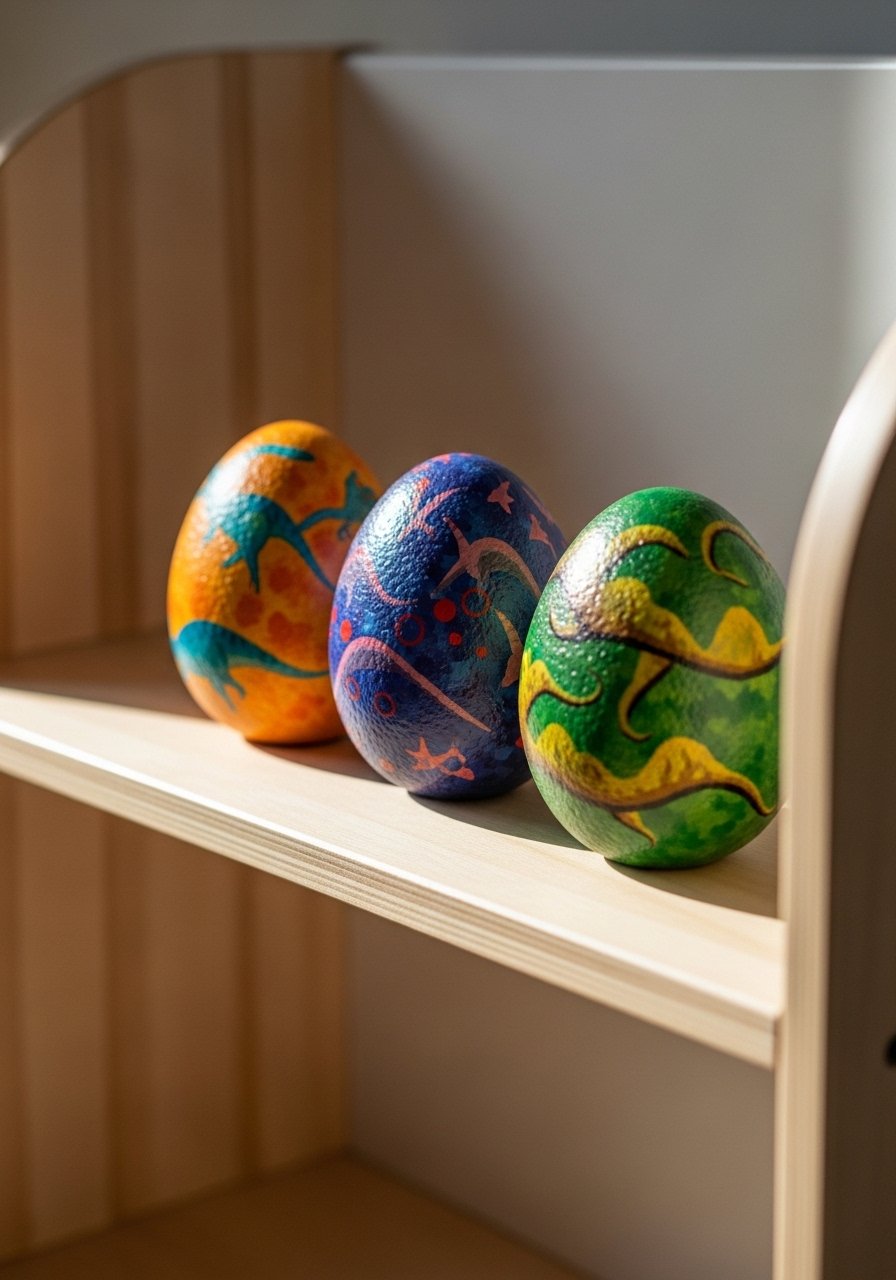
These were a weekend project with my niece. Shape ovals and texture them with little cracks and dents, then paint in earth tones. A common problem is cracking during drying. Slow drying helps, so cover loosely for the first day and place on a flat surface. Make eggs about 3 to 4 inches so they feel like real finds. I used air-dry-clay-pkg and acrylic-paint-set. Budget $15 to $25.
Textured Hanging Planters For Porch, Boho Outdoor
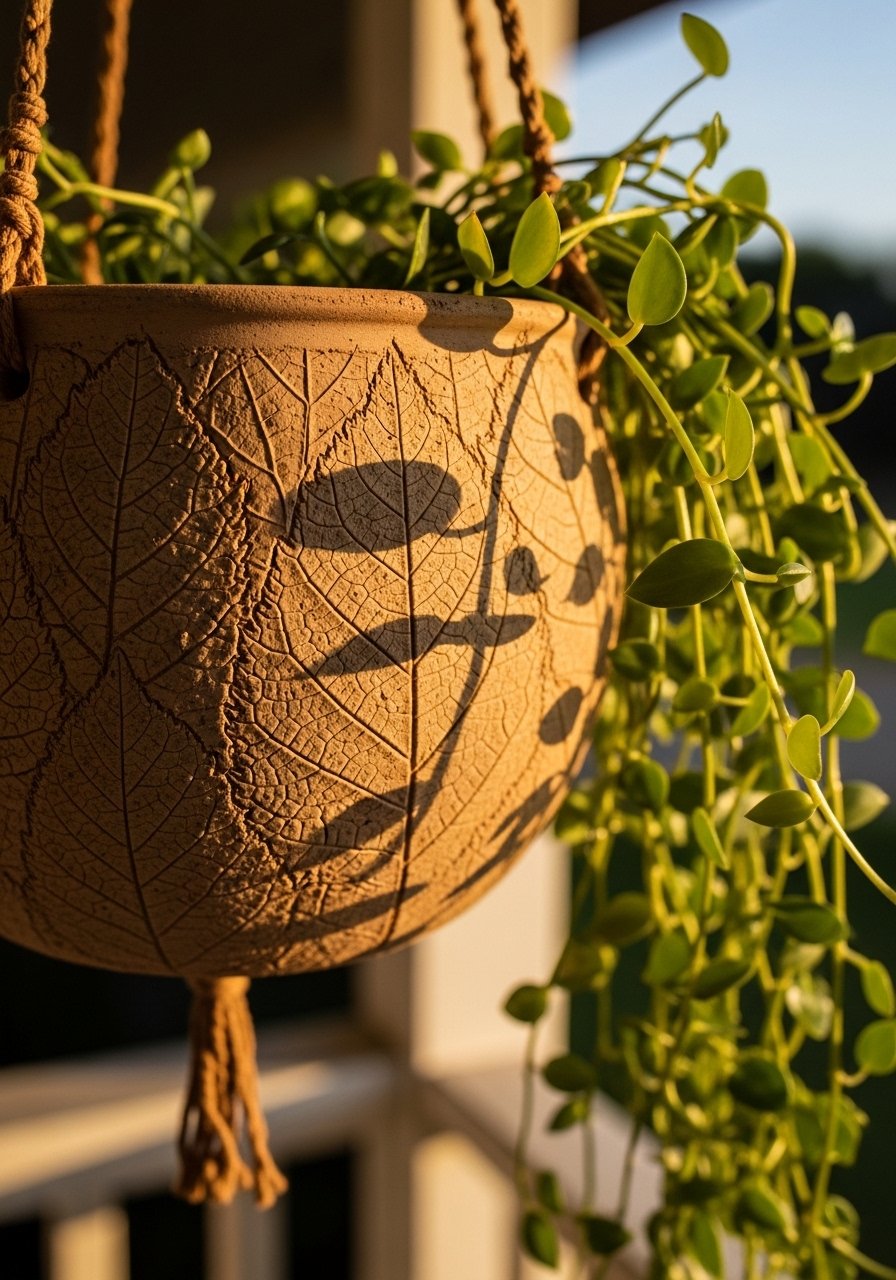
I molded small hanging planters over inverted bowls and added textures with a fork and pressed leaves. For hanging pieces, make the wall of the planter at least 1/4-inch thick so it stays sturdy. People often forget to make a proper hanging loop. Reinforce the loop with extra clay and let it cure fully before adding soil. Seal inside with a non-toxic glaze or varnish if you use them with real plants. I used natural-air-dry-clay and hanging-plant-hooks. Budget $20 to $35.
Minimalist Wall Hooks For Entry, Modern Function
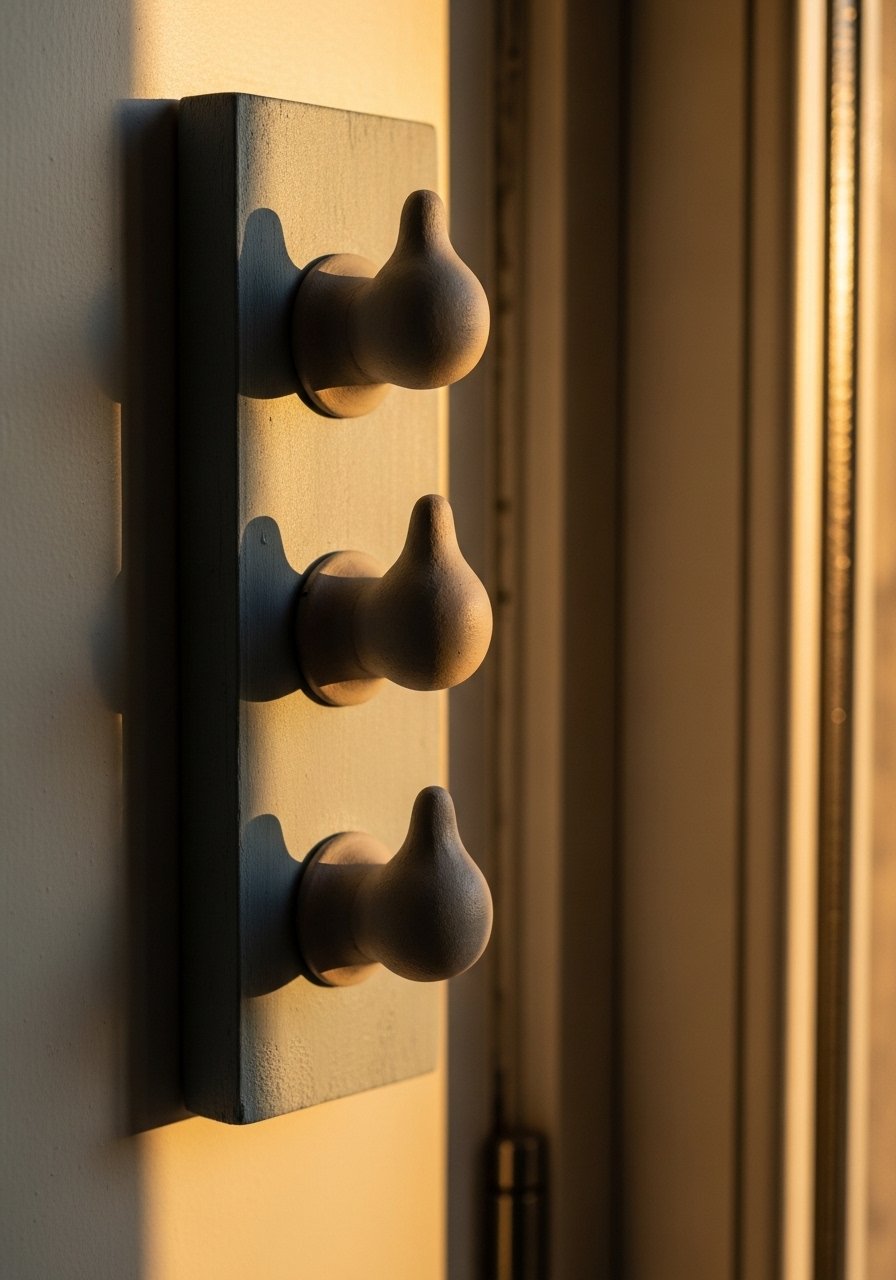
Make little 1.5-inch knobs and glue them to a wooden board for an instant command center. Drill pilot holes in the wood and use short screws through small embedded washers to secure clay knobs. Many DIYs skip reinforcement and knobs fall off. The trick is embedding a small metal washer before full dry. Pair this board with the pressed flower tray for a coordinated entry setup. I used small-metal-washers and a wooden-slat-board. Budget $12 to $20.
Clay Photo Holders For Desk, Vintage Desk Charm
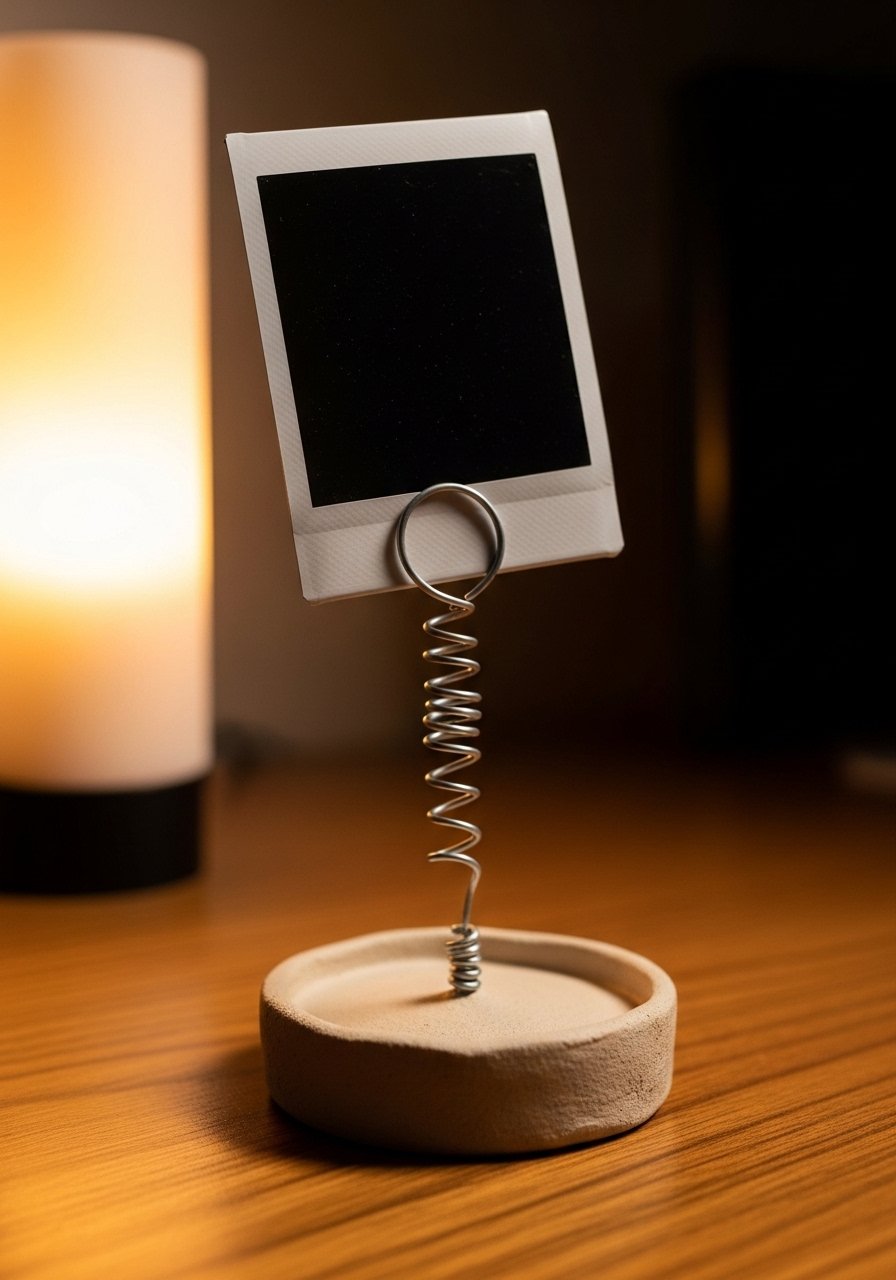
Make a flat base and insert a curved piece of stiff wire while the clay is still workable. I display recipes and small photos in my kitchen with these. The common error is not anchoring the wire deep enough. Push the wire 1 to 1.5 inches into the base and let it dry fully. Paint the base or leave it raw with a thin varnish. These are great paired with the seashell palette on a small desk. I used stiff-craft-wire. Budget $8 to $15.
Geometric Wall Tiles For Small Accent, Modern Gallery
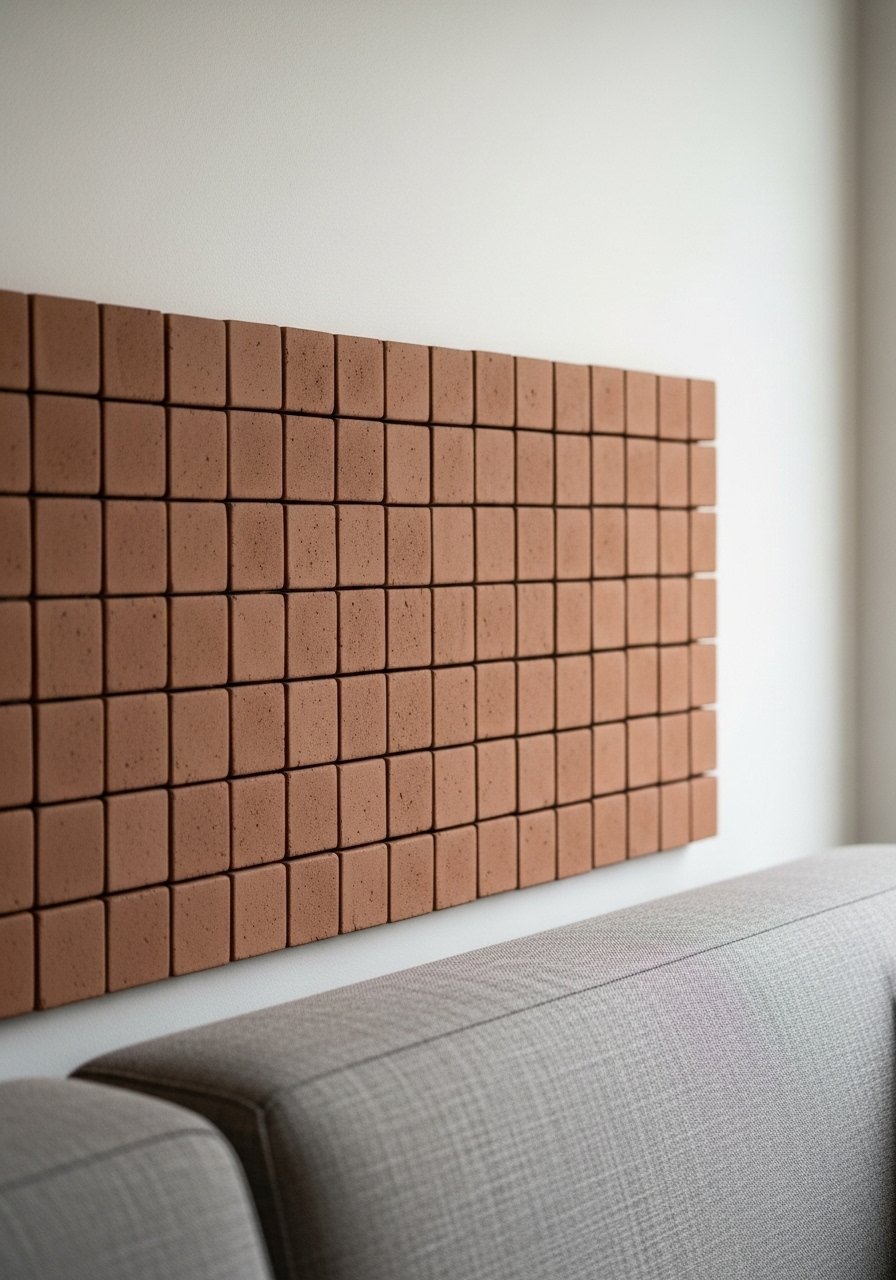
Cut consistent 3-inch geometric shapes and arrange them in a small cluster on a plaque or directly on the wall with mounting putty. Consistency is everything, so use a template for each piece. Dry them flat to keep edges crisp. A small set of 9 tiles looks intentional without being overwhelming. Seal with a matte spray to keep the white dust from rubbing off. I used mounting-putty-small. Budget $25 to $40 for a set.
Mini Jewelry Dishes For Nightstand, Feminine Touch
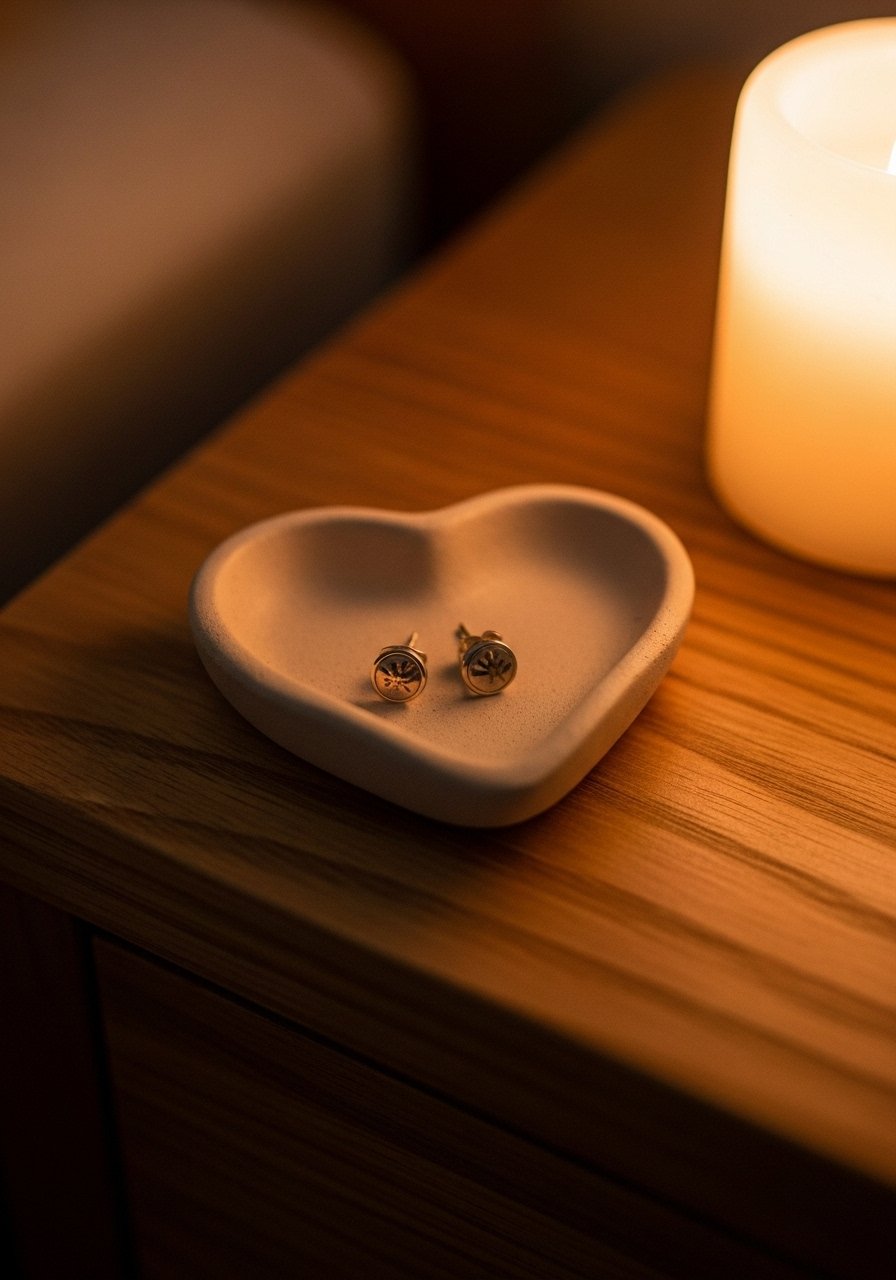
I kept losing earrings until I started making 2.5-inch heart dishes. Roll to 1/4-inch thick, shape with a small cutter, and smooth edges with a damp sponge right before drying for a polished look. Many tutorials skip that damp sponge trick and you end up sanding. Sanding can damage thin pieces. Seal with a satin varnish. I used small-cutters-set. Budget $10 to $18. These also make sweet party favors.
Leaf-Pressed Wall Plaque For Dining Area, Natural Accent
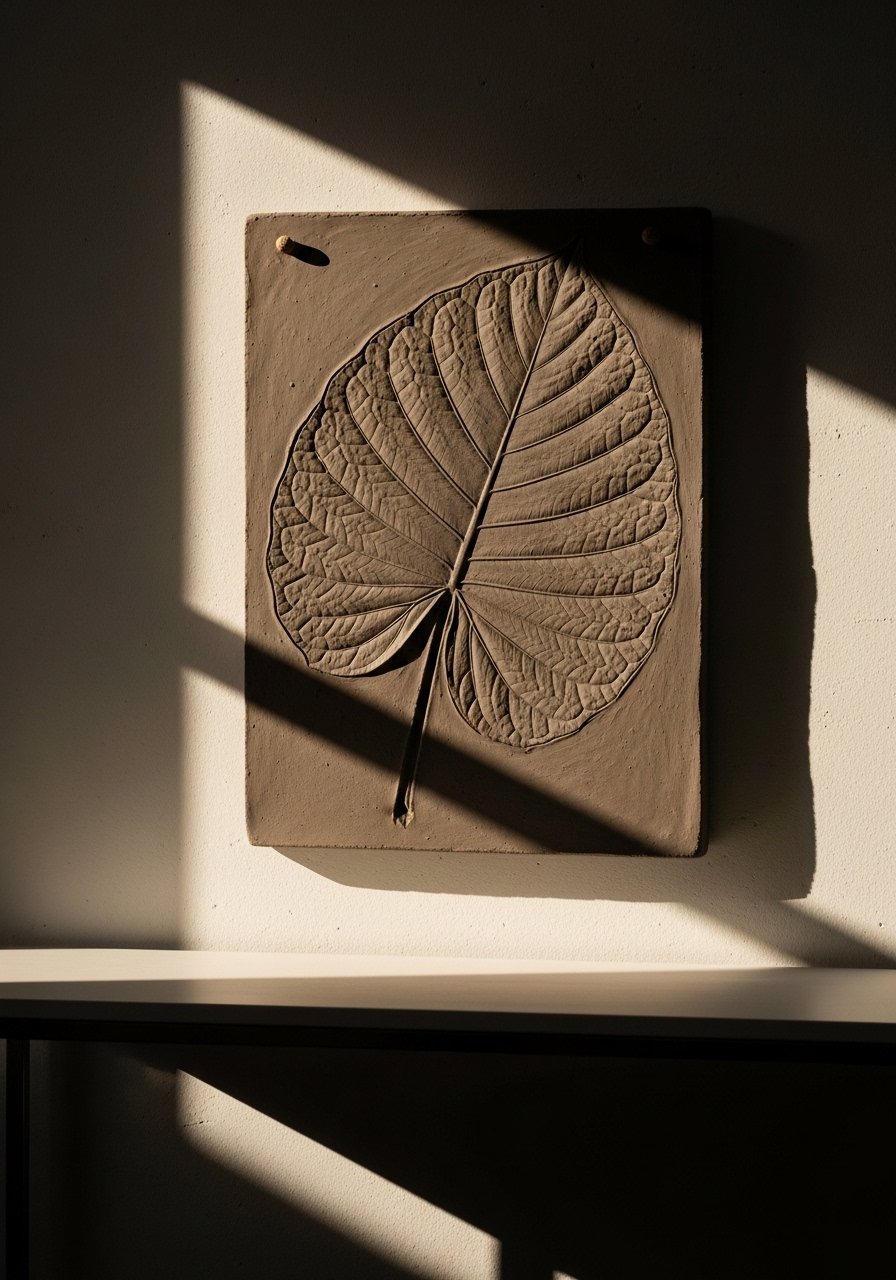
Press a single large leaf into a rectangle of clay, score a hidden hanging slot at the back, and paint the raised veins with a wash. People often expect perfectly flat plaques. Let the clay dry 48 hours and weigh it down gently if it warps. Add a thin coat of varnish and hang on a small nail. Works beautifully with the stamped herb pots on a nearby shelf. I used large-leaf-pressing-kit. Budget $15 to $25.
Tiny Planter Magnets For Office, Small-Space Green

Make mini 1.5-inch hollow planters, glue small faux succulents in, and affix strong magnets to the back. Perfect for apartments where floor space is tight. The typical mistake is making magnets too weak. Use neodymium magnet discs and secure them with epoxy. These pair well with the citrus magnets for a playful fridge vignette. I used neodymium-magnet-discs and mini-faux-succulents. Budget $10 to $18.
Clay Name Plate For Home Office, Personalized Work Nook
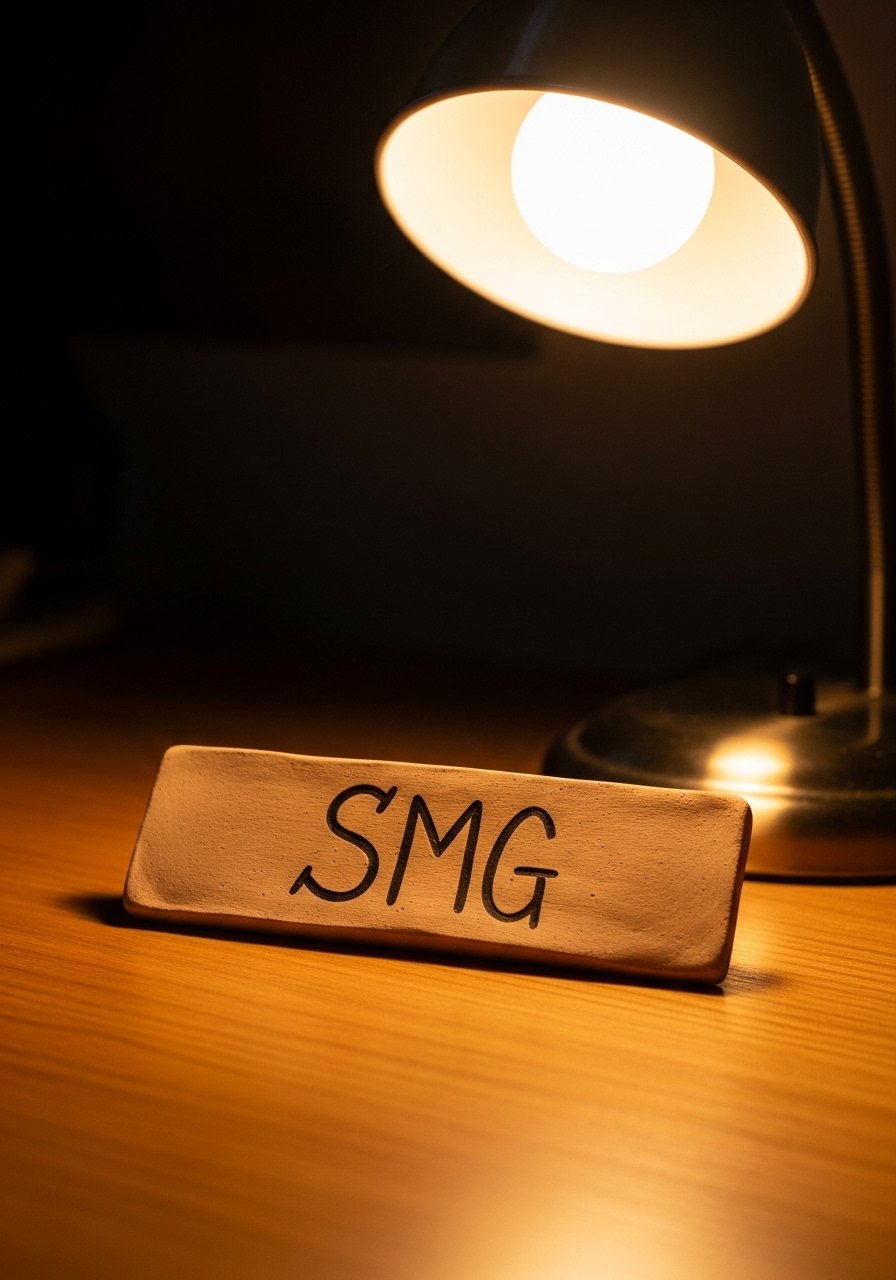
I made a small 6-inch name plate to mark my home desk. Carve initials while the clay is still soft and paint the letters after a full dry. Many people try to paint before full cure and the paint flakes. Dry 48 hours and seal with a non-toxic varnish if pets might sniff. If you have a dog, choose a pet-safe sealant to avoid chew risks. I used fine-detail-brush-set and non-toxic-clear-varnish. Budget $12 to $20.
Your Decor Shopping List
Textiles
- Chunky-knit-throw-blanket-cream (~$35-55). Drape over a sofa arm for immediate texture.
- 22-inch-linen-pillow-covers-pack-of-2 (~$25). Linen loses the cold hotel vibe faster than polyester.
Clay Tools & Materials
- crayola-air-dry-clay (single pack, white). Good for beginners and kids.
- acrylic-varnish-spray (~$8-15). Stops white dust and adds water resistance.
- craft-knife-set-with-blades (~$10). Cuts precise shapes and letters.
Finishing & Extras
- jute-rope-3mm (10m). Wrap rims or add rustic detail.
- small-rubber-stamp-set (~$12-20). For consistent pressed patterns.
- neodymium-magnet-discs (strong pack). For magnets that actually hold.
Budget Finds
- glass-beads-mix (~$6-12). Instant polish for trinket dishes.
- acrylic-paint-set (~$8-20). Two coats look better than one.
Similar at Target or HomeGoods
- Linen pillow covers and chunky throws are often cheaper in store. If you prefer touching before buying, look there for quick swaps.
Shopping Tips
White oak beats dark wood in 2026. Design feeds have shifted completely. These white-oak-floating-shelves look current, not dated.
Grab crayola-air-dry-clay for kid-friendly projects. Most newbies go straight for air dry since no oven needed.
Curtains should puddle or kiss the floor, never hang halfway up. 96-inch-linen-panels are the right call for standard 9-foot ceilings.
For small apartments choose mini projects under 4 inches. You got dozens of ways to use one clay pack without repeats. mini-cutters-set helps keep sizes consistent.
If you have pets use a non-toxic sealant and avoid tiny pieces dogs could swallow. non-toxic-clear-varnish is a safer choice.
If you want instant polish, two thin coats of acrylic paint look brighter than one thick coat. Try acrylic-paint-set.
Frequently Asked Questions
Q: How long does air dry clay actually take to dry?
A: Plan on 24 to 48 hours on a flat surface, flipping once halfway through. For thicker pieces like bowls or bookends leave them closer to 48 hours and dry in a cool spot to prevent cracking.
Q: Why did my piece crack down the middle?
A: Cracking happens when clay dries too fast. Cover loosely for the first 24 hours, keep it out of direct sun, and flip pieces so both sides dry evenly. Thicker bases help for functional items.
Q: Can I use pressed flowers without them browning?
A: Press flowers thoroughly before embedding and press them when the clay is still soft. If you paint over them too soon they can smudge. Let the clay cure fully first, then seal.
Q: Do I need special tools to get smooth edges?
A: No. A damp sponge or your damp finger smoothed edges better than sanding for thin pieces. It is a cheap trick many tutorials skip but it makes pieces look pro.
Q: Are these projects good for renters and small spaces?
A: Yes. Many ideas are 2 to 4 inches and fit shelves or small tables. Tiny planters, magnets, and trays are made for apartments and require no permanent changes.
Q: How do I stop white chalky dust after drying?
A: Seal with an acrylic varnish or non-toxic clear varnish as soon as the piece is fully dry. That fixes the dust and adds water resistance.
Q: What paint and sealant should I use if I have pets?
A: Use non-toxic water-based acrylic paints and a pet-safe clear varnish. Keep small decorative pieces out of reach and avoid tiny parts dogs could chew.
Q: Can beginners make functional items like bowls or bookends?
A: Yes, if you follow thickness rules and dry slowly. Roll slabs to 1/4-inch for bowls and make bookend bases at least 1/2-inch thick with a weighted core. That keeps pieces stable and durable.
