

My living room had nice furniture and decent lighting but it still felt like a waiting room. Took me embarrassingly long to figure out it was missing warmth on the walls. A peel and stick wood wall fixed that feeling fast, and I learned a bunch of tricks that saved time and money.

Layered Rustic Shiplap Accent For Living Room
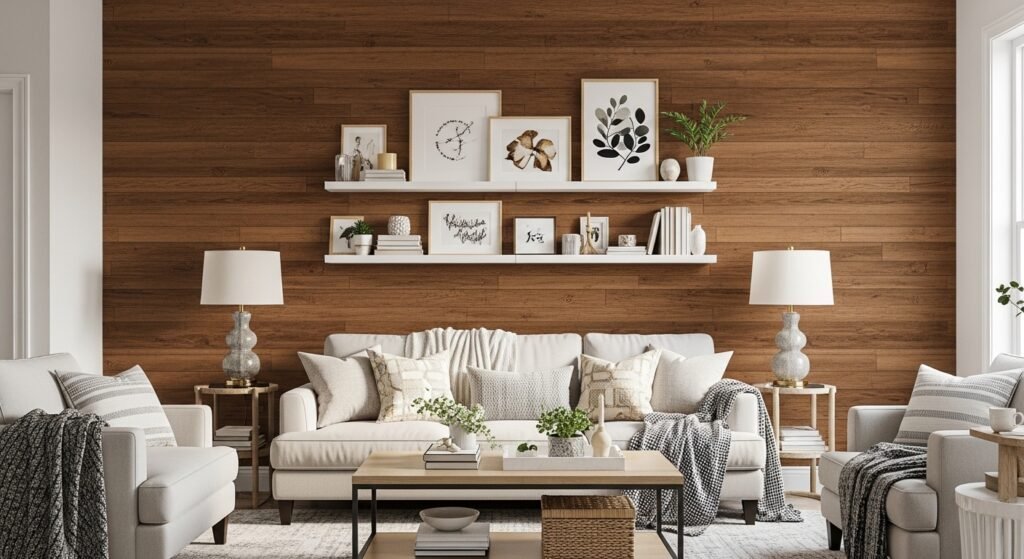
The moment I installed a 4-inch plank shiplap behind my sofa the room stopped feeling flat. What makes this work is the horizontal lines anchoring the seating area visually. For a living room, use 4-6 inch planks and run them the full width of the wall to make the ceiling read higher. I used peel and stick wood planks that come in 6×48-inch strips, which sped installation. Common mistake, people start mid-wall and end up with tiny cut slivers at the top. Measure first and plan for full planks at eye level. One detail most articles skip, leave a 1/8-inch gap for seasonal expansion.

Light Oak Headboard Wall For Bedroom
I tore down a boring headboard and applied wood planks directly to the drywall for instant texture. Light oak tones work best in bedrooms because they reflect soft light and keep the space calm. Budget runs $30 to $120 depending on square footage. I picked light oak peel and stick planks and cut them to 36 inches above the bed so the art and sconces sit comfortably. A common mistake is placing electrical fixtures before confirming plank thickness. Pro tip, test one plank around your lamp for shadows before committing. Matches hit about 90% right off the bat, but that last bit needs your room test.

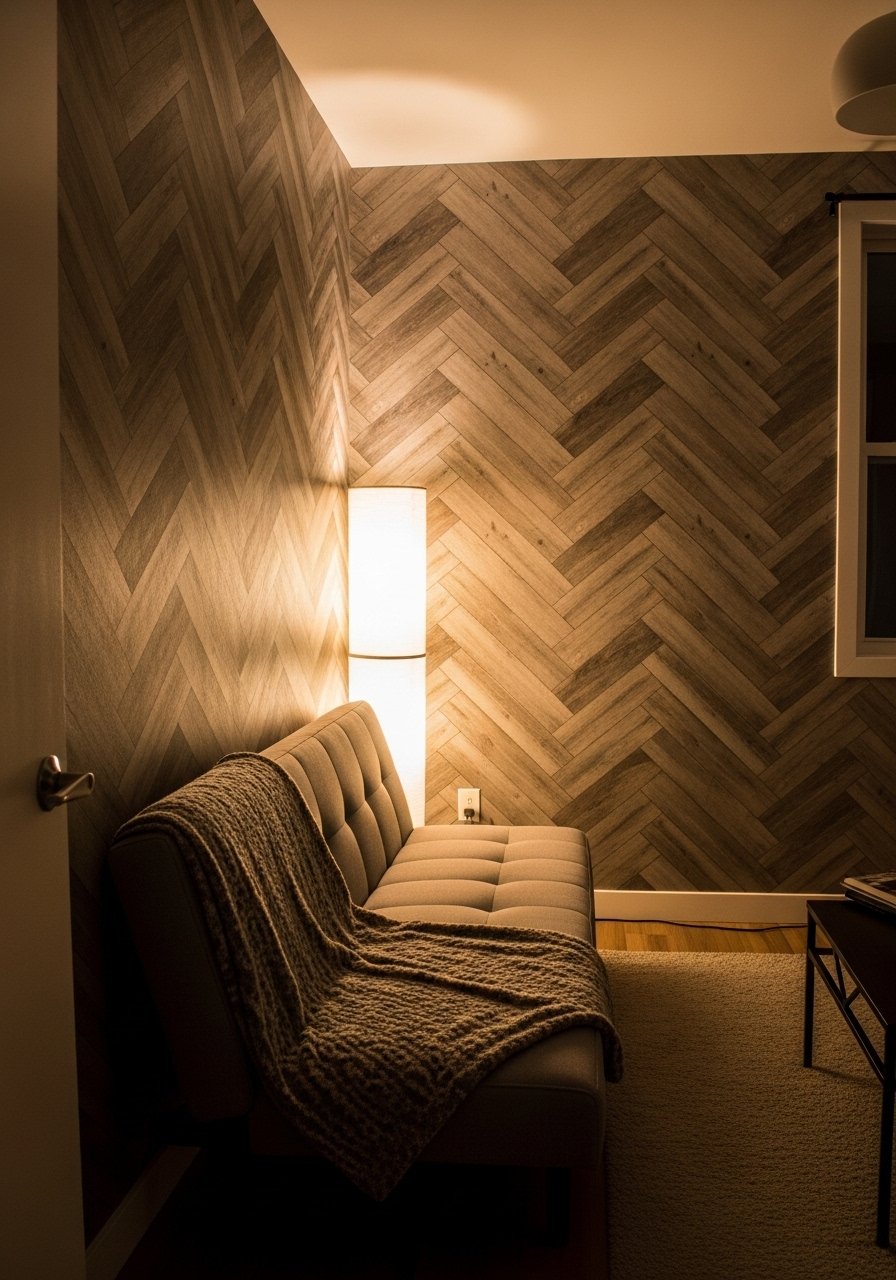
Diagonal Chevron Accent For Narrow Hallway
A chevron pattern in a narrow hallway makes the space feel custom without custom carpentry. I dry-fit the pattern on the floor first to mark the center line, then worked out toward the edges. Budget friendly if you buy 3 extra planks for mistakes. People assume diagonal makes the ceiling taller. It does visually, but only if your planks are narrow, about 3 to 4 inches. I used adhesive wood strips that cut clean on a utility knife. Mistake to avoid, do not eyeball the center line. A 1-2 inch offset ruins the symmetry.

Patchwork Mixed Tones For Reading Nook
I patched leftover planks into a small square wall behind my reading chair and it stopped the corner from disappearing. Mixing two to three tones, like honey oak and weathered gray, creates depth. Use smaller 12×12-inch peel and stick wood tiles for patchwork. I grabbed a sampler pack and went freeform. Common mistake, people try too many tones at once and it reads busy. Keep a ratio of 80/20 for dominant versus accent tones. If you rent, this is renter-friendly since you can peel a small patch off later. Most colors flip hard from day to night lamps, so check the patch under evening light.
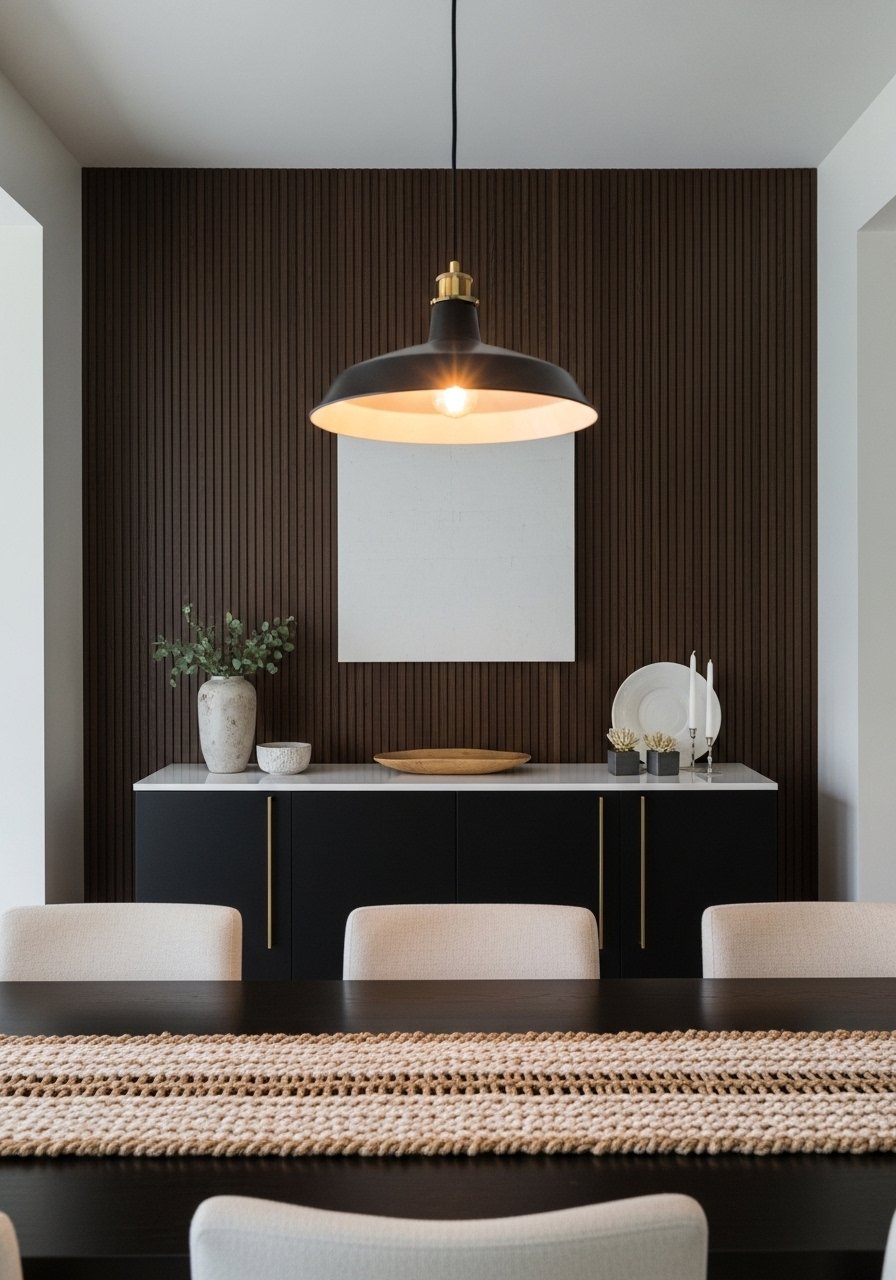
Vertical Walnut Panels For Dining Room
Vertical panels pull the eye up and make a dining room feel taller. I used wide 6-inch walnut planks and installed them end-to-end for a continuous vertical grain. The result was immediately more intimate and grounded. Budget was about $150 for a medium wall. Watch out for seams lining up with light switches or outlets. I used dark walnut adhesive planks and trimmed around outlets carefully. One trick most sources miss, run the panels to the floor and finish with a thin shoe molding rather than baseboard. It hides small gaps and looks finished.

Geometric Accent For Small Entryway
There was a tiny, sad patch of entry wall that needed personality. I cut small peel and stick wood pieces into triangles and created a geometric diamond behind the mirror. It cost under $40 in materials and made the whole entry read intentional. People overcomplicate this with power tools. You can score and snap thinner peel and stick panels for clean edges. Use artist tape as a template and place pieces first. I linked the mirror to the console height by keeping the diamond 24 inches wide so the focal point sits at eye level. Bring the actual sample for color matching, photos lie.
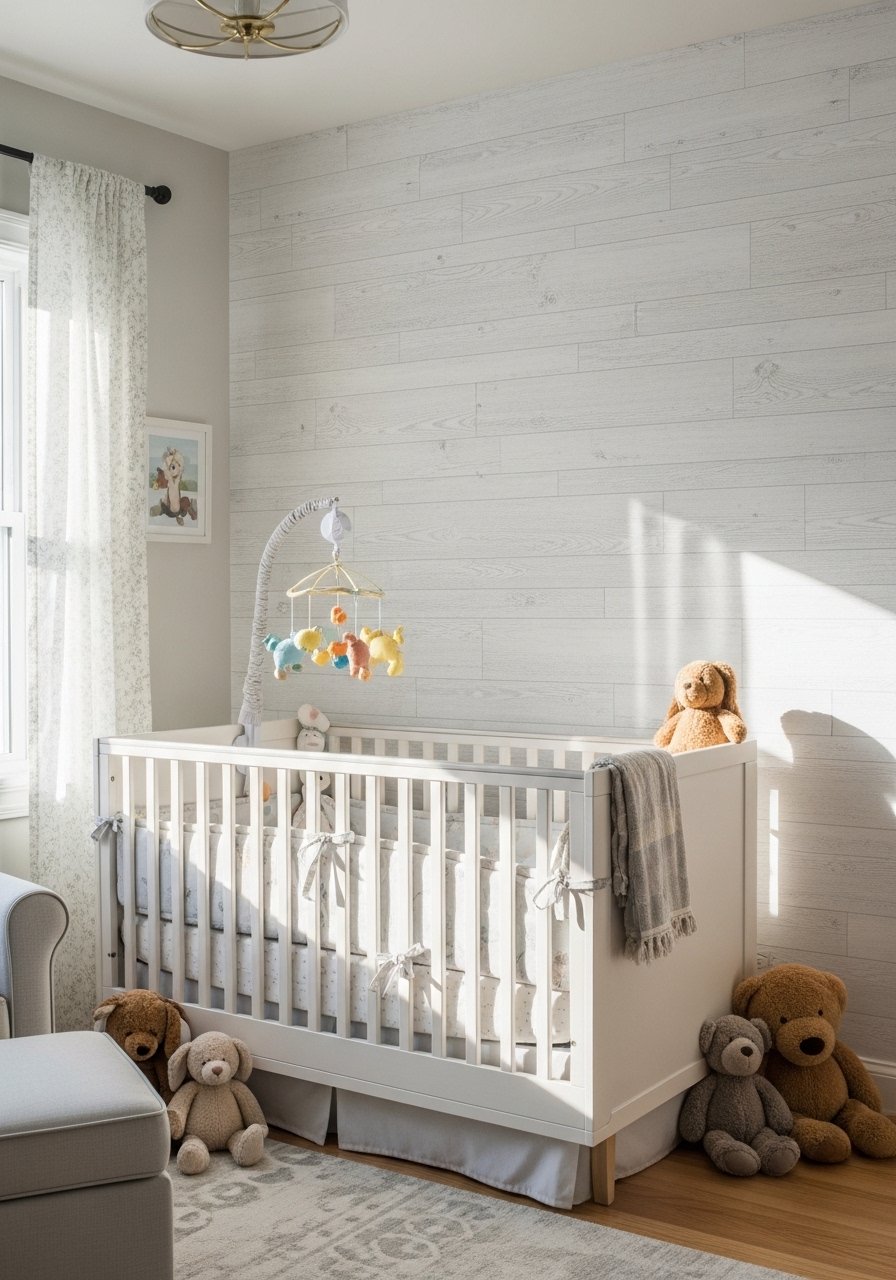
Whitewashed Wood For Nursery Calm
A soft whitewashed wood wall behind the crib added gentle texture without stealing attention from the mobile. Whitewash hides small imperfections and makes the room feel layered. I used 3×12-inch whitewashed planks that are lightweight and easy to cut. Budget around $50 to $80. A mistake parents make is using rough textures near the crib. Pick smooth finish planks and sand any edges. One detail many articles skip, keep the whitewash shade one tone lighter than your furniture for balance. Try a sample behind the rocker to watch it at night under the nursery lamp.

Office Backdrop With Floating Shelves For Video Calls
I needed an upgrade for Zoom backgrounds that looked professional but warm. A medium-tone wood wall plus two staggered floating shelves made my video frame interesting without clutter. I installed 24-inch shelves anchored into studs and used 6×48-inch planks from a peel and stick kit. People forget to test how grain reads on camera. Grain that is too busy flickers on webcam compression. I used neutral medium wood planks and kept decor sparse. One detail, mount shelves 6 to 8 inches apart for comfortable shelf styling on camera.

Playful Painted Panels For Kid's Playroom
Instead of buying expensive decals, I cut peel and stick wood into circles and triangles and painted them in a limited palette. The result looks custom and survives rough play. Use water-based paint and two coats, and seal with clear matte varnish so marks wipe off. I spent $25 on paint and used peel and stick craft wood tiles sized 6 inches across. People assume paint will chip off; sealing is the step most forget. Arrange shapes in a 3:2 horizontal to vertical rhythm so children can use the wall as a visual game.

Moisture Friendly Reclaimed Look For Bathroom
I wanted a warm vignette near open bathroom shelving without hacking tile. There are peel and stick wood products rated for high humidity. I picked a reclaimed look finish and installed it behind glass shelves. Budget varies, but expect $40 to $120 depending on coverage. A common mistake, people place them inside the shower. Avoid direct water contact. Use a moisture-rated adhesive plank like bathroom peel and stick panels and leave a 1/16-inch gap at the top near the ceiling. Test a small sample above the sink for a week to watch how it reacts to steam.
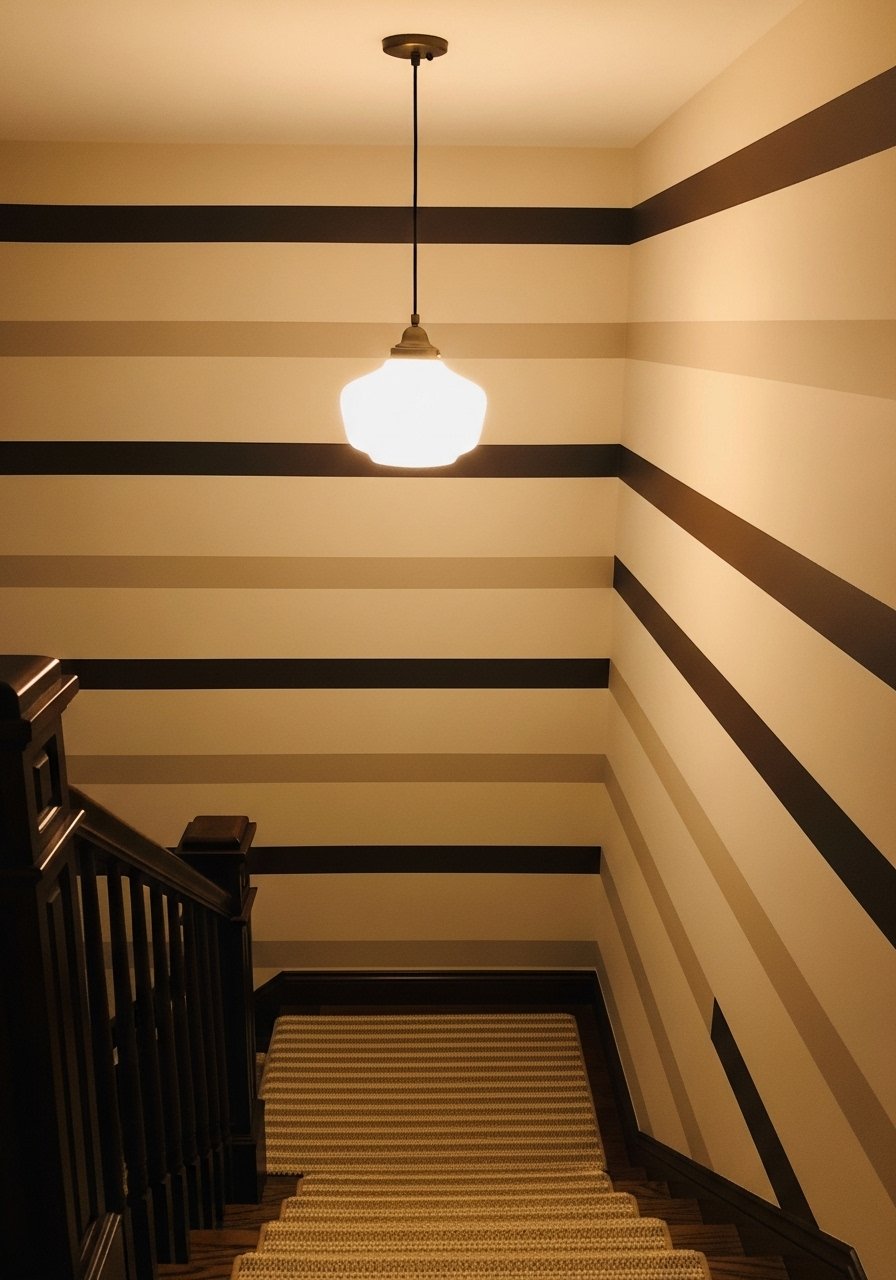
Striped Stair Landing For Instant Interest
My blank stair landing felt like an afterthought until I added alternating light and dark horizontal strips. Using two tones makes the small area feel intentional. I used 2.5-inch strips placed in a repeating pattern, alternating every 12 inches vertically. People make the mistake of mismatching strip widths. Keep them consistent and start at the middle point for symmetry. I bought thin peel and stick wood strips and measured twice before sticking. A helpful detail, mark the center of each stair riser so the pattern reads continuously from floor to landing.
Removable Herringbone For Rental Living Room
Renters, listen up. I tried a removable peel and stick herringbone wallpaper that looked like wood without the commitment. It peeled off cleanly after a year. Use 6×24-inch strips and plan for 10 to 15 percent waste for cuts. A common renter mistake is not testing adhesion on a hidden trim piece first. I picked removable wood-look peel and stick wallpaper and kept panels to a single wall so it does not overpower the room. One detail, match the pattern joints to the natural sightline, about 54 inches from the floor for a standard sofa.

Short Plank Backsplash For Kitchen Nook
I wanted warmth behind open kitchen shelving without tile work. Short 12-inch peel and stick planks made a rustic backsplash that pairs well with copper and brass. Use a high-temperature rated adhesive near stoves. People assume any plank will handle kitchen heat. Check the product rating before installing. I used heat-resistant wood plank tiles and sealed the top edge where steam hits. One practical detail, paint the wall primer color first so any gap at the edges reads intentional.

Subtle Ombre With Mixed Widths For Bedroom
I wanted a feature wall that was interesting but not loud. I used mixed-width planks and stained them from light to dark from the top down. The ombre reads subtle because the grain ties the tones together. Budget varies by stain and plank quality. The mistake is going too dramatic with contrast. Keep the top and bottom only two tones apart for subtlety. I used stainable peel and stick planks so I could adjust on-site. One detail, pre-lay the top three rows to confirm the fade before sticking anything.

Functional Cork-Backed Wood Panel For Home Office
I turned a wasted wall into a combined pinboard and accent with cork-backed wood panels. They stick like wallpaper and accept pushpins. Great for organizing and mood boards. I bought 24×24-inch panels and used them vertically behind the desk. People forget to check how pins interact with the finished surface, cork backing keeps pins secure without damaging the wood face. I used cork-backed peel and stick panels. One detail to mention, leave 1/4 inch breathing space around electrical outlets.

Brightening Laundry Room With Narrow Planks
The laundry room was dark and the narrow 2.5-inch light planks visually broadened the space. Narrow planks reflect light better than wide ones. I spent under $60 and trimmed each to fit behind open shelving. Common mistake, using wide dark boards that swallow light in a small room. I used narrow light wood adhesive planks. One detail many miss, paint the ceiling a lighter shade than the wall to enhance the brightness effect.
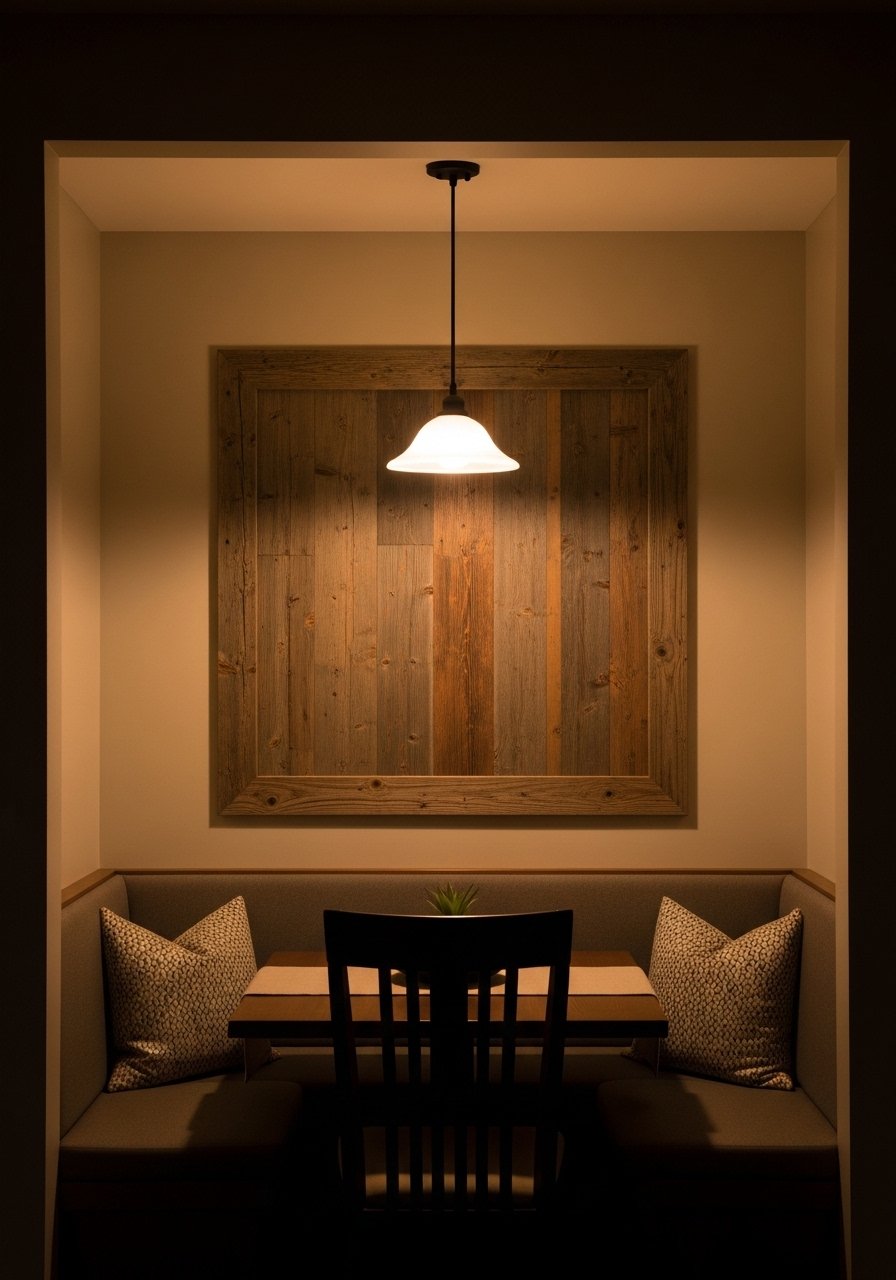
Framed Wood Alcove For Dining Nook
Framing a square section of wood behind a hanging pendant gives the look of a built-in without demolition. I cut a 36×36-inch square and finished edges with slim molding. Keep the framed area proportionate to your pendant diameter, roughly 1.5 to 2 times the pendant width. I used reclaimed-look peel and stick planks. Mistake to avoid, hanging the pendant before confirming the framed placement. I moved the pendant 3 inches to truly center the frame and the effect was immediate.

Lowboard Skirting For Studio Apartment
I added a 12-inch band of horizontal planks along the lower third of my studio walls to give the room built-in character. It reads like wainscoting but is easier to install. Keep the band at a consistent 30 to 36 inches high for a balanced look. I used thin peel and stick wood skirting strips. A mistake people make is matching the skirting to the floor exactly, which makes the design disappear. Pick a tone one or two shades darker than the floor for contrast.

Soft Curved Corner With Staggered Tiles For Loft
My loft had a sharp corner that felt harsh. I staggered small 6×24-inch tiles in a soft curve to break the edge without carpentry. The trick is to cut tiles on a slight angle and overlap the joints. Budget is low but requires patience. People try to curve large planks which makes cuts messy. I used small staggered peel and stick tiles. One detail other write-ups skip, align the top row with the sightline of the staircase for a continuous flow.

Mini Wood Sample Gallery For Guest Bedroom
I mounted 6 small 6×6 wood-slab peel and stick samples in a grid above the dresser as a gallery. It is an easy way to show material and color without obligation. This works for anyone testing tones before committing to a full wall. I labeled each square discreetly on the back so future me knew the product SKU. A mistake is not sealing the samples if they will be touched often. I used peel and stick wood sample tiles. One pro detail, leave 2 inches between each frame for breathing space.
Your Decor Shopping List
- Honestly the best $40 I have spent. Peel and stick wood planks, 6×48-inch in light oak for headboard and accent walls
- For the curtain trick and height play, 96-inch linen panels (~$30-50 per panel)
- Found these while looking for something else. Brass picture ledges, set of 2 (~$18-25) to swap art without new holes
- Cork-backed peel and stick panels, 24×24-inch for functional office backdrops
- Heat-resistant wood plank tiles for near-stove backsplashes, choose oil-proof adhesives
- Removable wood-look peel and stick wallpaper for renters, peel-off friendly
- Chunky knit throw in cream, 50×60-inch (~$35-55) to layer with wood textures
- Mixed metal picture frames set for gallery walls, vary finishes for interest
- Peel and stick craft wood tiles, 6×6-inch sampler pack for small projects and testing
- Narrow light wood adhesive planks, 2.5-inch for laundry rooms and skirting
Shopping Tips
White oak beats dark wood in 2026. Design feeds have shifted completely. White oak floating shelves look current, not dated.
Grab peel and stick wood planks that are listed as moisture rated when you plan to use them near sinks. Most products are fine for humidity but not direct water.
These removable wood-look panels peel cleanly from many painted surfaces. Test a small hidden spot first to be safe.
Curtains should puddle slightly or kiss the floor, never hang halfway up. 96-inch linen panels will work for most 9-foot ceilings and look tailored.
If you want a showpiece plant, skip five small succulents. One 6-foot faux fiddle leaf fig gives you height and visual weight with no maintenance
Frequently Asked Questions
Q: Can peel and stick wood go behind a stove or in a backsplash area?
A: Not directly in high-heat areas. Use heat-resistant adhesive planks and keep them a few inches from direct flame. Test a small sample above the counter for a week to watch how it reacts to steam and heat.
Q: Will peel and stick wood damage painted walls when removed?
A: Many modern removable products peel off cleanly. Test a scrap in a hidden area first. Renters should always use removable-rated sheets and avoid long-term exposure to strong sunlight which can make adhesive stickier.
Q: How do I avoid a mismatched color after buying online?
A: Bring a physical sample when you can, and test on a poster board in your room lighting. Matches hit about 90% right off the bat, but that last bit needs your room test.
Q: What plank width looks best in small rooms?
A: Narrow planks, around 2.5 to 4 inches, reflect light better and read less busy in small rooms. Wide planks work in larger spaces but can overwhelm a tiny wall.
Q: Can I mix peel and stick wood with real wood shelves visually?
A: Yes, but check tones and finish. Keep a one to two shade difference between the wall planks and shelves so each element reads separately. This avoids the all-one-surface look that flattens the room.
Q: How do I plan for expansion and gaps?
A: Leave a tiny gap, about 1/8 inch, around the perimeter to allow for seasonal movement. Use thin shoe molding to conceal the gaps for a finished look.
Q: Are there renter-friendly testing methods for wall projects?
A: Absolutely. Try a poster board sample taped to the wall, or a small removable patch behind furniture. Removable peel and stick wallpaper is also a renter-friendly route.
Q: What tool makes cutting planks easiest for a DIYer?
A: A utility knife works for thin peel and stick products. For thicker planks, a jigsaw or circular saw gives cleaner cuts. Score and snap for thinner planks to avoid splintering.
