

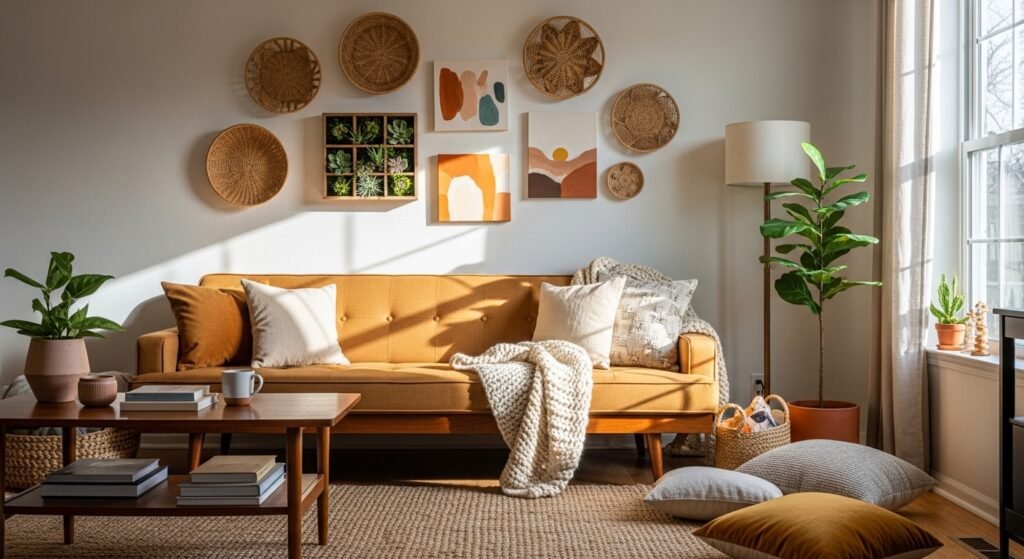
My living room had nice furniture and decent lighting but it still felt like a waiting room. Took me embarrassingly long to figure out it was missing texture. Every surface was smooth, every color was flat, and nothing invited you to actually sit down. This list is a mix of quick fixes and mini projects I actually did, most of them cheap enough to try without committing to a full redo.
These ideas lean modern farmhouse with a touch of boho. Most items are under $50, with a few splurge pieces around $100-150. Works for living rooms, bedrooms, small entryways, and any awkward wall that needs a personality boost.
Thrift Frame Monogram for Entryway Cozy
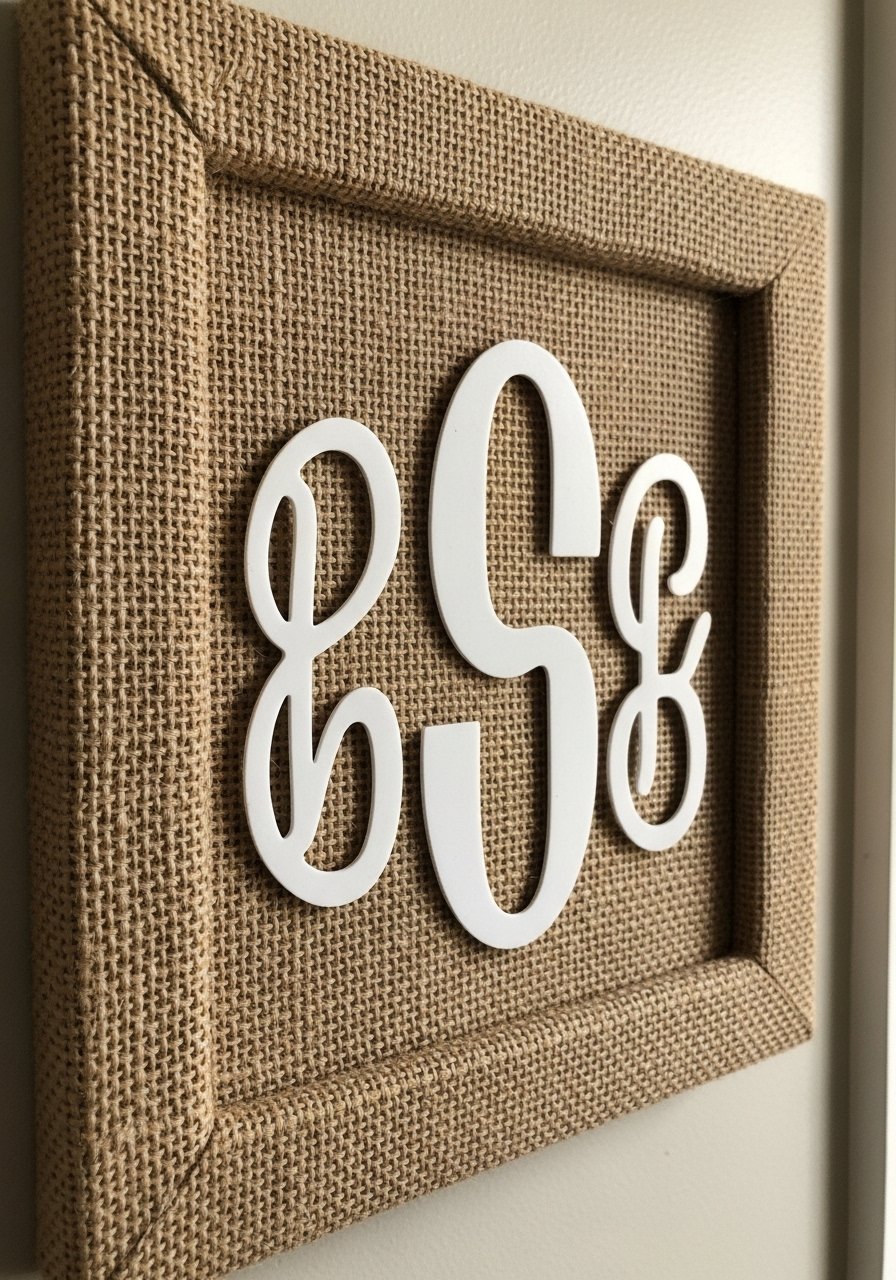
I rescued tired frames from Goodwill and covered the backing with burlap fabric to make a monogram wall for my entry. Use thrift store frames cut to 12×16 inches and glue fabric with Mod Podge for under $10 total. I used a vinyl letter cutout inside to keep it clean. Hang three frames in an odd-number cluster, spaced 4-6 inches apart, and center the grouping about 57 inches from the floor. One common mistake is making the monogram too small. Make the letter fill at least 60 percent of the frame for real impact. Vinyl letter sticker pack is an easy buy.
Hand-Painted Abstract Canvas Trio for Living Rooms
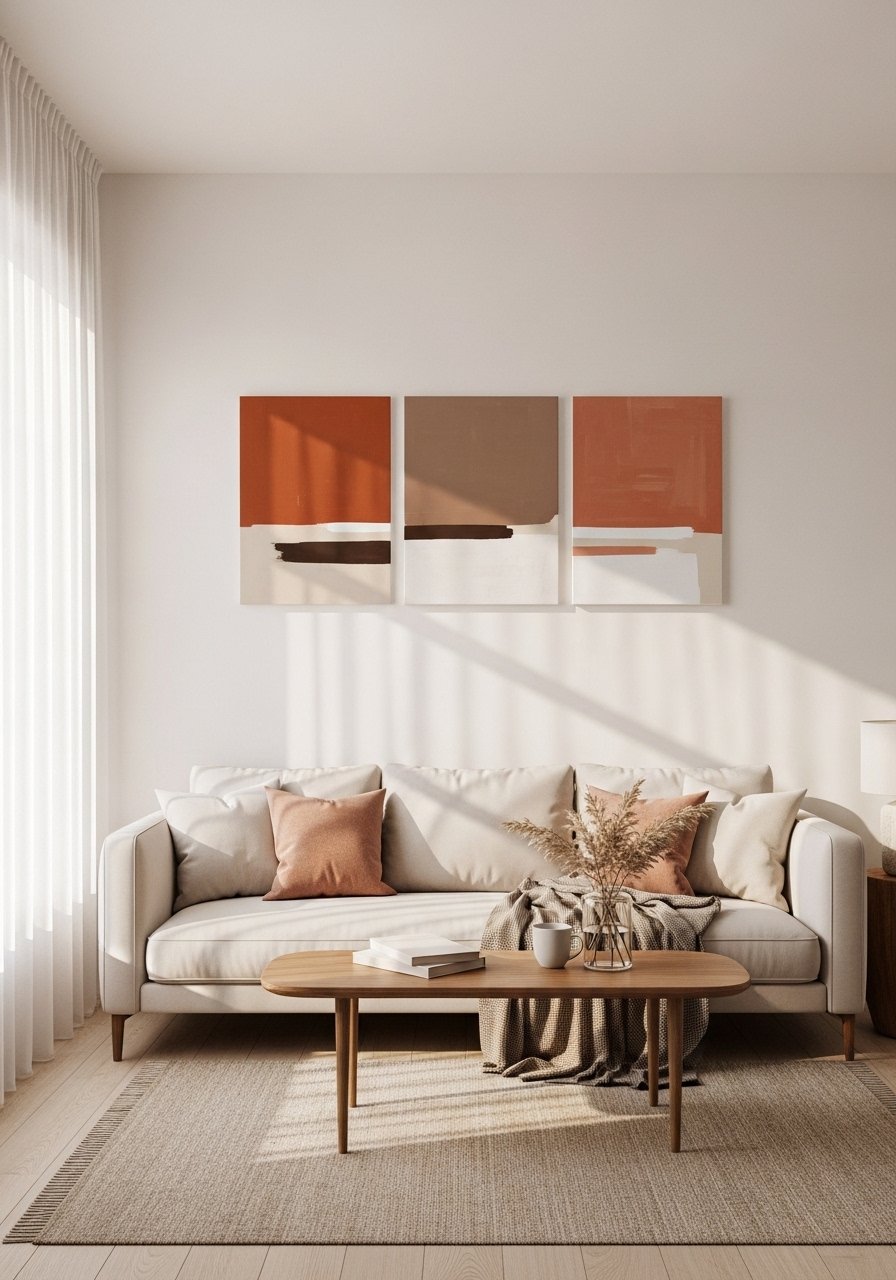
I bought three blank 16×20 canvases and painted them with just three colors to avoid chaos. Hand-painted abstract canvas trios fill a wall without looking like printed stock. Use mushroom, terracotta, and cream for a grown-up palette. Most folks nail wall refresh for under 20 bucks a pop. Keep each canvas to 3-4 shapes and repeat a color across all three to tie them together. A mistake is overworking small canvases. If you have a large wall, stagger the trio with 4-6 inches between each. Basic acrylic paint set got me started.
Woven Basket Cluster Boho Texture Wall
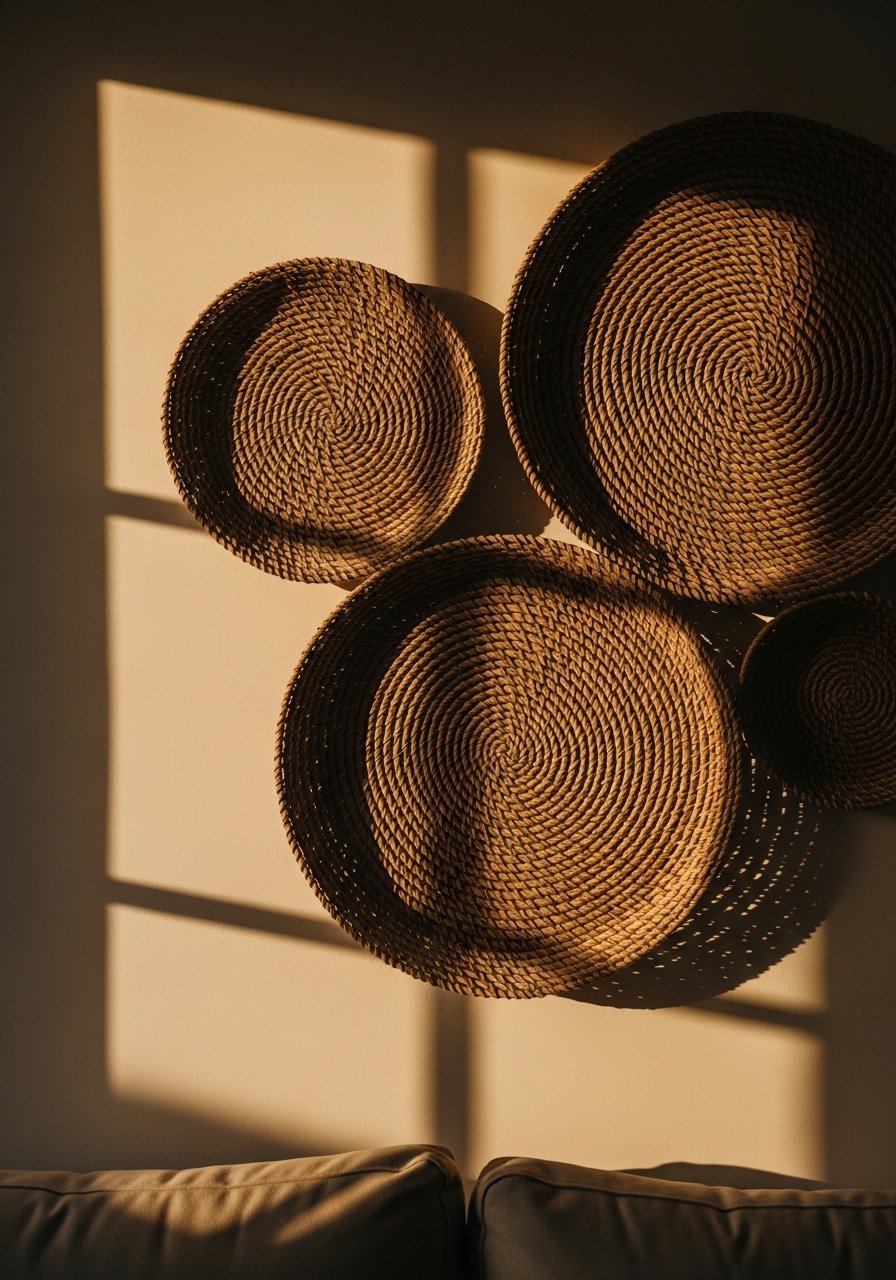
I learned that texture beats a glossy print most days. A cluster of woven baskets adds depth and is renter-friendly when you use command hooks. Use three to five baskets, odd numbers only, and space them 4-6 inches apart for rhythm. Choose one large 18-inch basket flanked by two 12-inch ones for balance. Overdoing pattern and color is a mistake. Stick to natural tones for continuity. If you worry about nails, damage-free command hooks saved my deposit and my walls.
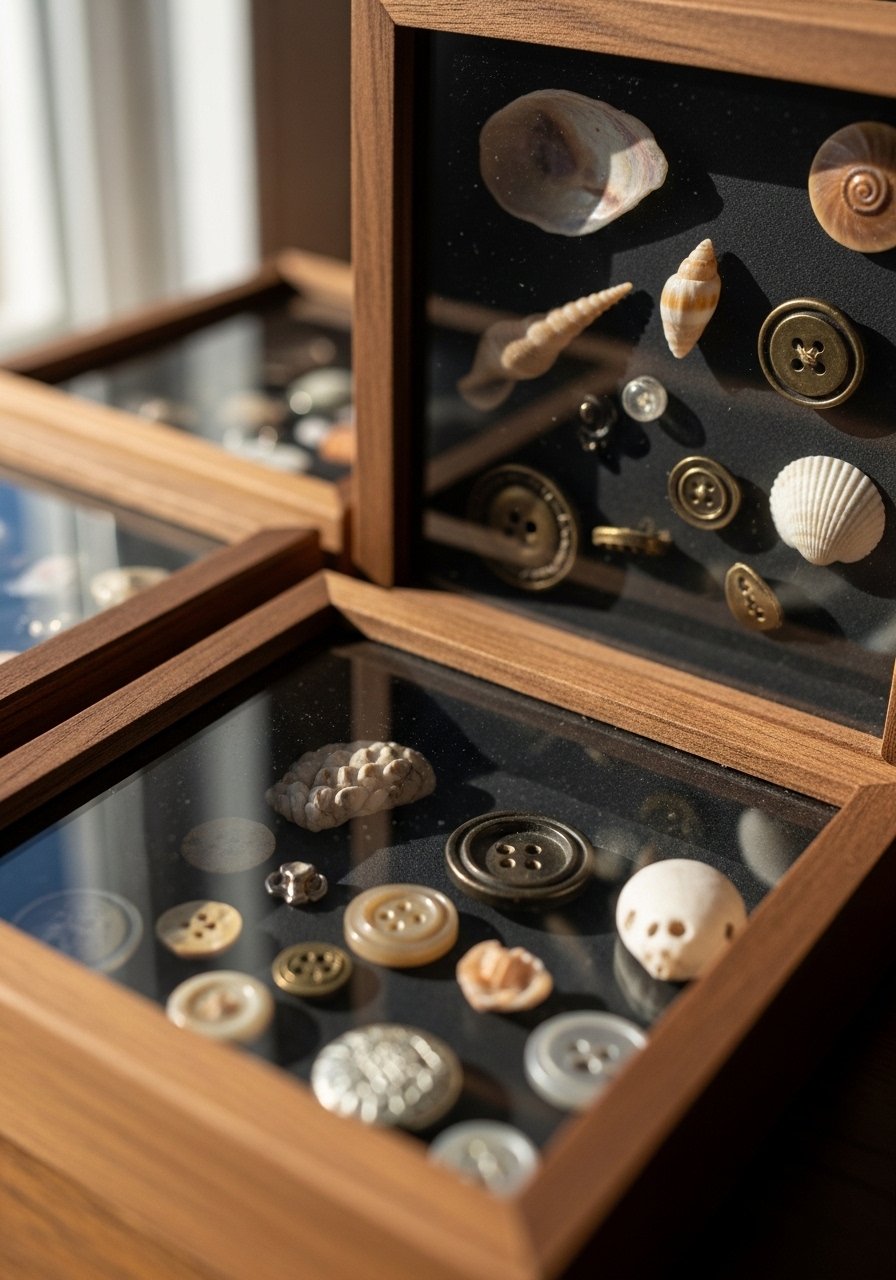
Faux Succulent Shadow Boxes for Small Walls
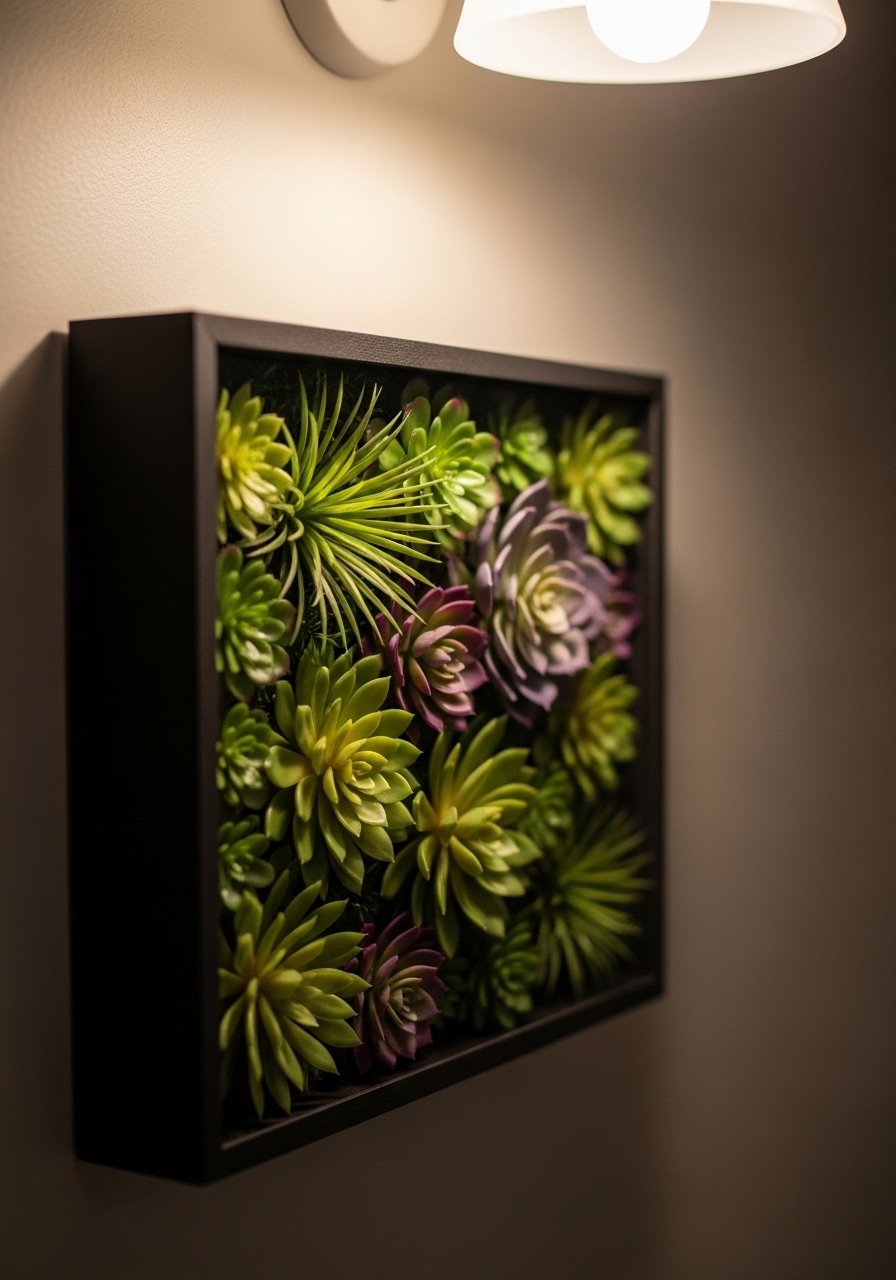
I needed greenery on a narrow wall with zero sunlight. Faux succulent shadow boxes are 8×10 size friendly and sit within small gaps that nothing else fits. Hot glue faux succulents in clumps using dots instead of covering every inch. One swap I learned is to use matte frames instead of glossy ones so the plants look more real. Over half of renters skip anything needing a drill. That is why I used adhesive gallery strips instead of screws. 8×10 craft shadow box worked perfectly.
Wood Slice Burned Rings Rustic Accent
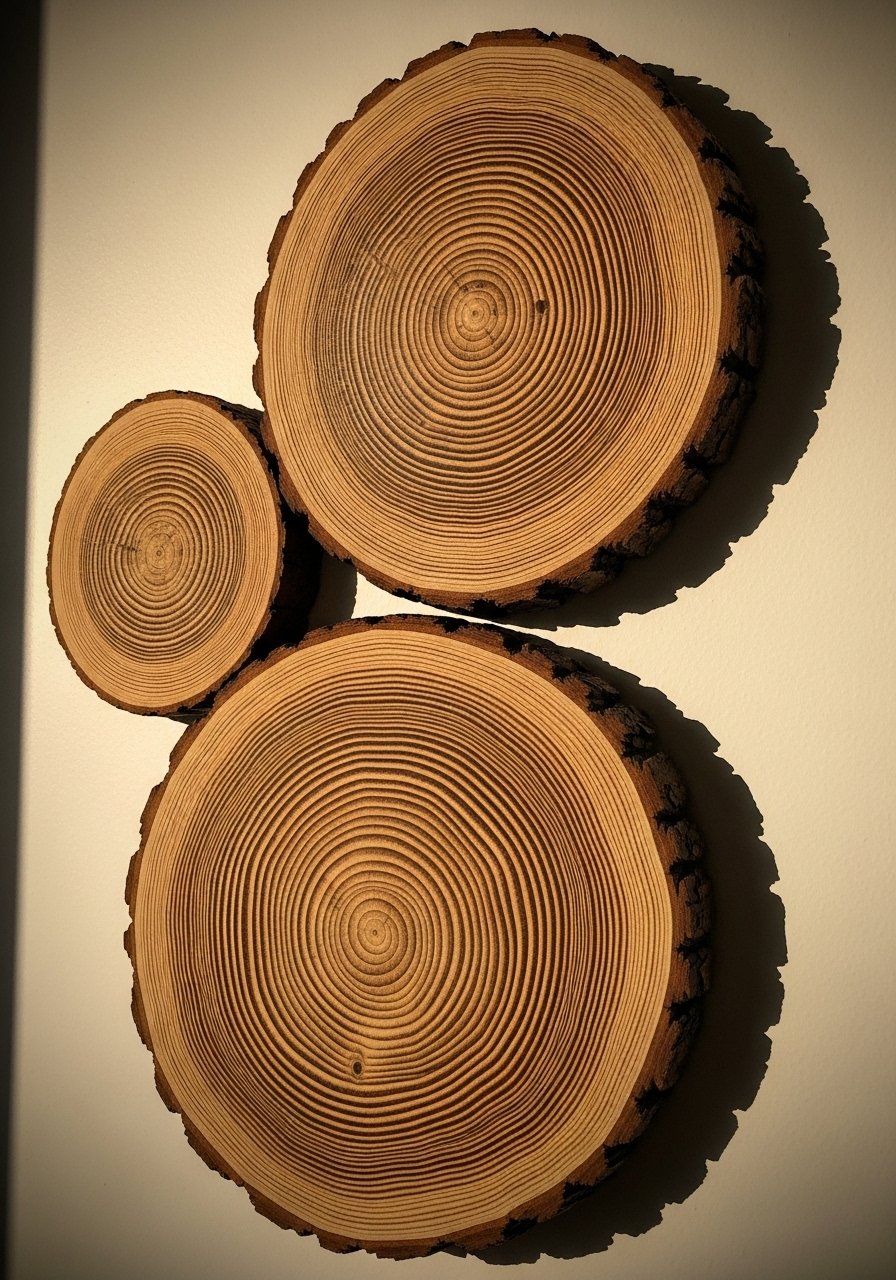
I grabbed a few 12-inch wood slices and used a wood burner to trace the rings and then inked a small phrase on one. Wood slice art looks custom but costs almost nothing if you source scrap wood. Hang three in a triangle and keep them 3-4 inches apart, or they read as a random scatter. A common mistake is making each slice the same size. Mix 10 to 12-inch rounds for organic scale. Wood burning kit and a pack of pre-cut slices sped this up.
Toothbrush Galaxy Art for Kid Bedrooms
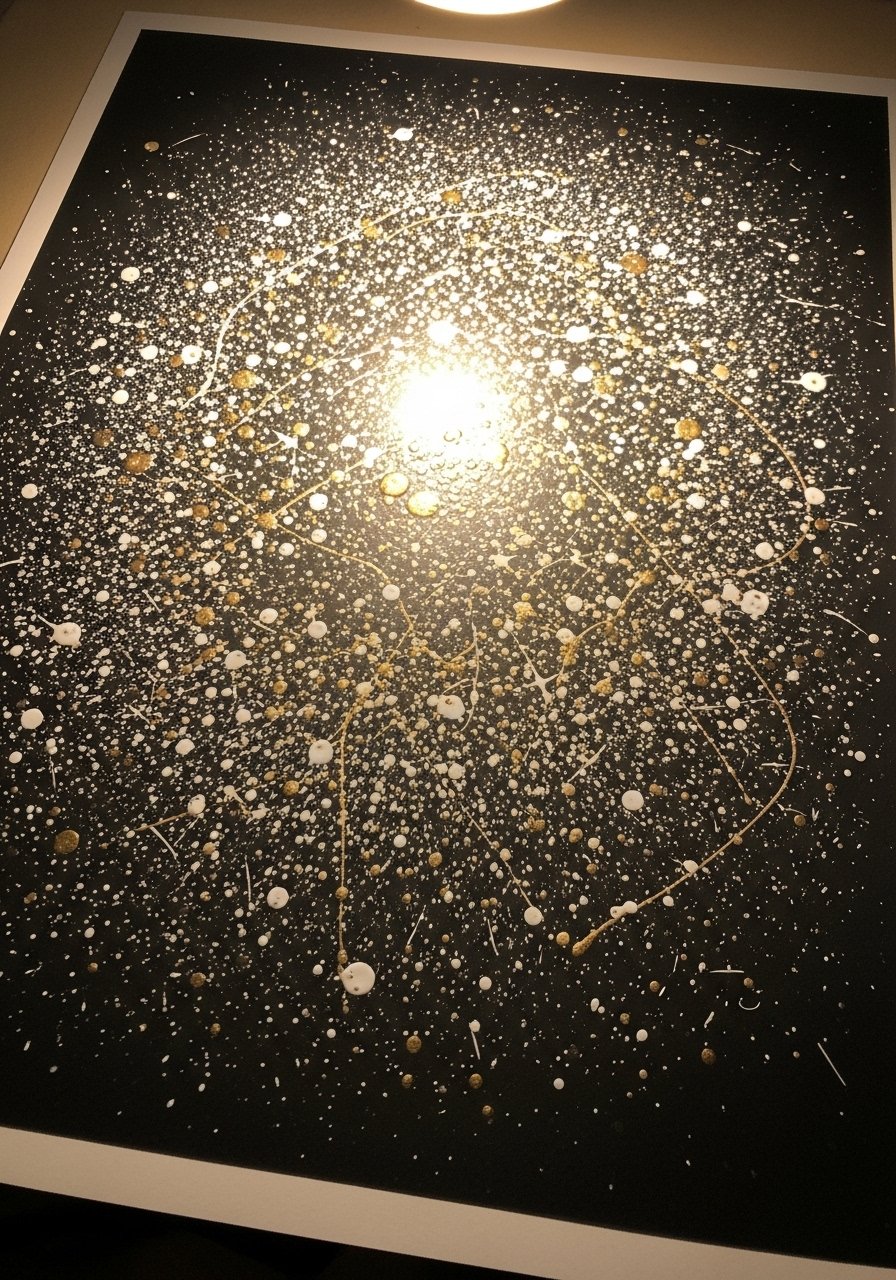
My son painted a galaxy with a toothbrush and it looked way better than any poster I could buy. Use 11×14 black paper, flick white and a tiny bit of metallic paint with an old toothbrush, then add a few painted planets with a small round brush. This is cheap and quick, perfect for kids. Mess control is the trick. Lay down butcher paper and wear an apron. Another common mistake is overcrowding the stars. Keep splatters light and let the negative space breathe. Black sketch paper pad is a durable base.
Four Seasons Finger Tree Prints for Hallways
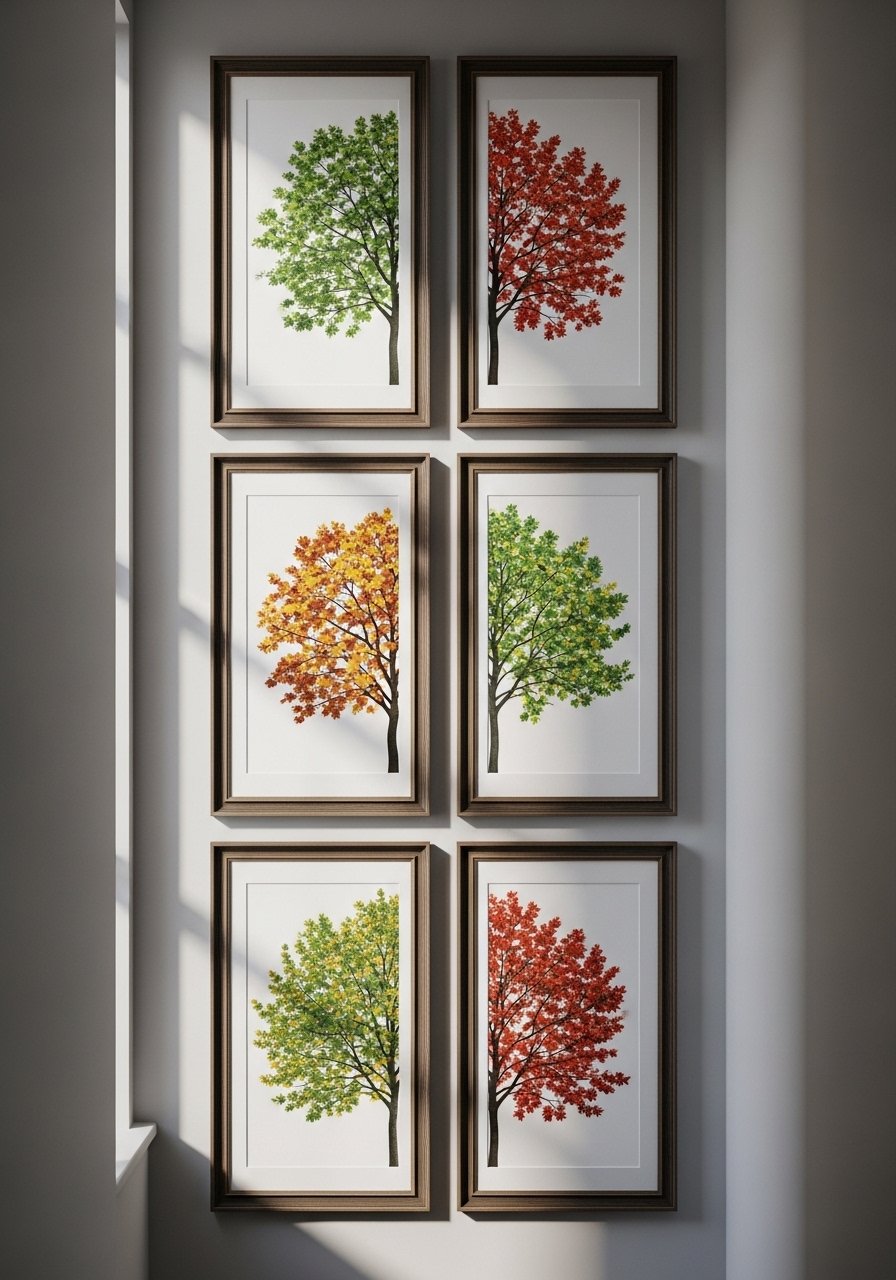
I made four 9×12 tree prints, one per season, using finger paint and simple cutouts. It is the kind of project you can swap out seasonally and it actually gets attention. Use neutral tree trunks and change leaves in sage, rust, gold, and bare twig for winter. The secret detail most people skip is labeling each print on the back with the month it goes up. A mistake is mixing scales. Keep all frames to the same 9×12 size and hang them centered at 57 inches for consistent sight lines. 9×12 frames pack keeps costs low.
Decoupaged Fabric Shelf Art Industrial Vibe
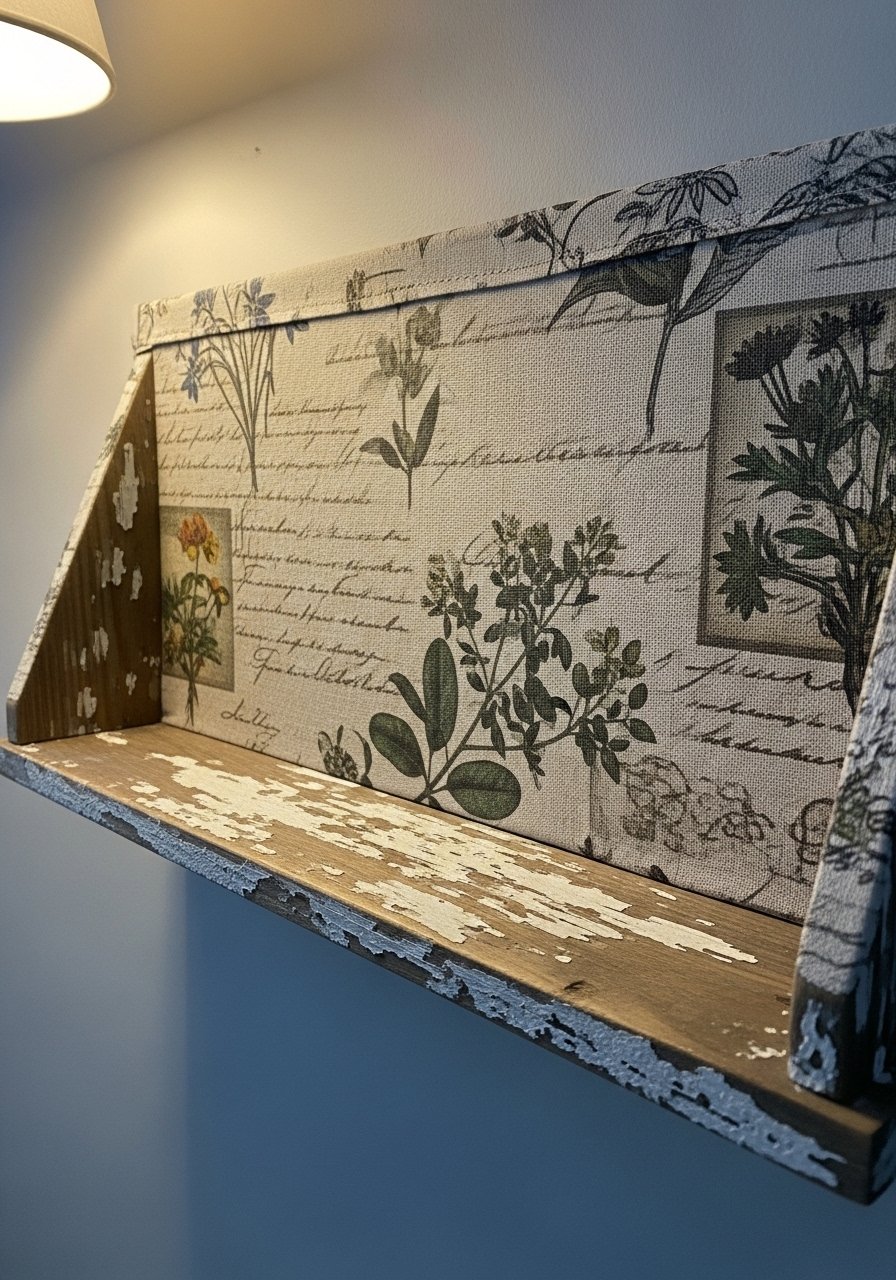
I turned a thrifted shelf into wall art using decoupaged linen scraps. Cover the flat shelf backing with fabric and seal with Mod Podge, then hang the shelf horizontally as a picture ledge. It reads as crafty, not cheap, when you choose muted linens. One detail to try is lining the inside edges with matching trim for a finished look. People often forget to prime the wood first, which leads to bubbling. Sand lightly and use an adhesive primer. Mod Podge sealer holds everything in place.
Snowflake Twig Pallet Frame for Holiday Walls
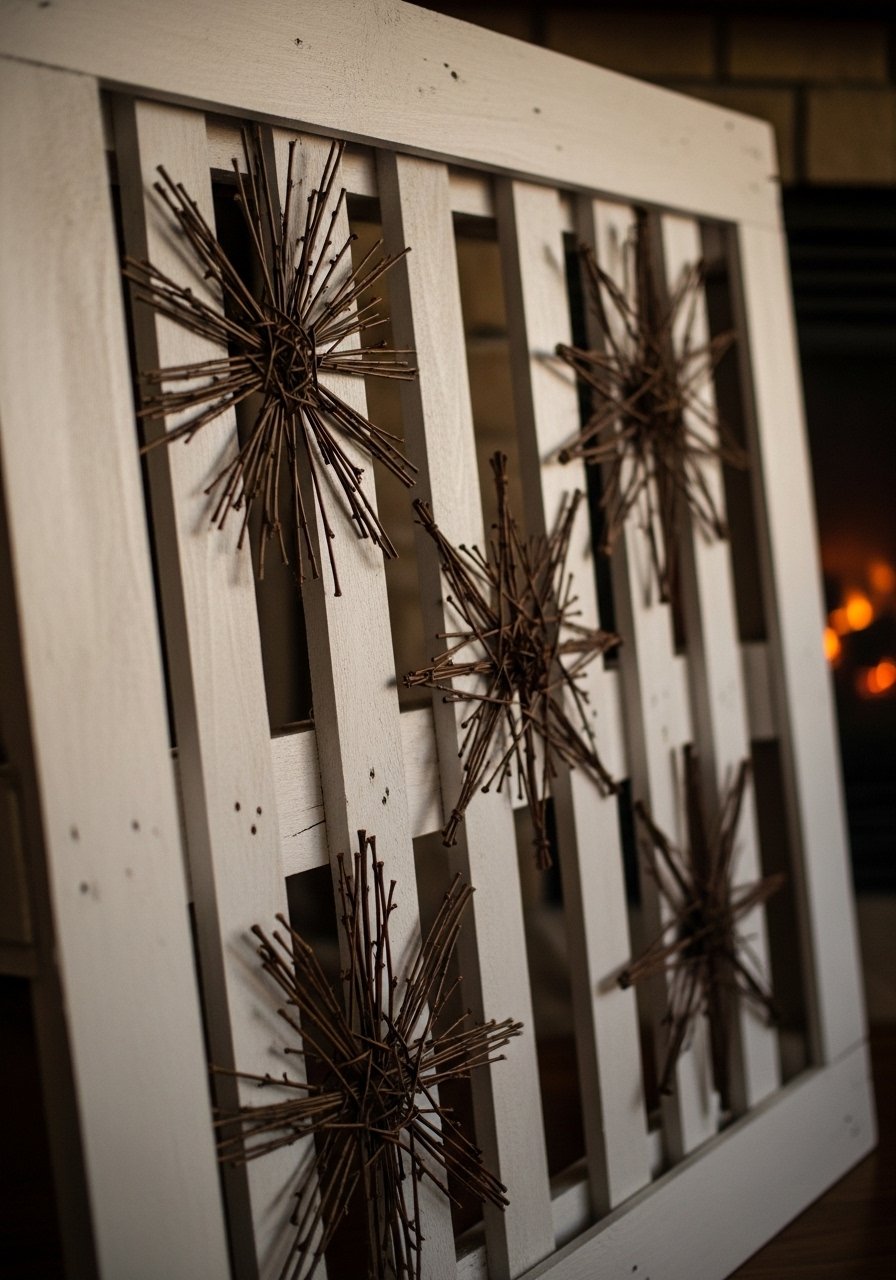
I made a winter focal piece by painting a 24×36 pallet frame white and gluing twig snowflakes inside. It scales up for over-mantel impact and feels handcrafted without being holiday-cheesy. Use small twigs and press them flat before gluing to the pallet. A mistake is using twigs that are too thin. Pick twigs with some width so you get shadow and texture. If you hang this with command picture hanging strips, it can be renter-friendly for the season. 24×36 pallet picture frame fits perfectly.
Paper Mosaic Mini Art for Narrow Spaces
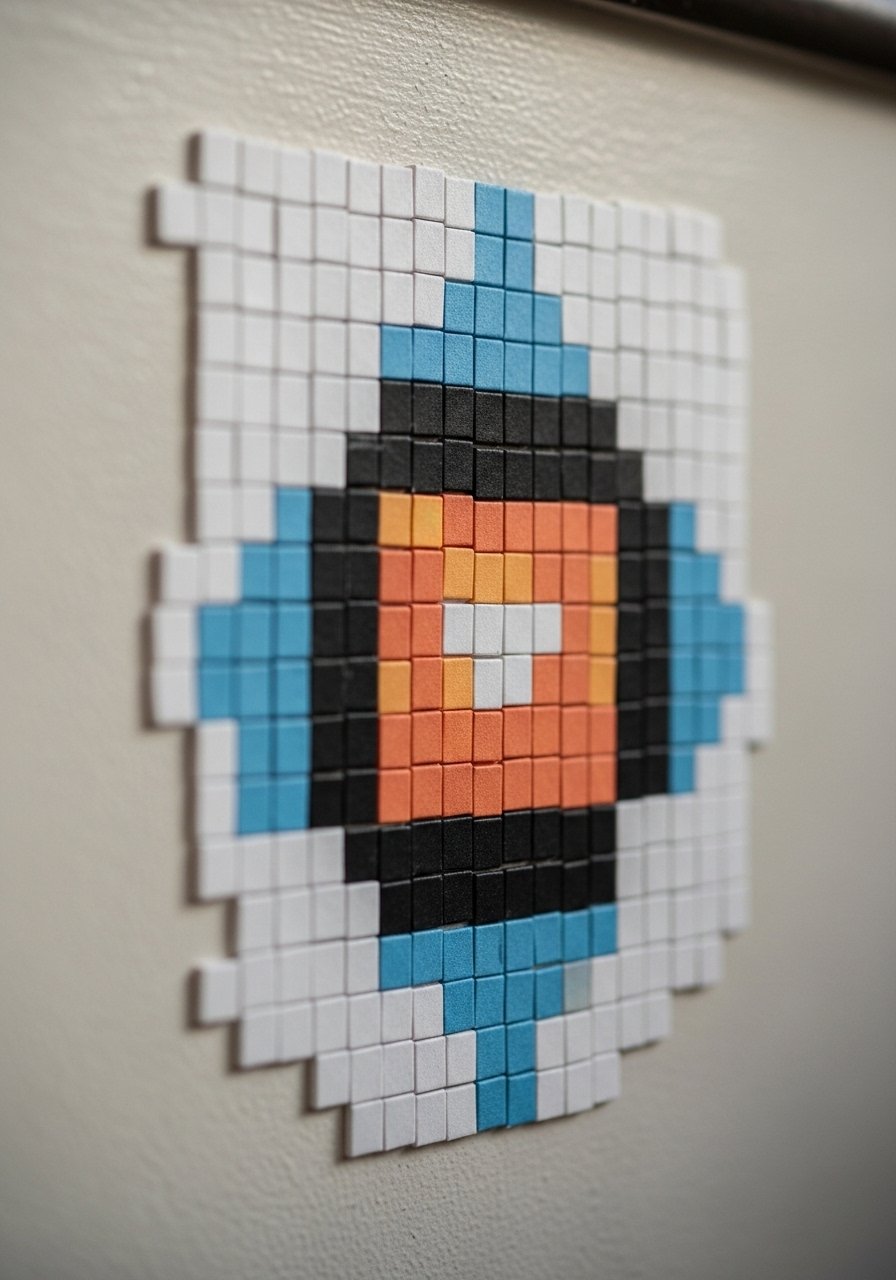
For a narrow stair wall I made three 8×10 paper mosaics using colored paper squares. Tiny tiles let you work with color without the mess of grout or tile. Glue 1-inch squares inside a simple shape and keep a 1/4-inch margin to frame the mosaic visually. A common mistake is using too many colors. Limit yourself to three shades and repeat them across pieces. These are cheap and lightweight so command strips will hold them. Colored paper pack keeps everything coordinated.
Rainbow Crepe Paper Texture for Playrooms
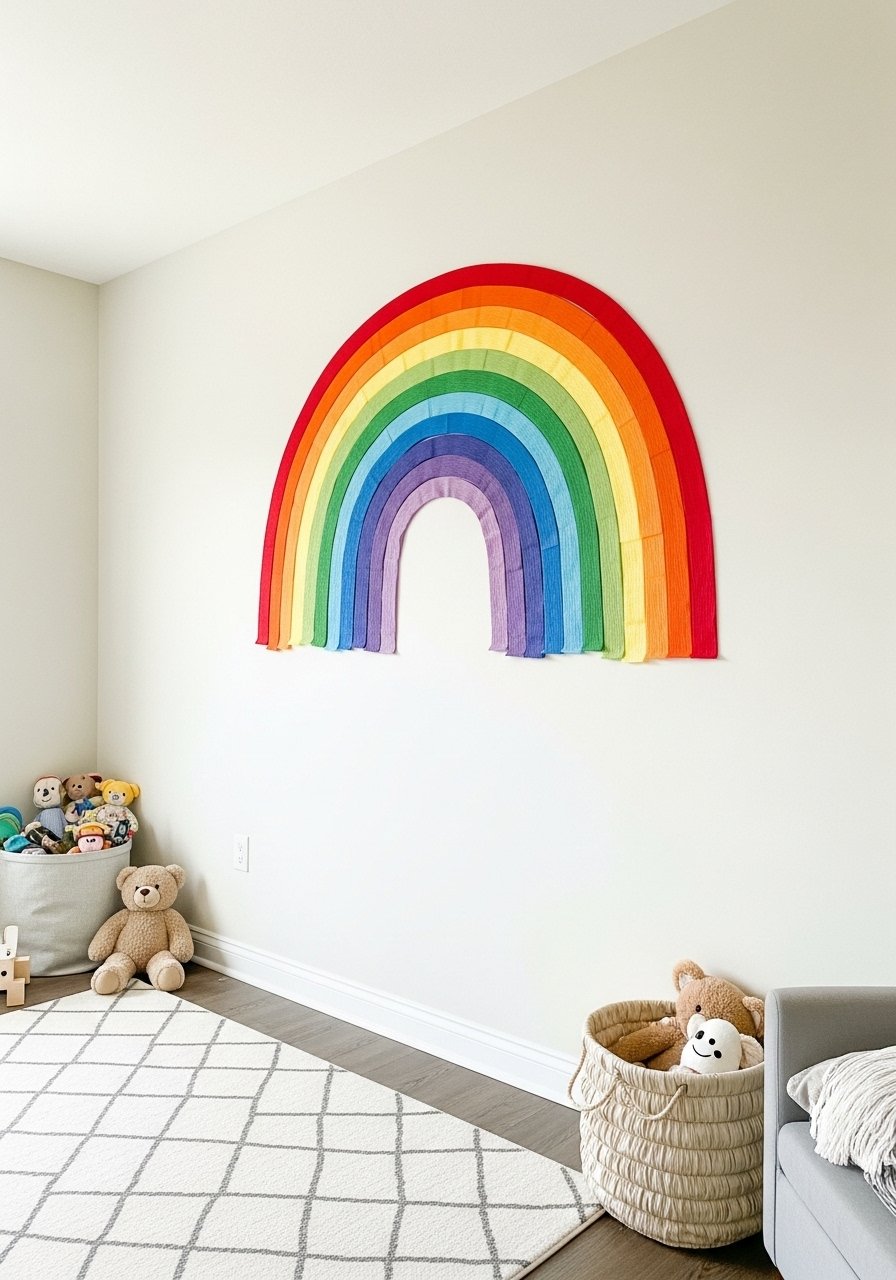
I used crepe paper strips to make a tactile rainbow on a playroom wall. Crepe paper creates soft folds and texture without weight. Cut 12-inch strips and glue them in layered arcs on a 12×18 paper base, then frame or hang as-is. The trick that makes it look intentional is alternating strip widths and keeping three colors maximum. Kids will touch it, so glue well or laminate the top layer. Most folks nail wall refresh for under 20 bucks a pop, and this was one of those wins. Crepe paper rolls are inexpensive.
Custom Light Switch Plate Decals for Details
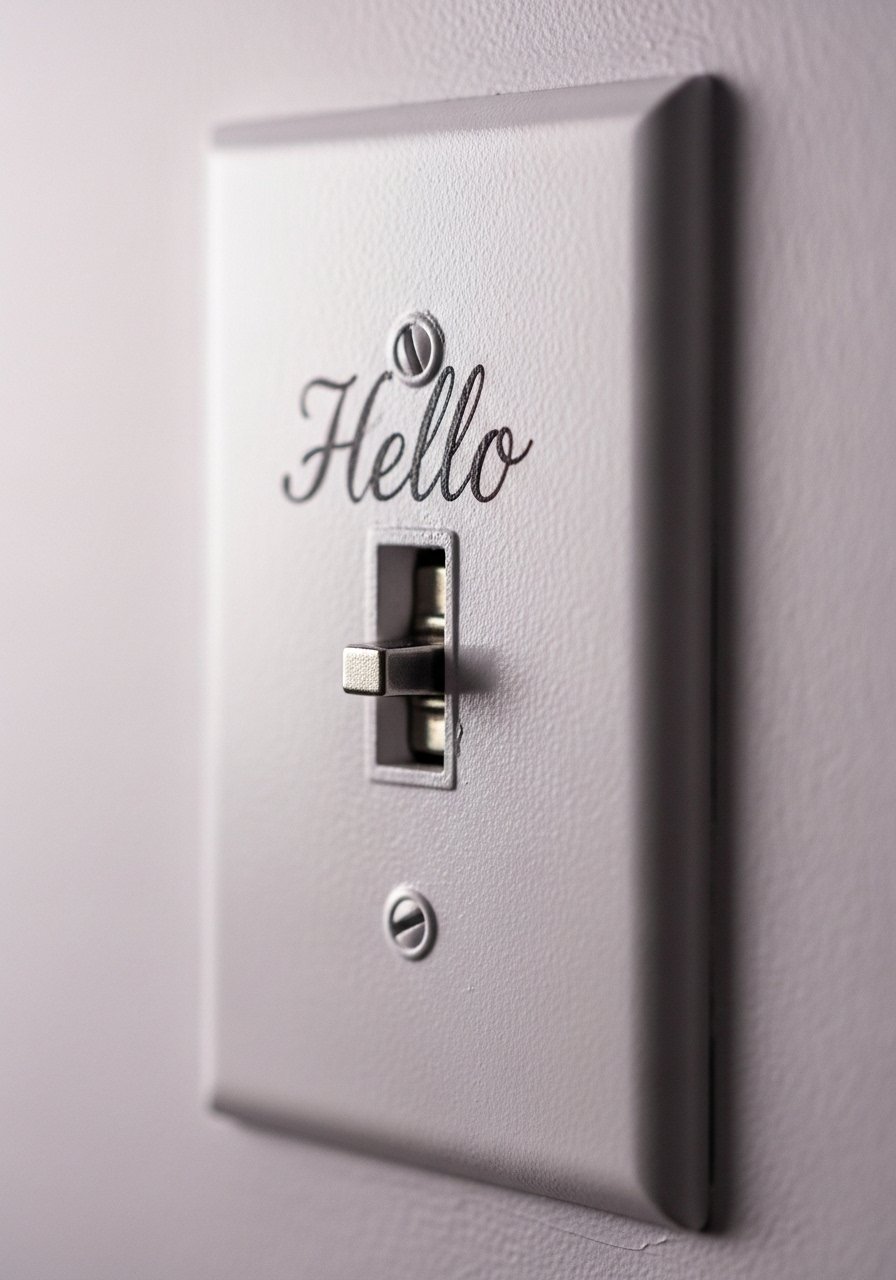
I replaced boring switch plates with custom decals and it fixed so many tiny blank spots. Print or buy peel-and-stick vinyl decals sized for standard switch plates and smooth them on. This is a one-minute upgrade that makes a small wall feel thoughtful. A common mistake is using thick decals that lift at edges. Pick thin matte vinyl for a seamless look. If you rent, choose removable vinyl so you can peel it off. Peel-and-stick vinyl sheets are easy to cut to any design.
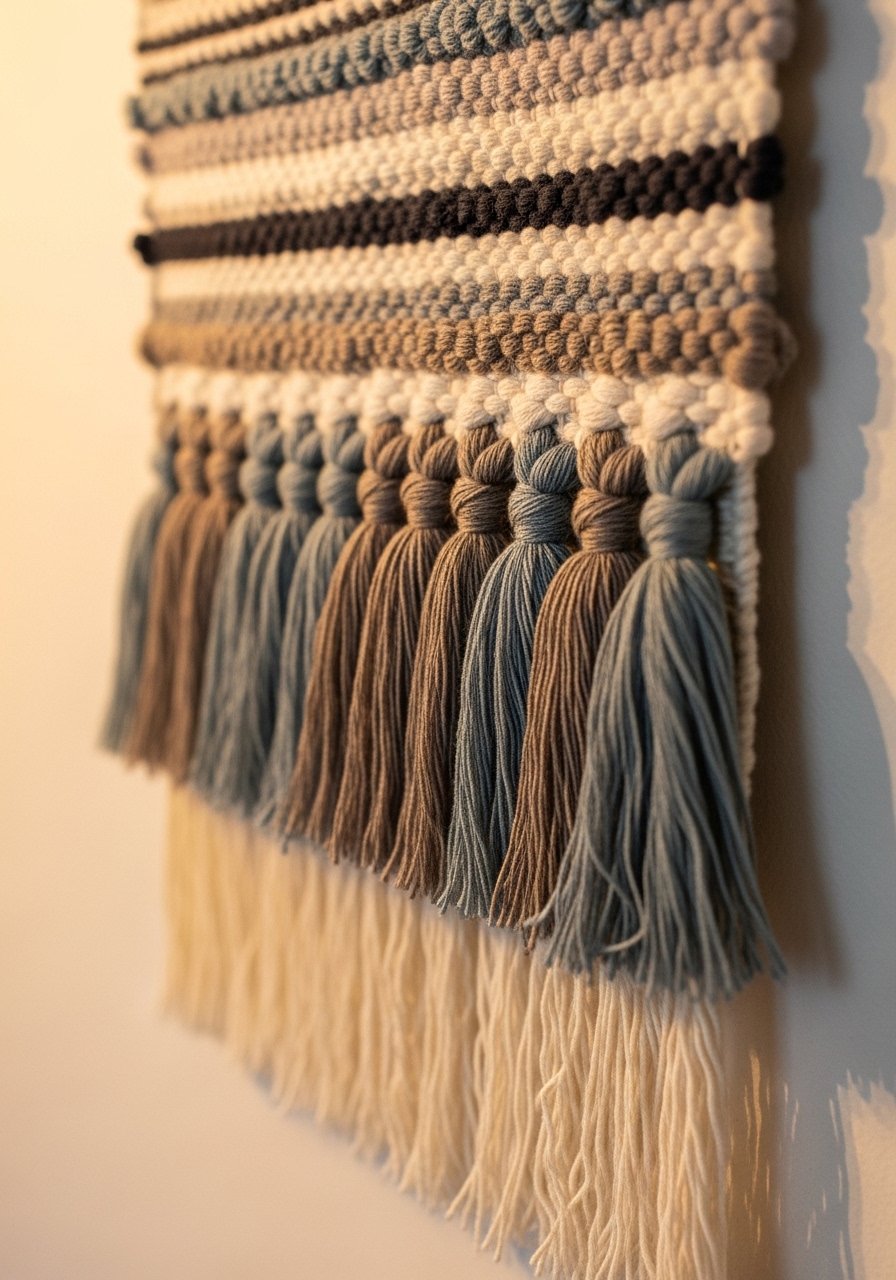
Layered Neutral Macrame Wall Hanging for Bedroom
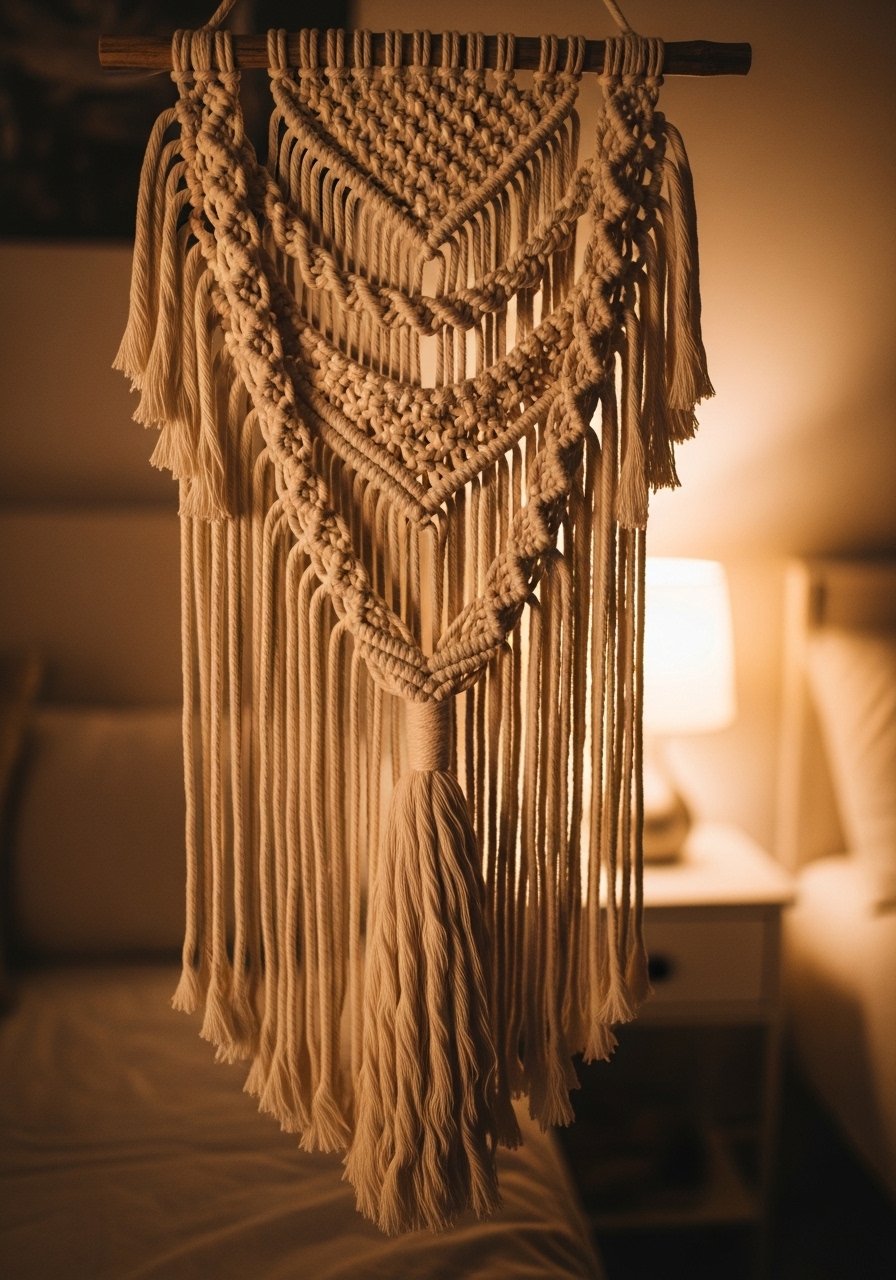
I tried macrame once and ended up making a layered neutral piece that sits above my bed. Choose cream cotton rope and make two panels, one 20 inches wide and a larger 30-inch piece below it. Layering different lengths gives depth without color drama. A common error is using ropes that are too thin so the piece looks weak. Use 3-5 mm cord for a sturdy look. Hang at eye level and pair it with a small woven basket cluster to the side for texture contrast. Cotton macrame cord is the right weight.
Framed Fabric Collage Modern Farmhouse
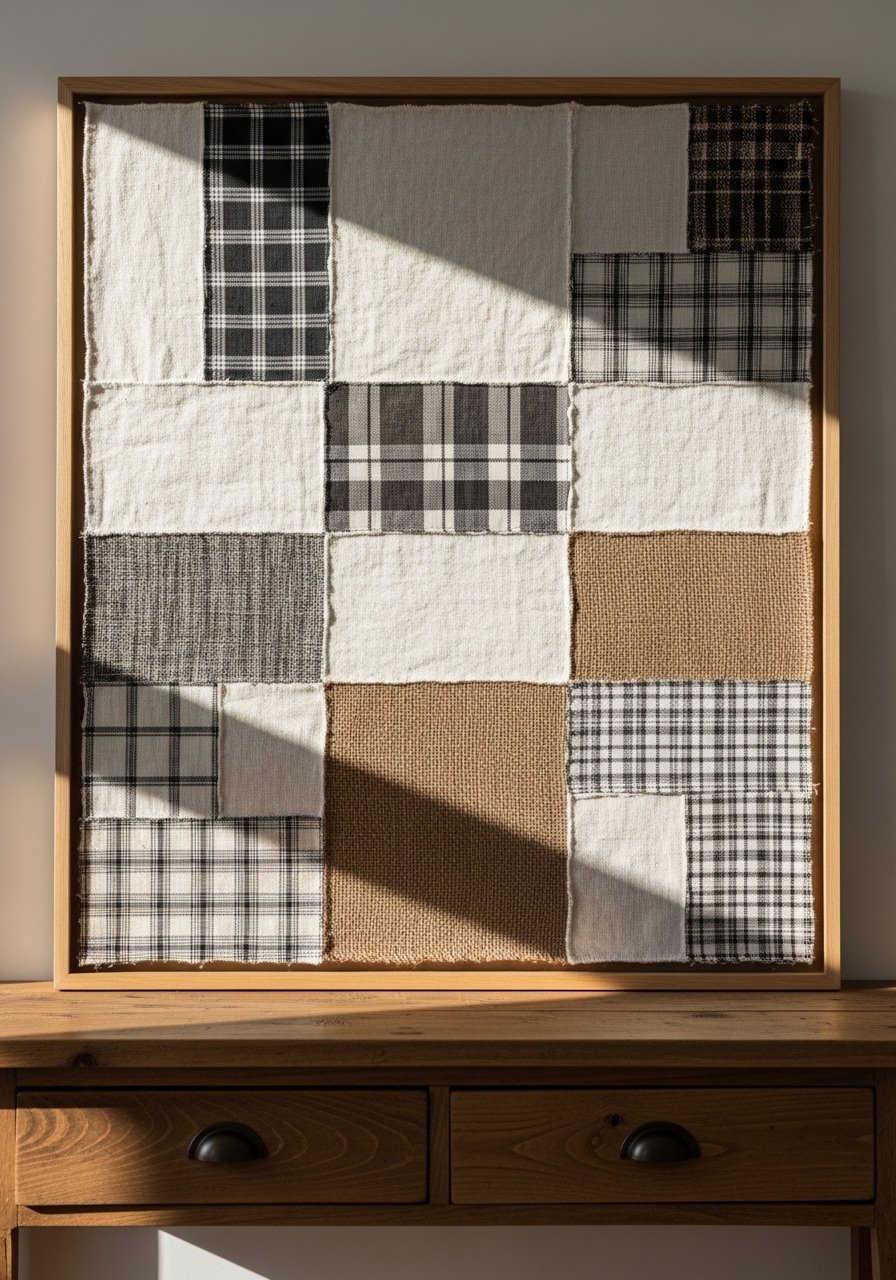
I framed scraps of linen, plaid, and burlap into a modern farmhouse collage. Cut each fabric to 5×7 and mount on a neutral mat inside 8×10 frames for a tidy grid. The detail that makes it look professional is matching the edge spacing at 1/2 inch across all frames. Too many fabrics or bright prints will look chaotic. Keep to a 3-color palette and repeat one pattern across the set. 8×10 frames set made hanging the grid painless.
Cork Board Map Pin Art for Home Office

I covered a backing board with cork and glued a simple continent outline, then added pins to mark meaningful places. The result is personal and lightweight enough to reposition. Use thin map outlines and pins with small flags for legibility. A mistake is using large pins that obscure the map. Opt for tiny map pins and keep label tags small. Hang this at eye level above a workspace and swap pins as you travel. Cork backing rolls are easy to cut to size.
Painted Vinyl Record Wall Cluster Vintage Corner
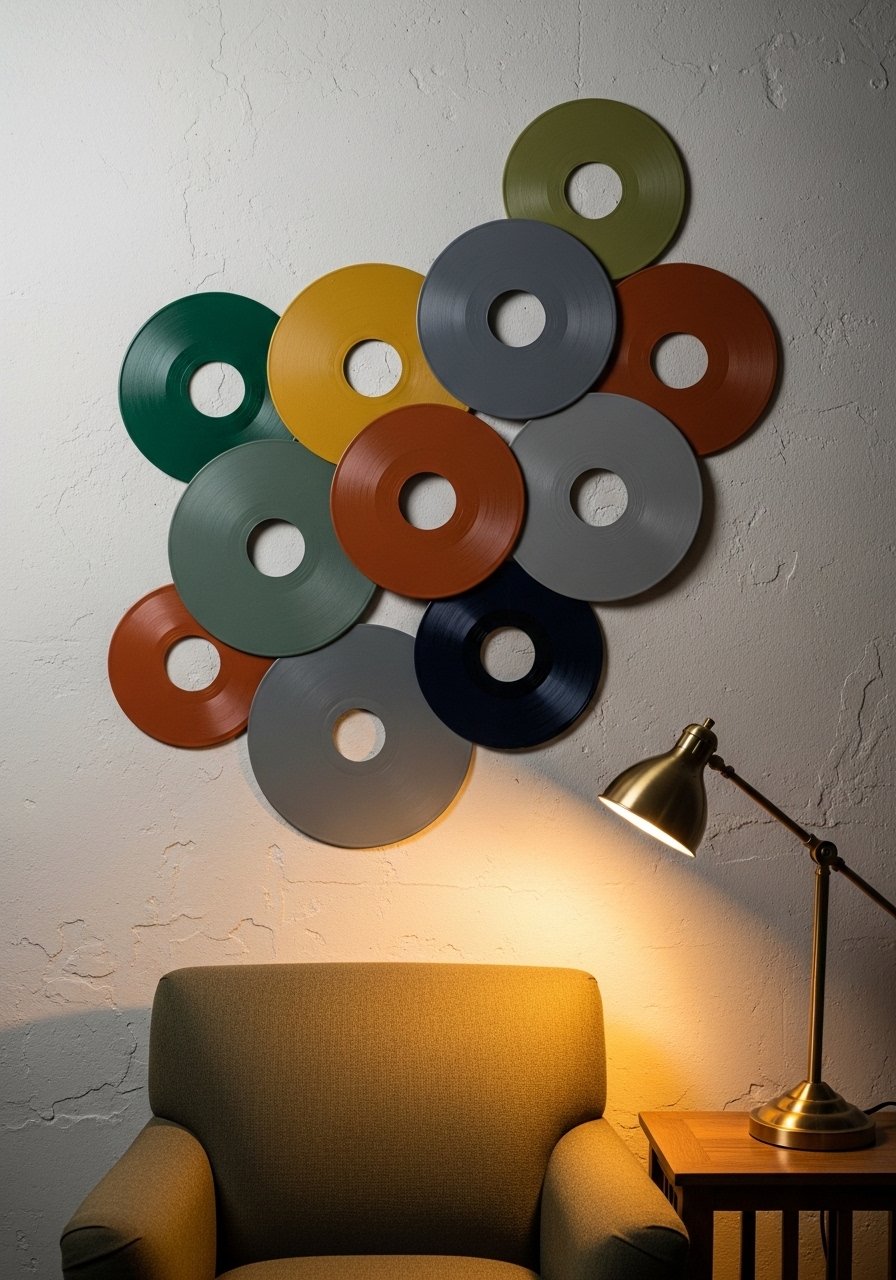
I painted old vinyl records in matte colors and grouped them in an offset cluster for a vintage-meets-modern look. Use 10-inch records and paint the fronts only, keeping the edges raw. Hang them in odd numbers and stagger heights by about 3 inches. Avoid high gloss paint which reads cheap. For renters use removable mounting squares at the back. The secret detail is to leave one record mostly black to anchor the cluster visually. Matte spray paint set gave me the finish I wanted.
Wooden Bead Garland Over Mantel Cozy Rustic
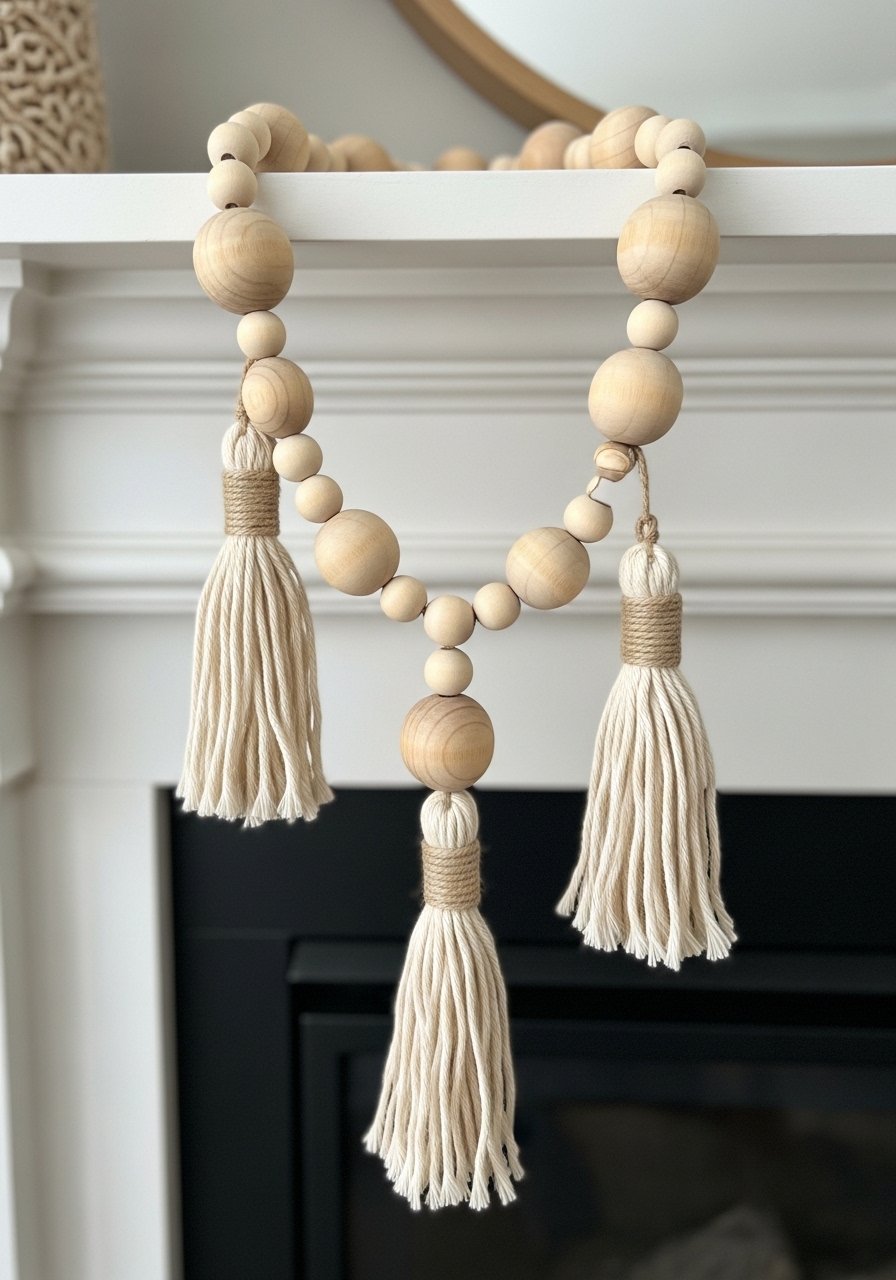
I stringed wooden beads on a thick cord and draped the garland across the mantel for an instant rustic feel. Use 20-25 mm beads and tie a tassel at each end to finish it. A mistake is using tiny beads that disappear on a large mantel. Bigger beads weigh more and drape better. Layer it over a framed print or a low stack of books for scale. Wooden bead pack comes with enough to make two garlands.
Stenciled Chevron Accent Panel for Entryway
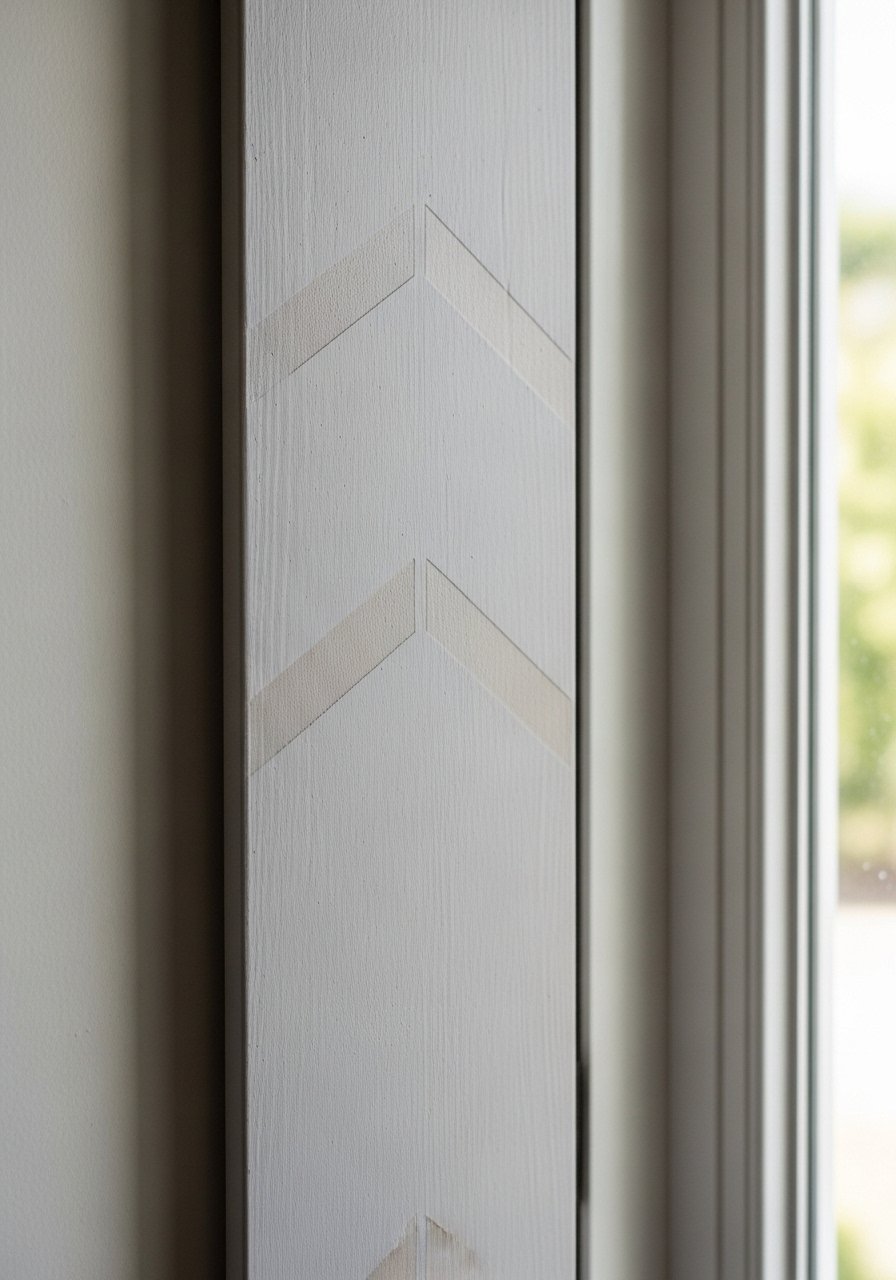
I stenciled a narrow wood panel with a chevron pattern and hung it vertically to lengthen my entryway. Use a 6×24 inch panel and a foam pouncer to keep edges crisp. Pick two colors and maintain a 70/30 dominance so the pattern reads subtle. A common mistake is using tape that moves while you paint. Hold the stencil firm and work in thin layers. Hang the panel centered at 57 inches for the best sight line. Chevron stencil kit includes sizes that fit narrow walls.
Washi Tape Geometric Gallery for Renters Minimalist
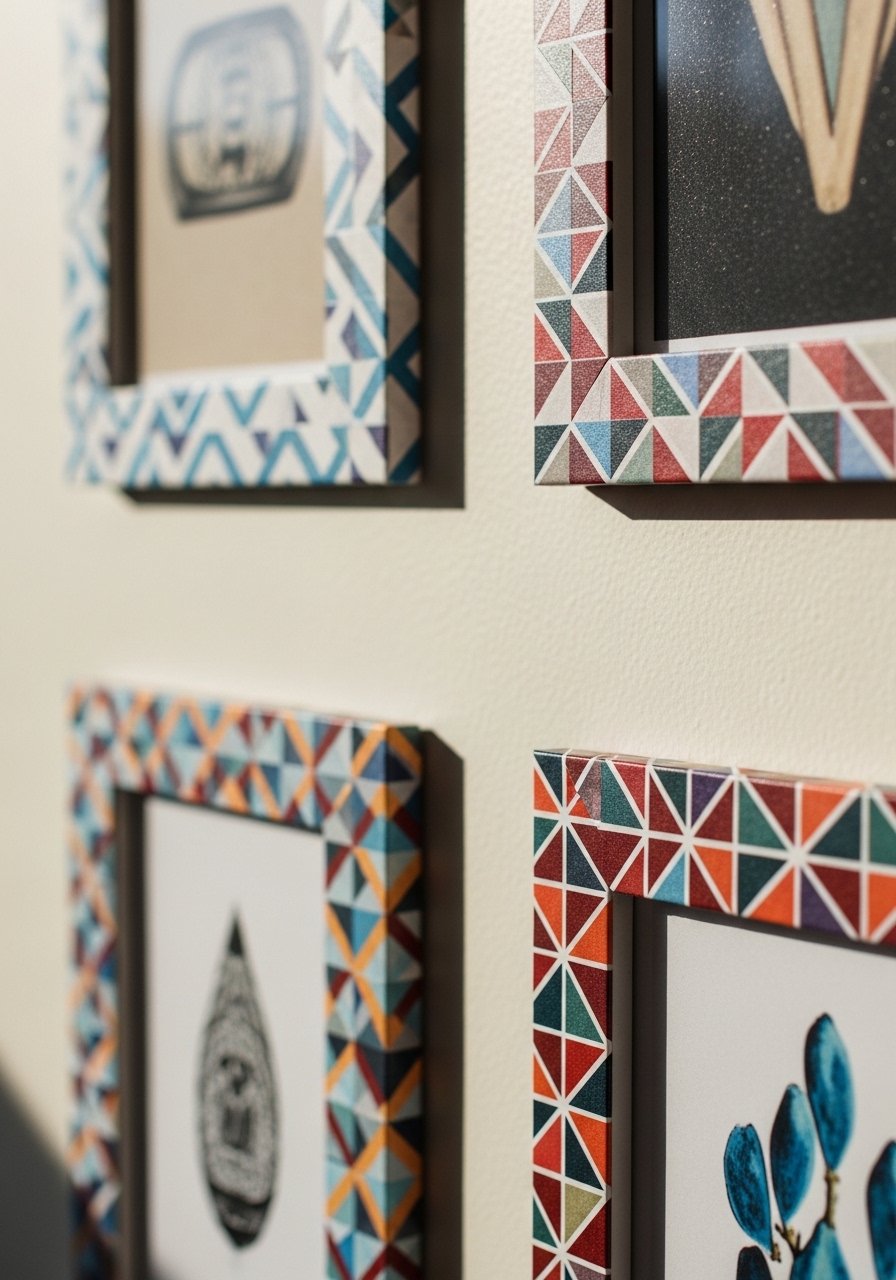
I used washi tape to add geometric frames around small prints so I could change the look without holes. Tape is renter-friendly and low risk. Use 1/2 inch washi tape in two contrasting shades and place frames 2-3 inches apart. The detail many people miss is to press the edges down with a fingernail so they do not peel. Avoid overly decorative tape that competes with the art. Over half of renters skip anything needing a drill, which is why this trick is so handy. Decorative washi tape set is an inexpensive upgrade.
Pressed Flower Resin Frames for Sunroom Bright
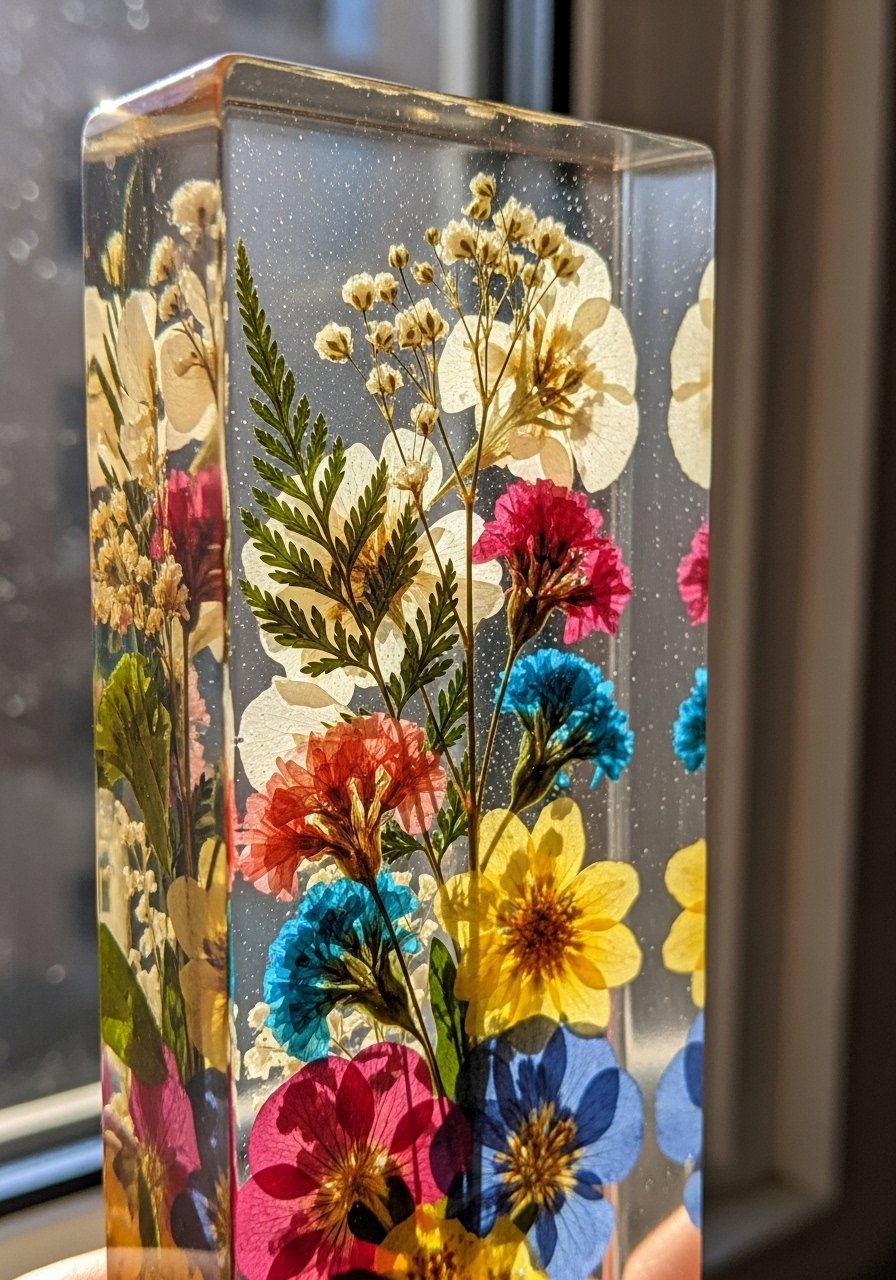
I pressed flowers from the garden and sealed them in small resin frames for the sunroom. Use an 8×8 resin mold and position petals off-center to look natural. A common mistake is not fully drying flowers which leads to discoloration. Press them in heavy books for two weeks before casting. Resin does yellow if not cured correctly, so follow the mix instructions and keep the pieces out of direct afternoon sun. Clear casting resin kit is what I used.
Oversized String Art Word Piece for Bedroom
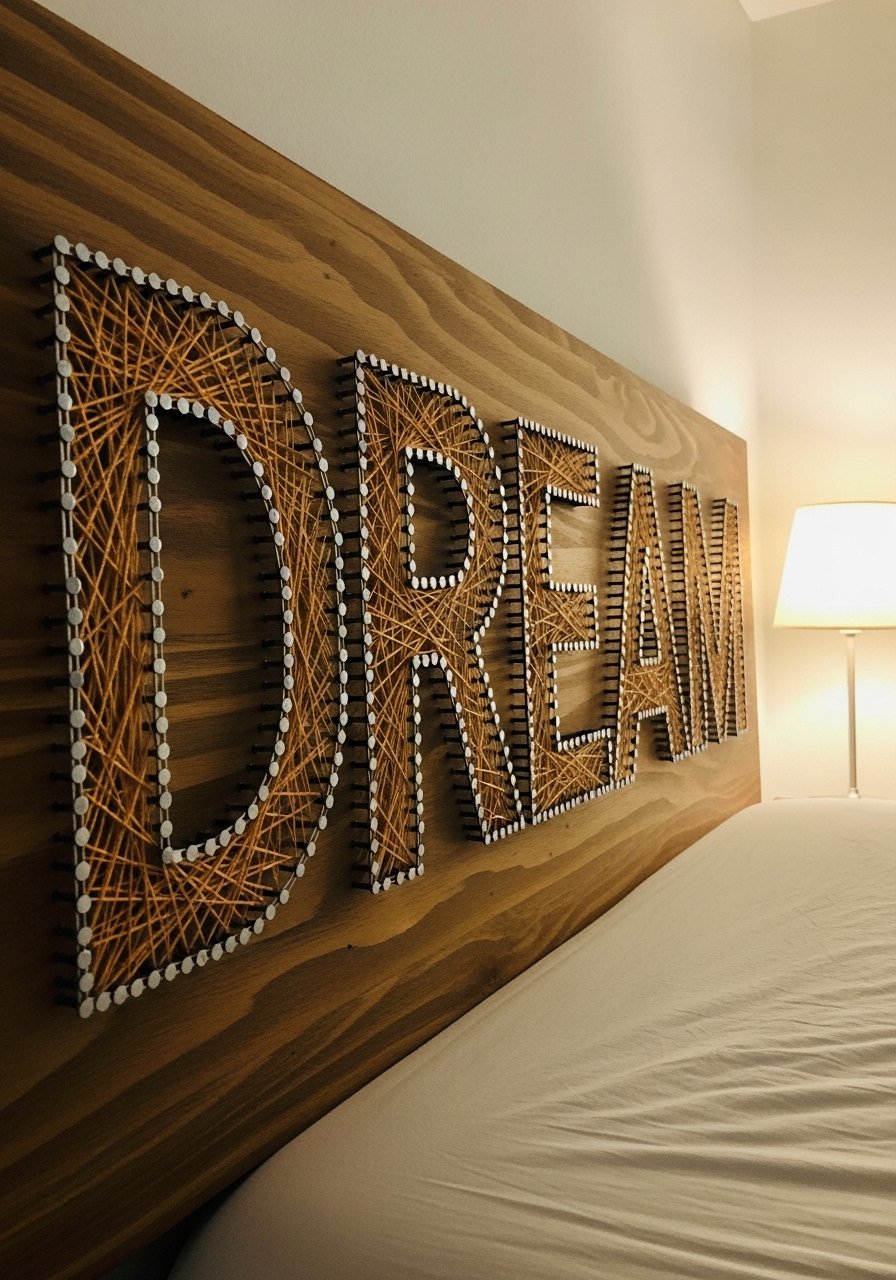
I nailed a simple word into a 24×12 board and wrapped string to make an oversized word piece above my bed. Use nails spaced 1 inch apart to keep curves clean and choose a word about 12 inches tall. A mistake is crowding the letters. Keep each letter airy and allow negative space. For renters use thin picture hanging hardware or rest it on a slim shelf to avoid many holes. Nail and hammer kit made the job quick.
Floating Shelves with Mini Prints for Kitchen Nook
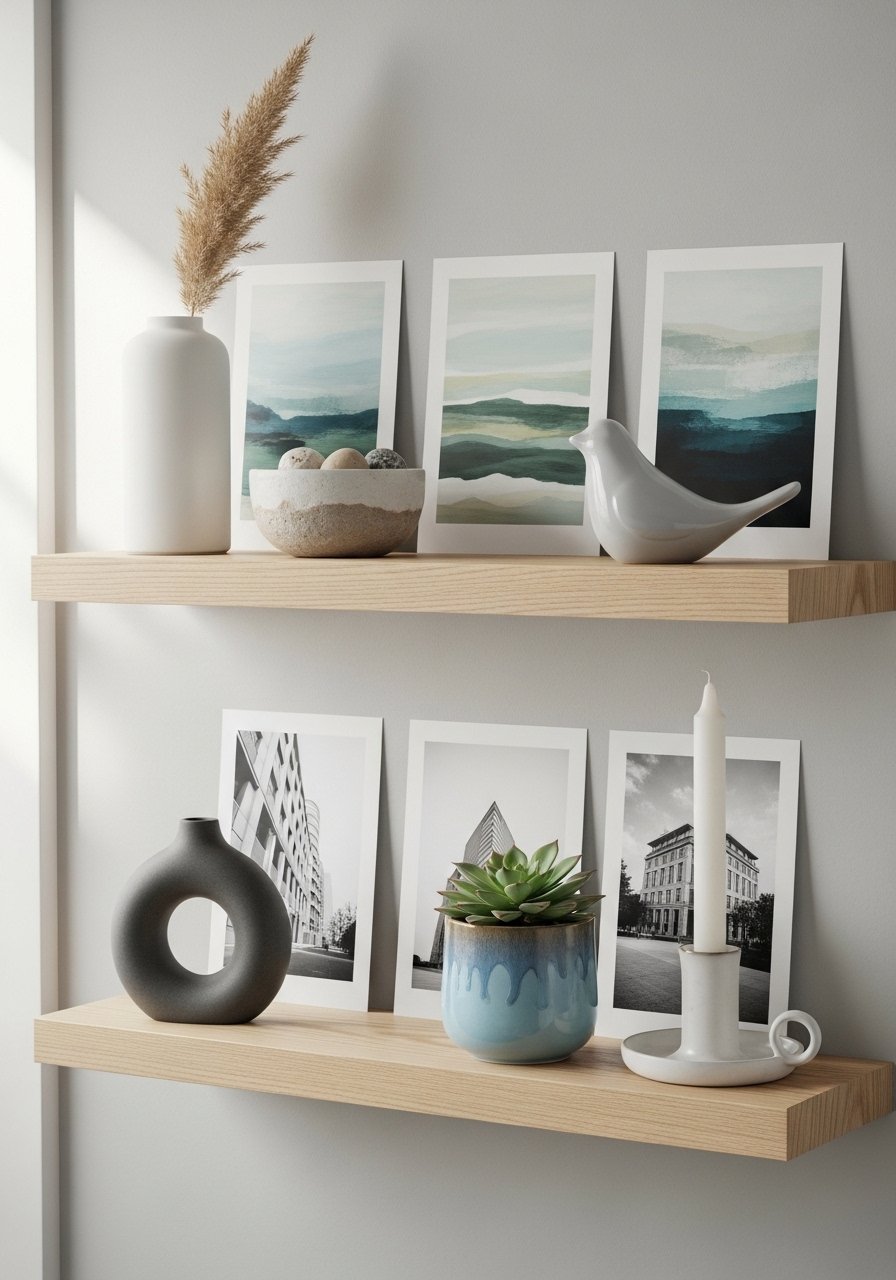
I installed white oak floating shelves in the kitchen nook and leaned mini 5×7 prints along them for an easy-to-update display. Use two shelves, one 24 inches and one 36 inches, and space prints unevenly for a casual look. One mistake is crowding the whole shelf. Leave empty zones to let pieces breathe. If you rent, consider installing picture ledges that rest on anchors instead of drilling many holes. White oak floating shelves are ahead of dark wood right now.
Embroidery Hoop Gallery Boho Bedroom
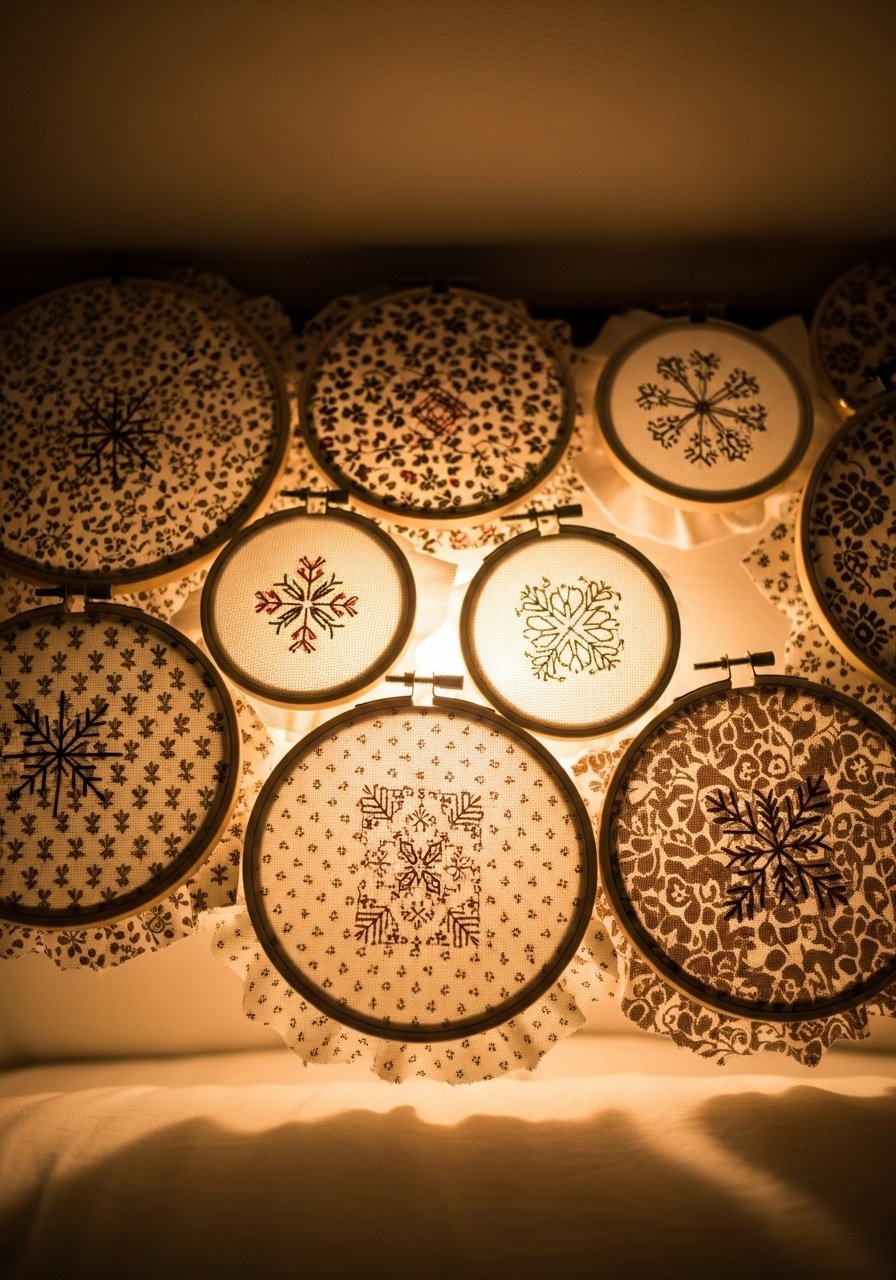
I used embroidery hoops to create a soft, boho gallery above my bed. Mix hoops in 6, 8, and 10-inch sizes and use fabrics in a three-color palette for cohesion. One neat trick is to use an inner hoop as a frame and replace fabric seasonally. Many people forget to tighten the hoop so the fabric sags. Keep the fabric taut and hang hoops in a loose diamond or cluster. Embroidery hoop set gave me the range I needed.
Tasseled Textile Strips Colorful Nook
I tied tasselled textile strips to a wooden dowel and hung it in a colorful reading nook to add vertical interest. Use strips 2 inches wide and lengths that vary from 18 to 36 inches for movement. A mistake is matching every tassel the same length. Variation gives the piece life. Knot the top of each strip and seal the ends with a tiny dab of fabric glue so they do not fray. Pre-made tassel pack saved me many hours.
Mini Shadow Box Collections for Small Spaces
I gathered tiny keepsakes and made mini 6×6 shadow boxes to fill a slim bathroom wall. These little boxes are perfect for narrow spots where bigger art would overwhelm. Place them in a vertical stack and keep 2-3 inches between boxes. A common mistake is overfilling the box. Choose one focal object per box and a neutral backing so the object reads clearly. Command picture strips hold these securely without drilling. 6×6 shadow boxes come in handy sizes.
Your Decor Shopping List
Textiles
- Honestly the best $40 I have spent. Chunky knit throw in cream in 50×60 inches for sofa drape
- Velvet pillow covers, set of 4 22-inch, down-filled look without the price
- Crepe paper rolls multi-color for textured rainbows, cheap and changeable
Wall Decor
- 16×20 blank canvases pack of 3 for abstract trios
- 8×10 craft shadow box for faux succulents and pressed flowers
- Wood slices 12-inch pack for burned-ring accents
- Woven seagrass baskets set medium and large sizes for clustered texture
Tools and Basics
- Mod Podge sealer 8oz for decoupage projects
- Hot glue gun kit quick and reliable tack
- Command hooks and picture strips pack renter-friendly hanging
Budget Finds
- Peel-and-stick vinyl sheets for switch plates and small vinyl art
- Decorative washi tape set for temporary geometric framing
- Colored paper squares pack for mosaics and kids crafts
Similar at Target or HomeGoods for baskets, throws, and frames
Shopping Tips
White oak beats dark wood in 2026. Design feeds have shifted completely. These white oak floating shelves look current, not dated.
Grab these velvet pillow covers for $12 each. Swap them every season and the whole room feels different.
Curtains should puddle or kiss the floor, never hang halfway up. These 96-inch linen panels are right for standard 9-foot ceilings.
Lead with texture not color when you are unsure. Nearly half go texture first these days. Seagrass basket set is an easy way to add that.
If you rent use damage-free command hooks for heavier pieces too. Over half of renters skip anything needing a drill.
Frequently Asked Questions
Q: Can I mix boho textiles with modern furniture without it looking messy?
A: Yes, keep to a 3-color palette and repeat one pattern at least twice. Use texture as the primary layer and a single bold color as an accent. For pillows, velvet covers in two shades will pull both styles together.
Q: What size should I choose for painted canvases?
A: For a trio over a sofa choose 16×20 canvases, and space them 4-6 inches apart. That scale fills the wall without overwhelming furniture.
Q: How do I hang baskets without nails?
A: Use damage-free adhesive hooks rated for the weight. Press for 30 seconds and wait one hour before hanging. Command picture hanging strips are my go-to.
Q: Will faux succulents look fake after a while?
A: Not if you choose matte finishes and avoid plastic shine. Glue them in clusters and mix leaf sizes for realism. Keep pieces out of direct afternoon sun to avoid fading.
Q: How can I make kids art look grown-up?
A: Limit their palette to three coordinated colors and frame pieces in simple 8×10 frames. The frame makes the whole thing feel intentional. 8×10 frames set keeps costs low.
Q: What is the best way to add height to a room with wall art?
A: Hang a vertical panel or set curtain rods higher than the window frame so the eye travels up. Center art at about 57 inches for balanced sight lines.
Q: Are resin frames safe to make at home?
A: Yes if you follow safety instructions and mix accurately. Use gloves and work in a ventilated area. Clear casting resin kit is beginner friendly.
