

My living room had nice furniture and decent lighting but it still felt like a waiting room. Took me embarrassingly long to figure out it was missing texture. Every surface was smooth, every color was flat, and nothing invited you to actually sit down. These projects are the kind of small wood builds that add real weight and warmth without taking over a studio or tiny bedroom.
These ideas lean modern farmhouse and transitional. Most projects land between $20 and $100, with a couple of splurge pieces around $150. They mostly work for entryways, living rooms, tiny offices, and balconies where space is a premium.
Rustic X-Brace Bench For Entryway Seating

I built this bench out of scrap 2x4s and it stopped the shoe pile from turning my entry into chaos. Cut the legs to 18 inches for comfortable seating and use X-braces to prevent wobble. Glue plus three screws per joint keeps it solid, and if you want a cleaner look, hide the screws with wood filler before staining. I spent about $30 and used a set of Simpson angle brackets for the cross braces. A common mistake is making the top too deep for tight entryways. Scale this to 12 inches if you need a slim profile for a narrow hall. Most folks mess up that first cut, happens every time. Pair this with the floating shelf idea later for a tidy drop zone.
Floating Wall Shelf With Hidden Brackets For Narrow Walls

Empty narrow walls are where hidden shelves win. Use a 1×6 pine board for a tidy 36-inch span that fits studs and holds about 50 pounds. French cleat or hidden brackets make the shelf look like it floats. I stained mine in a driftwood gray wash and finished with two coats of polycrylic to resist coffee rings. If you rent, try command-strip ledges for light decor or secure a thin tension rod shelf for heavier items. A common error is spacing shelves too close. I use 12-inch gaps following a rule of thirds so stacks look balanced. For brackets I used a French cleat kit that hid everything and made swaps easy.
Industrial Pipe Table Base For A Compact Desk
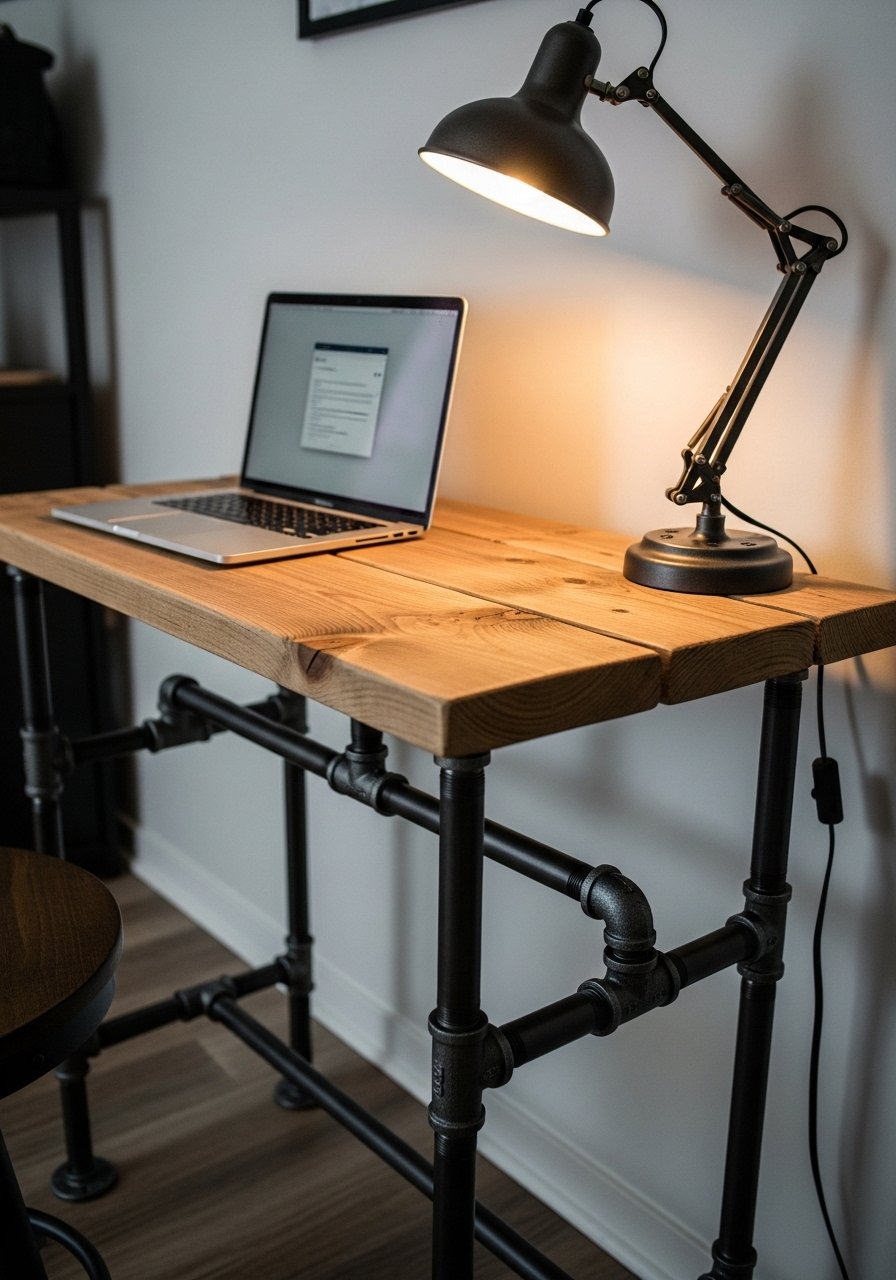
If you need a narrow bar-height workspace without buying new furniture, pipe legs plus a wood top are instant personality. I grabbed black pipe fittings and screwed a 2×12 oak plank to them. The industrial base keeps the footprint small while the wood top brings warmth. Pre-drill holes in hardwoods to avoid splits and use glue plus three screws per leg bracket for strength. Budget sits around $60 to $90 if you shop fittings in kits. If you are in a rental, rubber feet prevent floor damage. People drop about $45 on wood and screws for their starter build. I used black pipe fittings kit that made assembly much faster.
Ladder Shelf From Repurposed Shutters For Corners

I found shutters at a restore and turned them into a lean ladder shelf that solved corner clutter. The trick is a piano hinge where two shutters meet so the shelf leans without needing permanent wall anchors. It is perfect for apartments since it can be freestanding. A mistake people make is overloading the lower rungs. Stick to 2×4 framed supports if you want heavy storage. For styling, stagger baskets and books in odd numbers. If the shutters are narrow, add a 12-inch deep top shelf and nail a cleat underneath for stability. Found this hack saved me a month of stepping on shoes. Try leaning-shelf brackets for extra security.
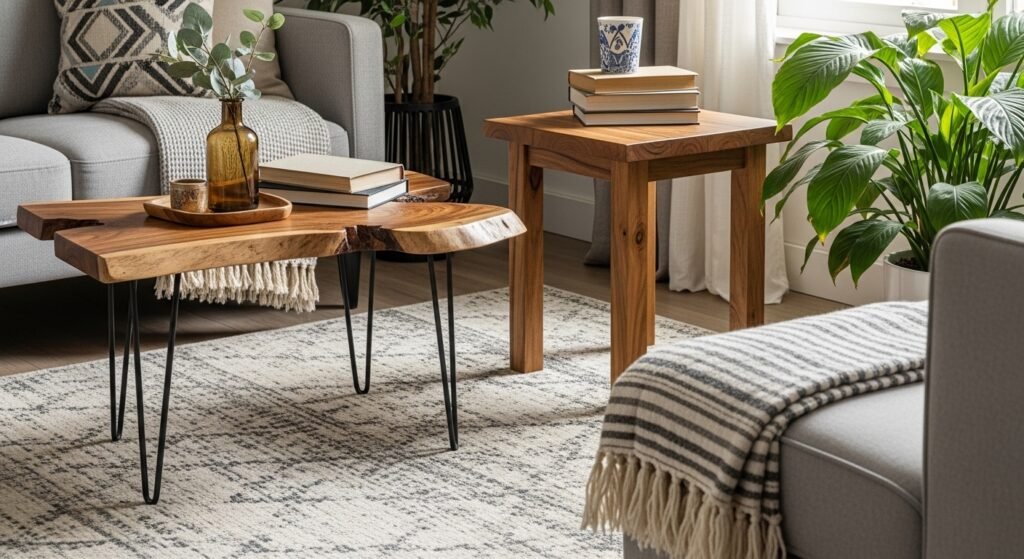
Live Edge Coffee Table Slab On Hairpin Legs For Small Living Rooms

Almost half go for those wavy live edge pieces now. I scored a small walnut slab and paired it with hairpin legs to keep the visual weight low. Live edge feels custom but the build is simple. Sand to 220 grit before stain and apply two coats of polycrylic for a durable finish. One oversight is making the top too thick for the room. Aim for a 1 to 1.5 inch slab for a small space. I mounted hairpin legs with wood glue and three screws per corner for everyday use. For sourcing, I linked the legs and a finish I liked. If you need a gentler look, use brass-toned legs. I grabbed mid-century hairpin legs set to finish mine.
Pallet Wood Headboard Frame That Stands Behind Beds
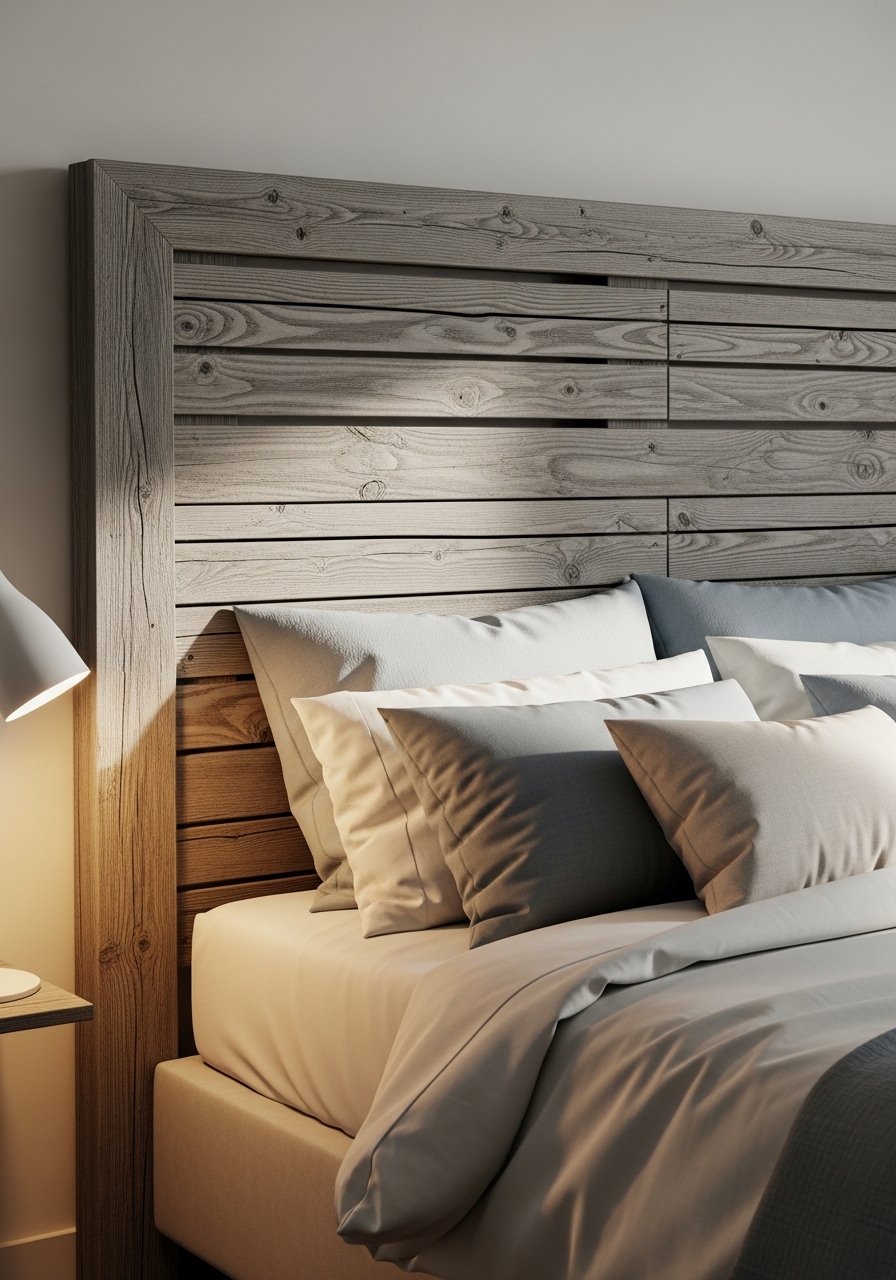
A pallet headboard is the fastest way to make a cheap bed feel intentional. I disassembled pallets, planed the slats, and built a 60-inch frame that stands behind the bed with no wall screws. Use 2x4s for the frame and reinforce joints with glue plus three screws for long-term strength. Driftwood gray stain gives that weathered look without harsh sanding. Most people forget to seal the back side of the wood and later get warping. Sand to 220 grit and let pieces dry at least two weeks indoors if your climate is humid. If you want an even softer finish, add a 1-inch foam strip to the top edge. I used driftwood wood stain for the faded feel.
Fold-Down Wall Desk Nook For Tiny Offices

My tiny apartment needed a desk that could disappear. A 24×48 plywood panel with a piano hinge and an internal support bracket becomes a desk that folds away. Pre-drill holes and use heavy-duty piano hinges for a smooth action. If tools are limited, a hand saw and a cheap router to round the front edge will do. Renter trick: mount the backplate to a sheet of 3/4-inch plywood that spans studs and hide the edges with trim. A common mistake is thinking one support strut will hold a monitor. Use two and glue plus three screws at every joint for reliability. I like the piano hinge kit for a clean fold.
One-Board X-Leg Side Table For Nights And Small Corners

This nightstand from a single 2×12 solves the problem of finding a table that matches sofa height. Pocket holes or dowels make the X-leg joinery clean. I used a pocket jig on my first try but you can do dowel joinery without power tools. Cut the top to 16 inches deep so it fits in tight living rooms. A common failure is uneven leg lengths. Measure three times and check with a level. For finish, sand to 220 grit and seal with two coats of polycrylic. I added felt pads to protect hardwood floors. Saved money by using a one-board 2×12 pine instead of buying a pre-made table.
Angled Dowel Bar Stool For Breakfast Nooks
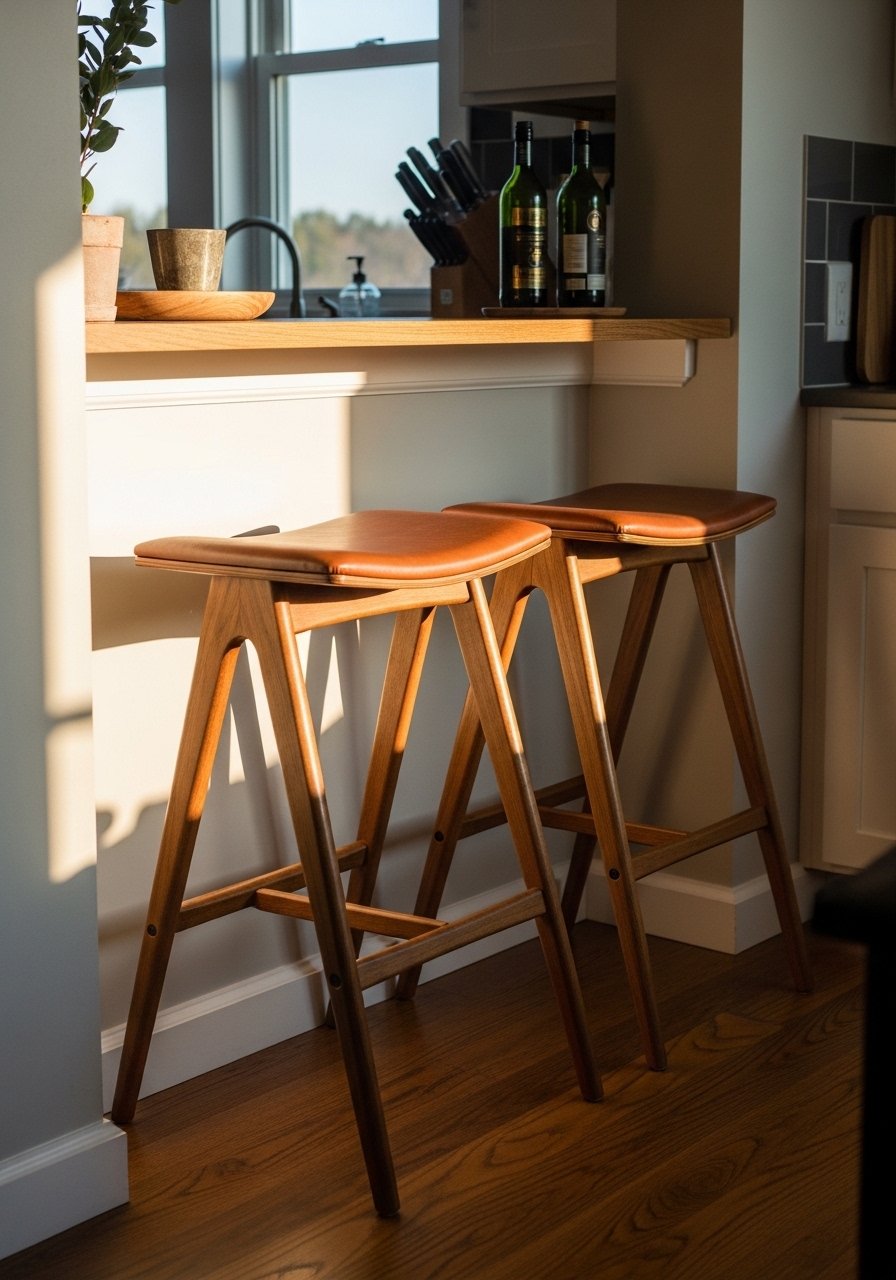
I built these stools when I needed seating that tucks under a narrow bar. The trick is angled dowel legs glued into a mortise for strength and a round oak seat. Pre-drill and use glue plus three screws at the apron for extra support. If you want swivel action, add a threaded swivel plate but expect a higher budget. People make the mistake of using skinny dowels that split. Use 1.5-inch dowels or laminated legs. I used an affordable oak round seat blank and wrapped the edge in leather for a little grip. These feel mid-century while staying compact.
Chalkboard Wall Organizer Shelf For Kitchens And Entryways
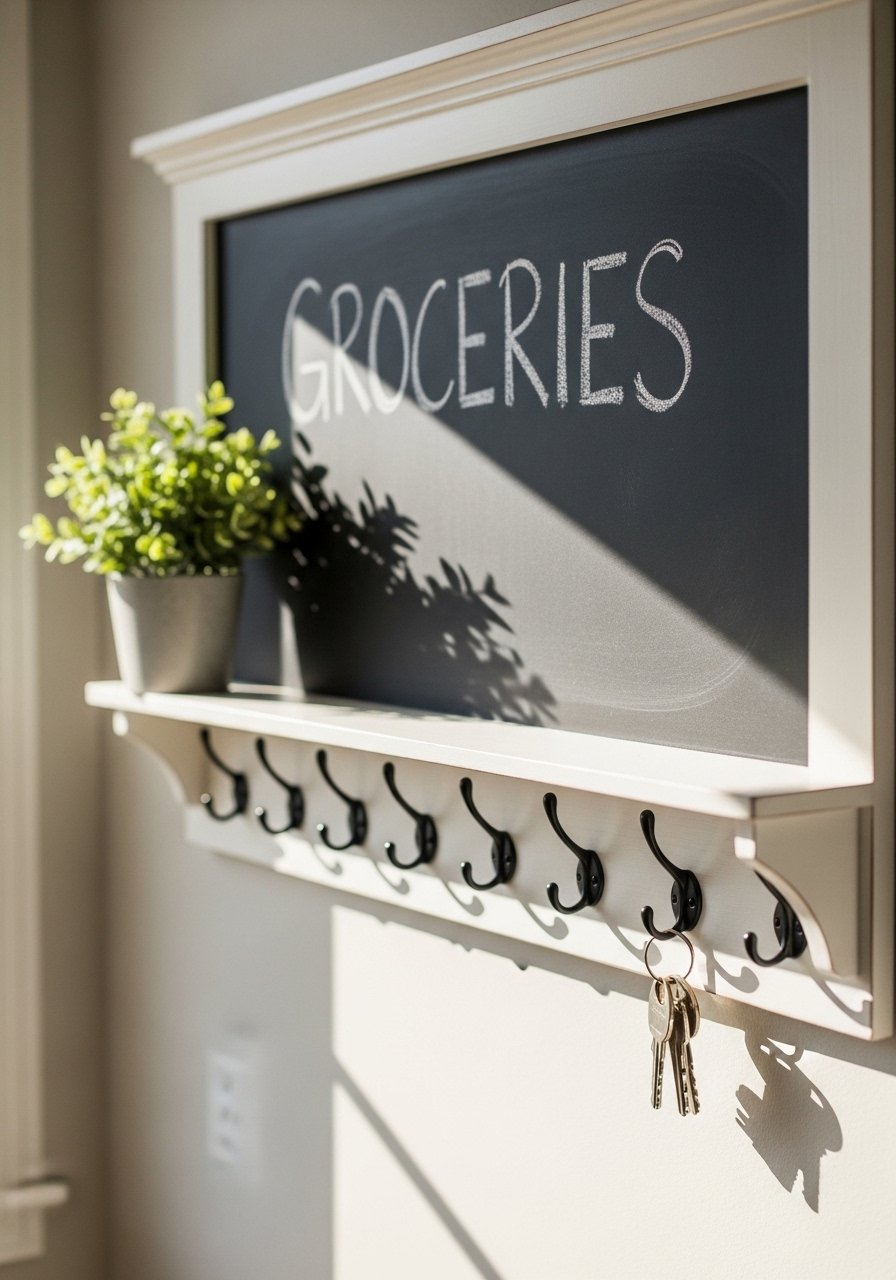
A wall-mounted chalkboard shelf became my kitchen command center. Paint a 12×24 plywood panel with chalkboard paint and add a 2-inch deep ledge for mail and keys. Cup hooks underneath hold reusable bags and keys. People often forget to seal the edges so paint peels. Sand to 220 grit, prime the wood, then two coats of chalkboard paint followed by a polycrylic clear coat at the top edge. I used a small set of cup hooks and mini shelf brackets. If you rent, use removable picture hanging strips for a no-hole option.
Weathered Picture Ledge For Gallery Walls In Tight Rooms
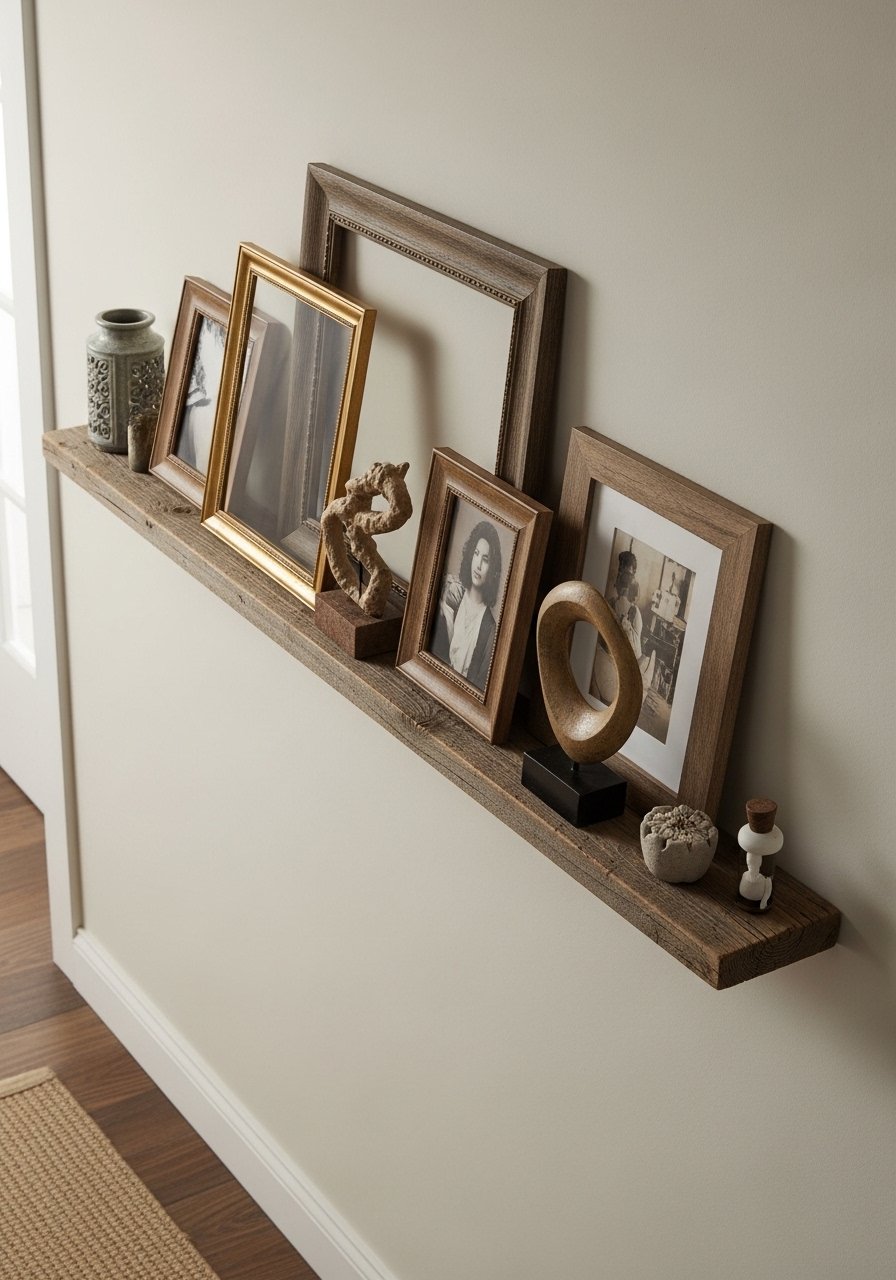
Gallery walls in narrow spaces look best when frames sit on a shallow ledge rather than hammered into drywall. Use a 1-inch ledge depth and stagger frames in odd numbers. I made mine from reclaimed fence pickets and used Z-clips for a float mount. A common mistake is using heavy frames on weak brackets. Place ledge supports at studs every 16 inches so real art stays put. For stability, glue plus three screws per support and sand to 220 grit before staining. I finished mine with a light gray wash that reads modern in small hallways. Try brass picture ledges for a sleeker look.
Cedar Adirondack Chair For Balcony Or Small Patio

I built a slimmed-down Adirondack for a small balcony and it made the outdoor space feel intentional. Use cedar 1x4s for weather resistance and exterior screws for longevity. Sand to 220 grit, apply a marine-grade finish, and let it cure for two weeks outdoors before heavy use. Wood warps outside if I do not seal it right, so sealing every surface matters. A tip many articles skip is rounding the front edge of the seat so it does not pinch legs. If pets gnaw, finish with boiled linseed oil followed by poly for chew resistance. I used cedar 1×4 deck boards for the slats and exterior deck screws.
Your Decor Shopping List
- My go-to finishing combo, sandpaper and sealant. 220-grit sandpaper pack and polycrylic clear coat. I always sand to 220 grit before stain.
- Hardware basics for all the projects. Simpson Strong-Tie angle brackets pack for benches and frames.
- Slim live-edge top option. Walnut live edge slab small (~$40-80) for coffee tables.
- Fast fold hinge for desks and benches. Heavy-duty piano hinge kit (~$8-15).
- Small hardware kit for hooks and organizers. Cup hooks and brass screws set helps with entryway builds.
- Legs and bases. Hairpin legs set for coffee tables and black pipe leg kit for desks.
- Pillow and throw for styling. Chunky knit throw in cream (~$35-55). Similar finds at Target or HomeGoods.
- Weatherproof finish for outdoor pieces. Marine wood finish quart (~$20-35).
Shopping Tips
White oak beats dark wood in 2026. Design feeds have shifted completely. These white oak floating shelves look current, not dated.
Grab these mid-century hairpin legs for $20. Swap a slab top and the whole coffee table reads custom.
Curtains should puddle or kiss the floor, never hang halfway up. These 96-inch linen panels are the right call for standard 9-foot ceilings.
Lead with one real plant not five small succulents. Faux fiddle leaf fig 6ft gives immediate height without fuss.
Buy a cheap pocket-hole jig if you plan a few builds. It speeds up secure joints without complicated joinery.
Frequently Asked Questions
Q: Can I build these projects with hand tools only?
A: Yes. Sawhorses, a handsaw, a block plane, and a drill will get most builds done. Swap a power sander for sanding blocks and use a hand router or a file for rounded edges. For the fold-down desk, a helper and a basic piano hinge kit work fine.
Q: How do I stop shelves from sagging under books?
A: Mount supports at studs every 16 inches and use a 1×6 board for spans around 36 inches. If you need more capacity, add a center cleat or use 3/4-inch plywood backing. Hidden brackets are nice but place them near studs.
Q: What finish holds up if I have pets that chew or lick furniture?
A: A boiled linseed oil coat followed by polycrylic topcoats gives chew resistance and a more natural look. Test on a scrap first. If chew is heavy, choose metal accents or thicker edges to protect vulnerable corners.
Q: Can these projects work in a rental without drilling into walls?
A: Many can. Leaning ladders, freestanding headboards, and tension-mounted shelves avoid permanent holes. For lightweight shelves, use heavy-duty command strips but avoid them for anything over 5-10 pounds.
Q: How long should I let wood dry after staining, especially in humid climates?
A: Let pieces dry at least two weeks indoors if humidity is high before heavy use. That extra time prevents finish tackiness and reduces warping. It is annoying but worth it for long-term stability.
Q: Which of these builds is best for absolute beginners who still want something sturdy?
A: Benches and one-board side tables are beginner-friendly. Use glue plus three screws per joint, sand to 220 grit, and add a clear coat. Most folks mess up that first cut, happens every time, so measure, clamp, and level before final assembly.
