

I used to dread opening my closet. It felt like a pile that hid half my clothes and made mornings clumsy. I’d lose scarves, lean jackets against shoe boxes, and wonder why the room still felt unfinished.
I stopped overthinking and started zoning. Small, visible changes made it easier to find things and the whole room felt calmer.
How to Organize a Closet with DIY Storage
This method teaches you how to get a usable, calm closet without custom carpentry. You’ll learn to edit what stays, create simple zones, and use affordable storage that reads intentional—think organic modern or Japandi-friendly neutrals. The result feels organized and lived-in, not clinical.
What You'll Need
- Velvet slim hangers, 30-pack, black (~$12–25)
- Fabric storage bins in neutral beige, set of 3, 11x11x11 (~$20–40)
- Clear stackable shoe boxes, set of 12 (~$25–45)
- Hanging closet organizer with shelves, canvas neutral (~$18–35)
- Bamboo shelf dividers, set of 4 (~$12–25)
- Over-the-door hooks, set of 6, matte black (~$8–18)
- Adjustable tension rod, chrome or white (~$10–25)
- Printable label pack for storage, 100 labels (~$8–20)
Step 1: Empty and edit so you see what you actually own

I pull everything out and make three piles: keep, donate, repair. Seeing everything at once makes decisions faster. I handle each item and ask if I wore it in the last year or if it fits the capsule I’m trying to keep.
Visually, the empty closet shows the real space I have. One insight people miss: empty space is helpful—don’t fill every shelf. Mistake to avoid: swapping piles too soon. Decide clearly before you start rebuilding the closet.
Step 2: Plan zones so items have a natural place
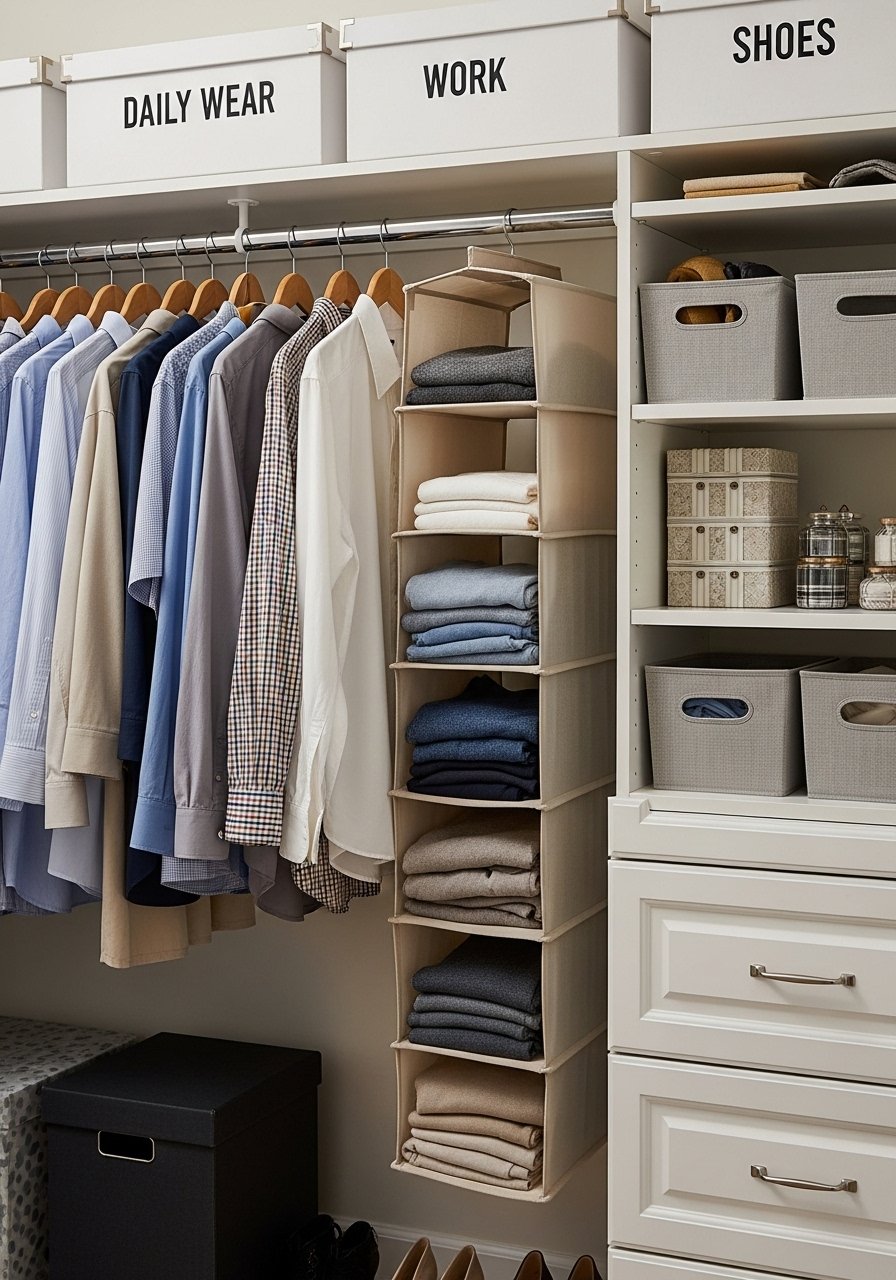
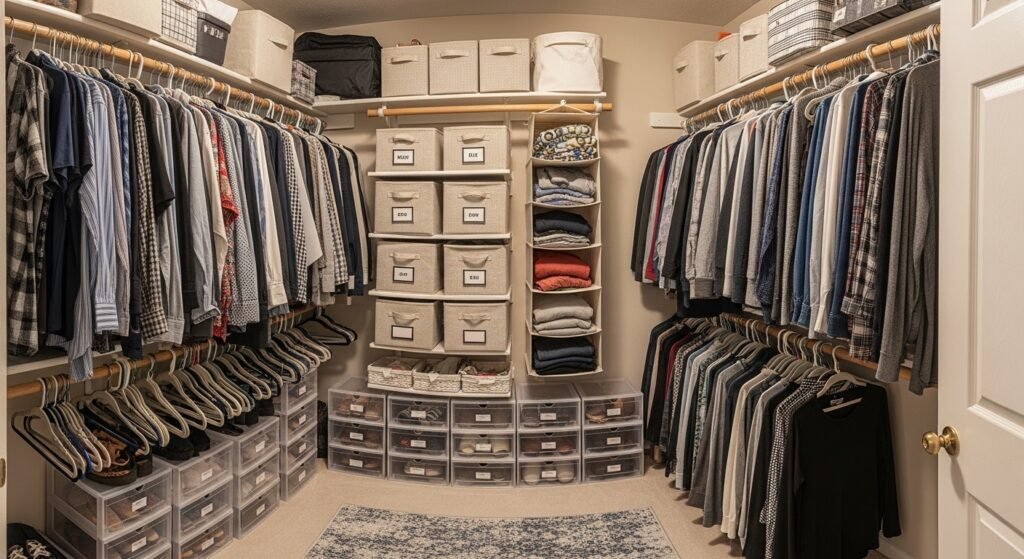
I map the closet into zones: daily clothes at eye level, workwear together, shoes below, and accessories in bins. I position the most-used zone where my hand naturally goes. This small directional choice speeds mornings and looks balanced.
People often miss aligning zones with how they dress, not with how the closet is built. Mistake to avoid: making equal-sized zones for unequal use. Let the most-used zone be the biggest.
Step 3: Swap mismatched hangers for thin, uniform ones
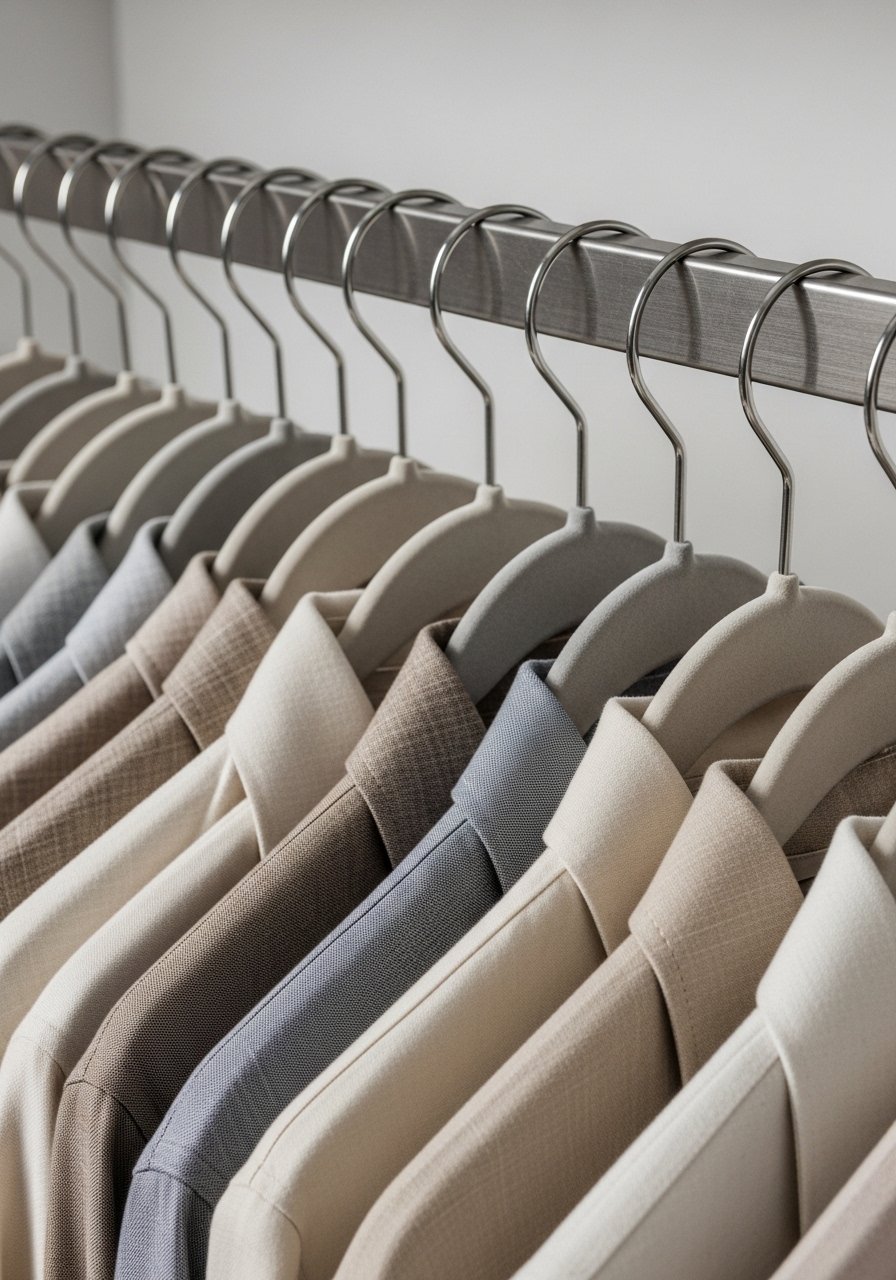
I replace bulky, uneven hangers with slim velvet ones. The line of identical hangers immediately reads calmer. Clothes hang straighter and I gain inches of hanging space. It makes the whole closet feel intentional, not chaotic.
Insight people miss: uniform hangers change perception more than adding shelves. Mistake to avoid: crowding the rod after switching hangers. Leave breathing room; visually uncluttered beats maxed capacity.
Step 4: Balance open shelves with closed bins and clear boxes
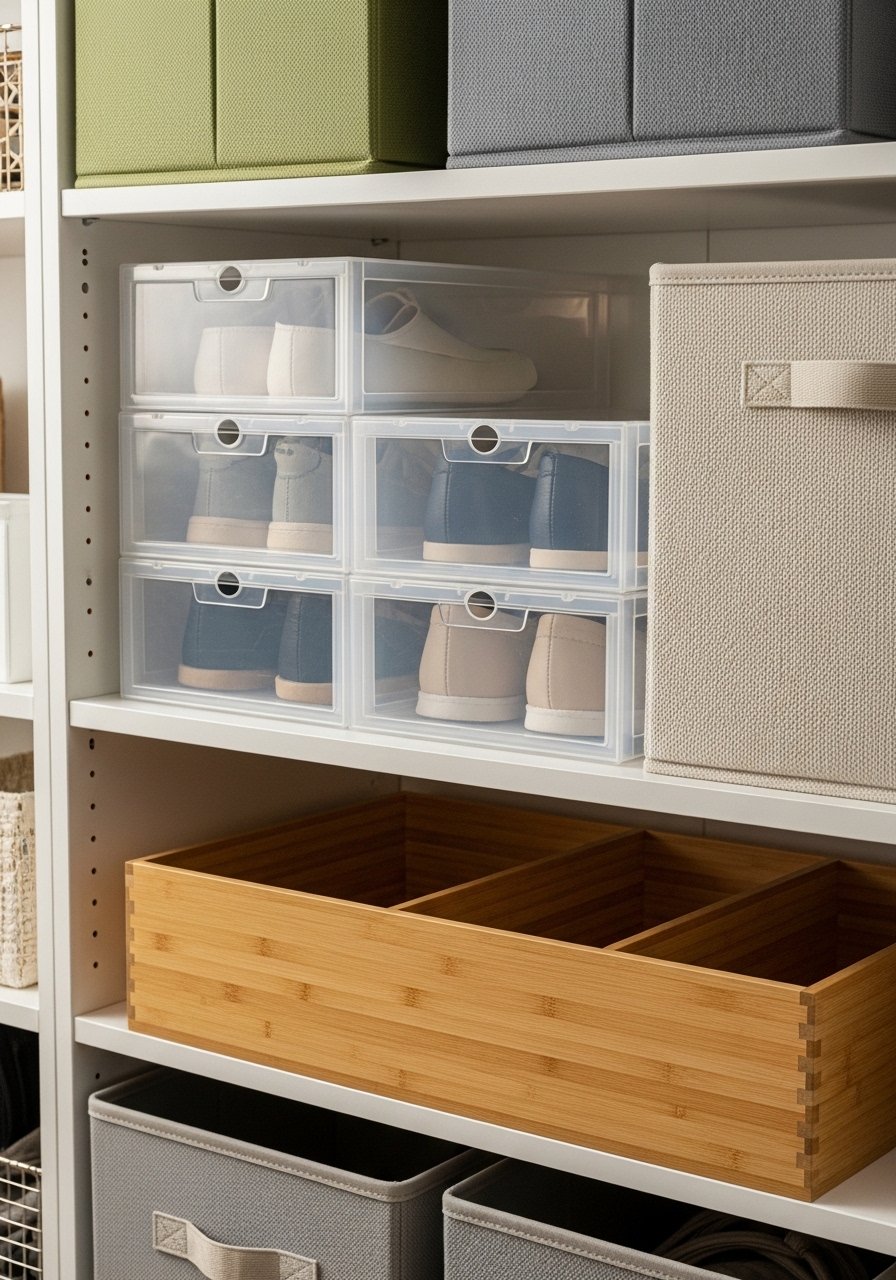
I use fabric bins for small items and clear shoe boxes for footwear I want visible. I stagger bins with a few open shelves to keep the layout airy. Bamboo dividers help keep stacks from toppling and add a natural touch that fits organic modern or Japandi looks.
People often store everything behind closed bins and lose quick visual cues. Mistake to avoid: using different-sized containers without a plan. Keep scale consistent so shelves read tidy.
Step 5: Add small fixes that keep it working daily
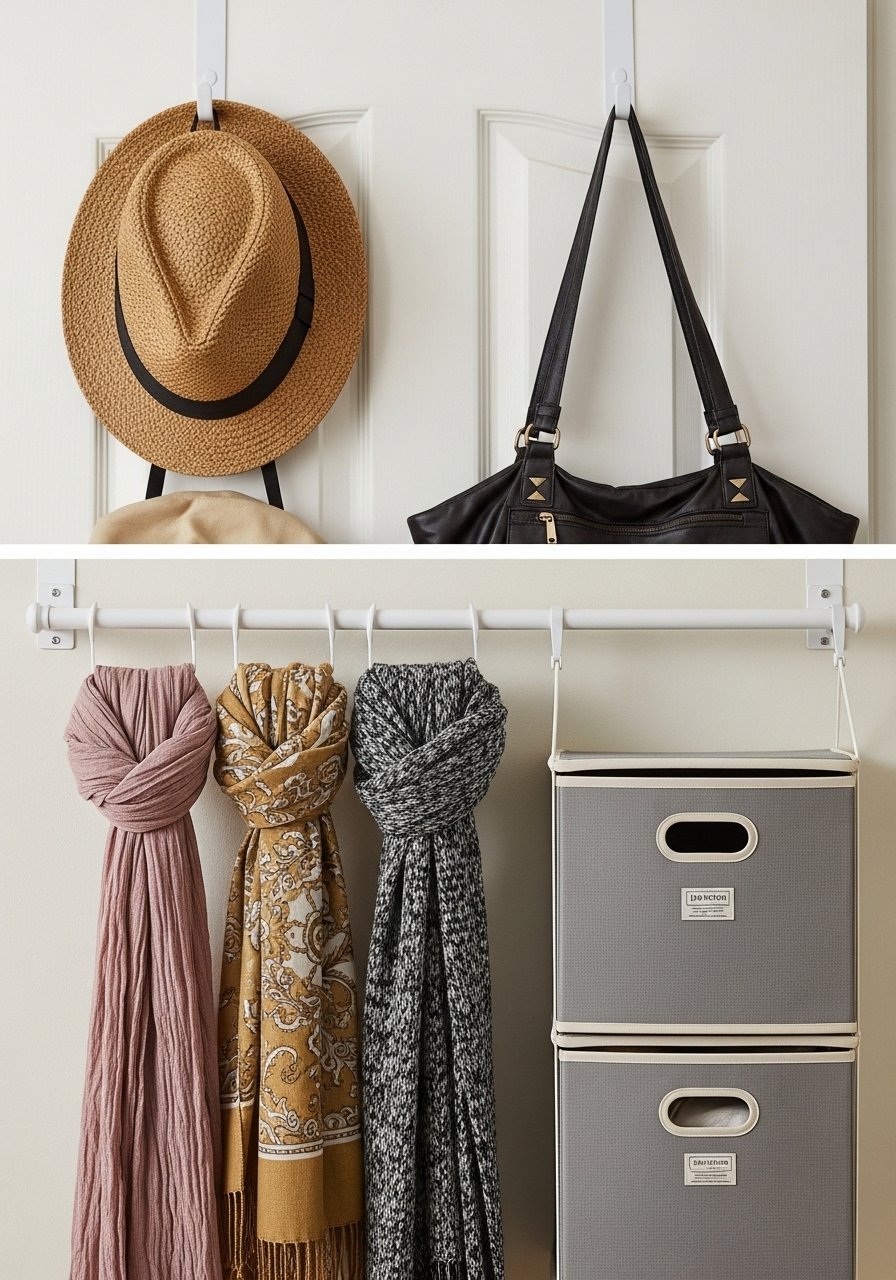
I add over-the-door hooks for bags and a tension rod for scarves or to create a low rack for flats. I label bins so it stays easy to maintain. The closet should require small habits, like a 30-second tuck each night.
Insight people miss: maintenance beats perfection. One mistake is overbuilding systems you can’t keep up. Start with one change, then add another after a month.
Common mistakes and how to avoid them
I’ve seen two consistent mistakes: trying to use every inch and not planning for how you actually dress. Too many little solutions create visual noise.
- Avoid cramming shelves with mismatched bins. Pick one bin size and repeat it.
- Don’t overcompartmentalize accessories—use a couple of visible hooks or a small tray.
- Leave some empty shelf space; it reads intentional.
I keep my system simple so I can maintain it without stress.
Adapting this approach for small closets or tight budgets
Small spaces reward edits and uniform pieces. I prioritize what I touch daily and fold the rest into bins. Slim hangers and a hanging organizer cost less than a closet system and give a big visual payoff.
Budget tips:
- Start with velvet hangers and one set of fabric bins.
- Use clear shoe boxes to protect shoes you wear often.
- Reuse what you already have and buy one organizer at a time.
Small changes add up and don’t require a big upfront spend.
Mixing DIY storage with the rest of your room’s style
I try to match storage textures to the room. If I’m leaning Japandi or organic modern, I choose bamboo dividers and neutral fabric bins. That keeps the closet from feeling like a utilitarian afterthought.
Quick ideas:
- For a cozy look, swap white labels for craft-paper tags.
- For a cleaner look, stick to monochrome bins and black hardware.
- Let one material repeat (wood, canvas, or metal) to tie things together.
The goal is that the closet feels like part of the room, not a separate project.
Final Thoughts
Start with one shelf or the hanger swap. Small, visible wins make you keep going. I usually begin with a pack of slim velvet hangers—low cost, high impact.
Be patient. An organized closet is a habit you build, not a single event. Take it in bite-sized steps and enjoy the room feeling calmer.
