

I’ve learned the hard way that small changes can make a cheap find feel like it belongs in my home. I lived with too-bright jars, limp pillows, and a tray that slid across the counter until I figured out what actually works. These are the real, repeatable hacks I still use.
They’re cheap. They’re fixable. And they actually look like I spent more time (and money) than I did.
30 Budget DIY Dollar Store Crafts That Look Shockingly Expensive
If you want quick, real-home upgrades that don’t scream “dollar store,” this list is for you. These 30 ideas are ones I’ve tested, returned, or lived with until they were right. Each idea is practical, feels lived-in, and includes what to buy so you can do it today.
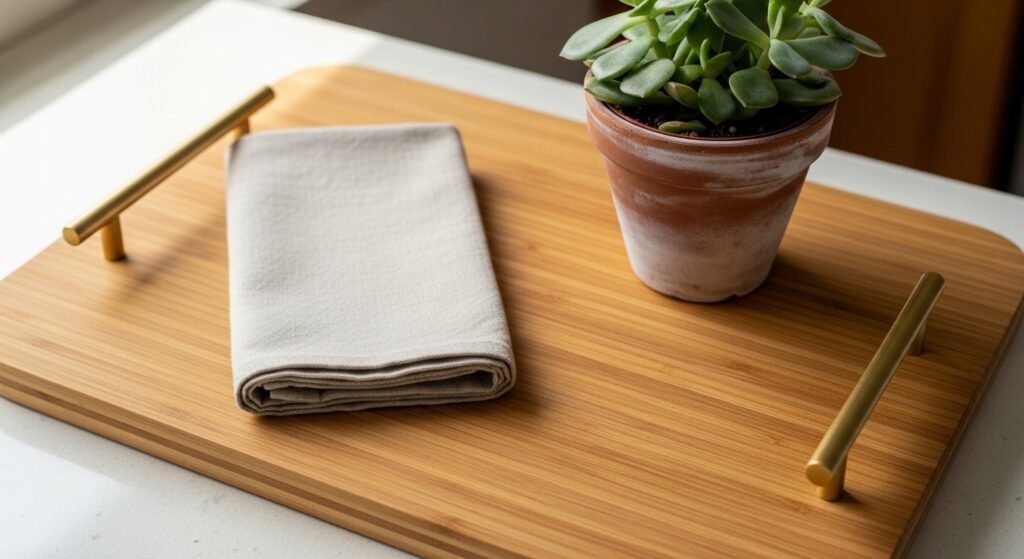
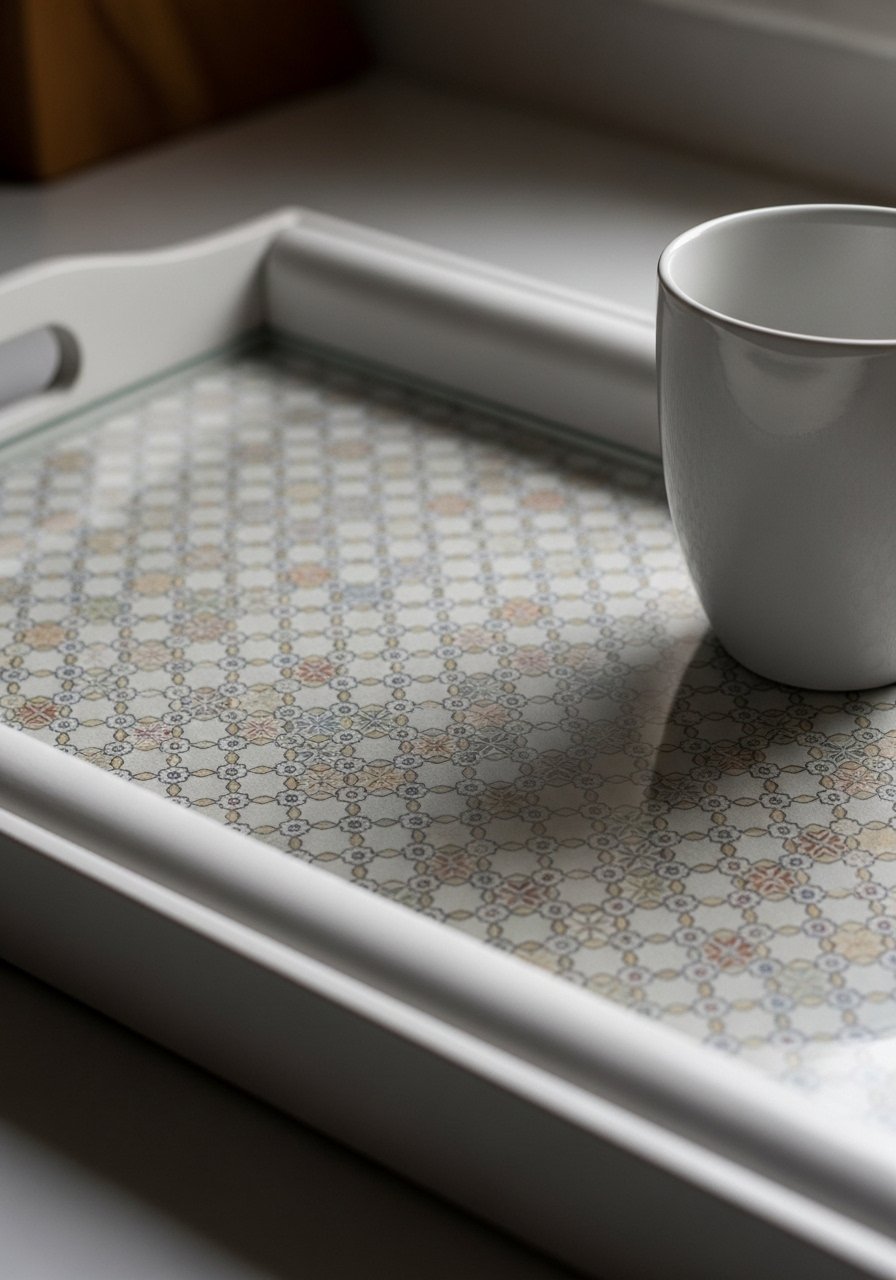
1. Bamboo Serving Tray with Gold Handles
I made my first tray from a Dollar Tree cutting board and cheap drawer pulls. At first the handles looked toy-like. A quick matte gold spray paint coat fixed that—suddenly it stopped reading cheap on my coffee table. I use mine daily for coffee, mail, and a candle cluster.
Tip: counters look calmer when trays group clutter. Make sure screws are snug; I stripped one hole and learned to pre-drill carefully.
What You’ll Need for This Look
2. Distressed Foam Board Farmhouse Sign
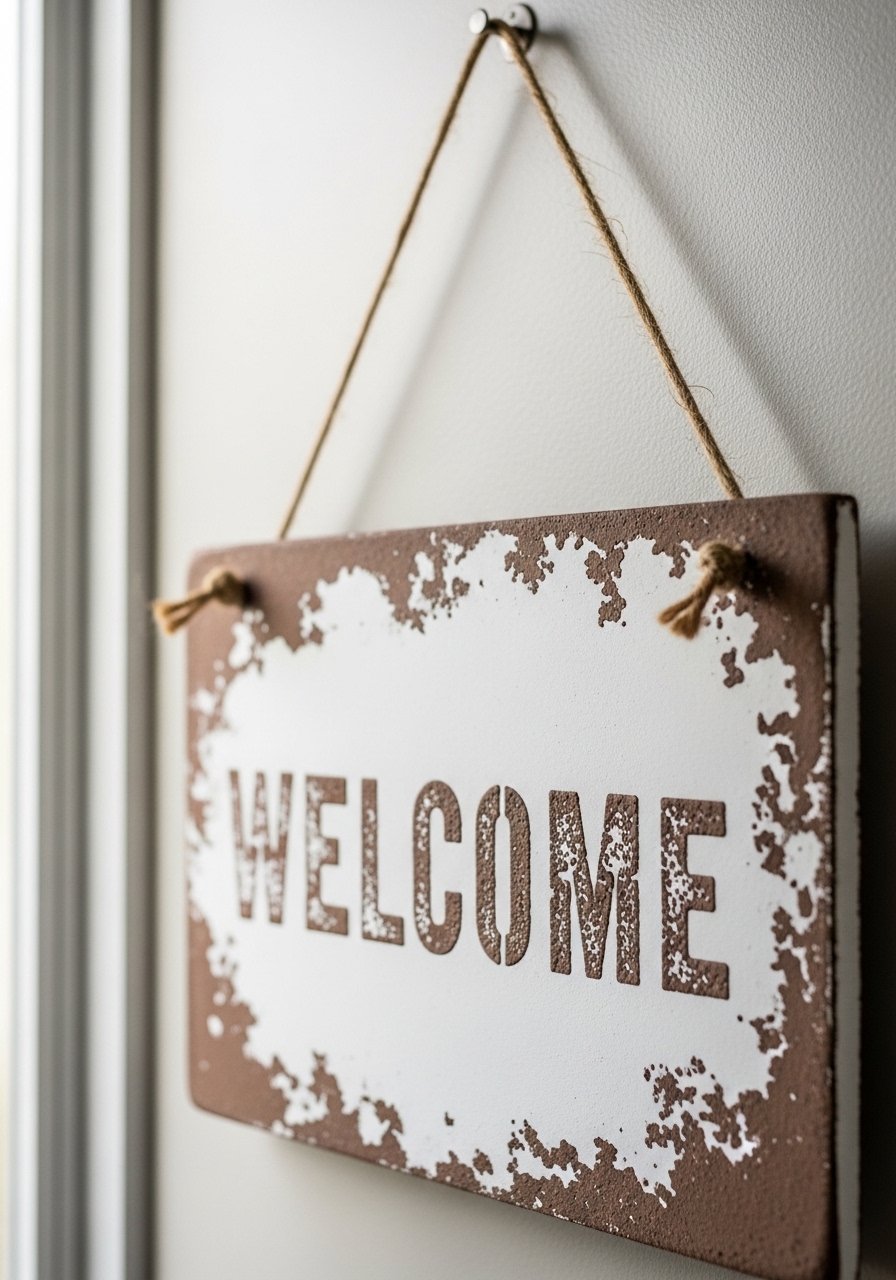
I made a “HELLO” sign from foam board and paint when I needed seasonal flair that wouldn’t ruin rental walls. I dry-brushed Waverly chalk paint and sanded the edges. At first I painted too dark and had to wipe most off—lesson learned: start light.
The result is a soft, worn wood look that’s lightweight and hangs with a simple command hook. It reads custom, not cheap.
What You’ll Need for This Look
3. Painted Glass Jar Vases That Read Designer
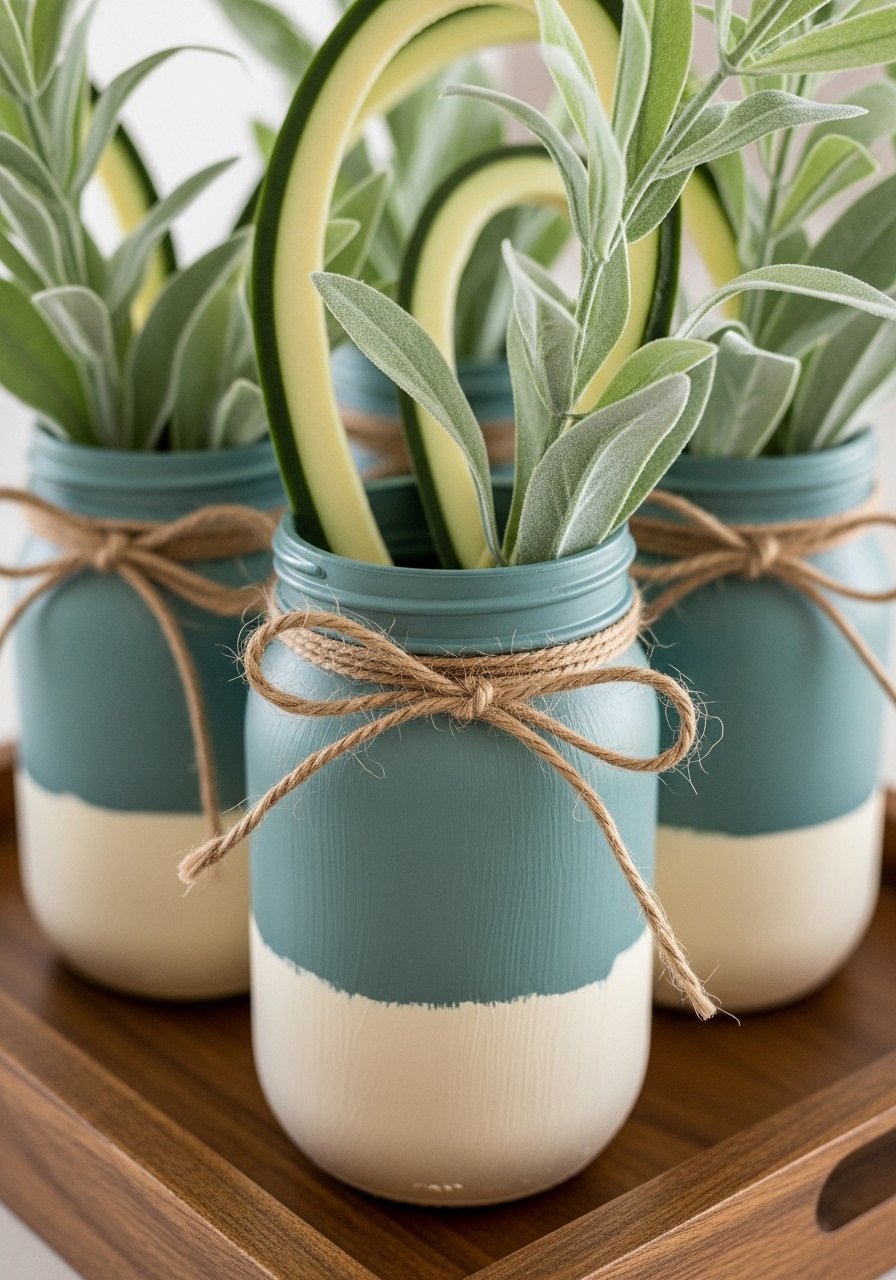
I painted a set of cheap glass jars to mimic vintage apothecary bottles. My first attempt used full coverage acrylic and looked like toys. I switched to watered-down craft paint and dabbed with a cloth. The imperfect opacity makes them feel old and useful.
I swap faux stems by season. Grouping three jars of varying heights on a tray instantly feels curated.
What You’ll Need for This Look
4. Burlap-Wrapped Bottles with Nautical Rope Handles
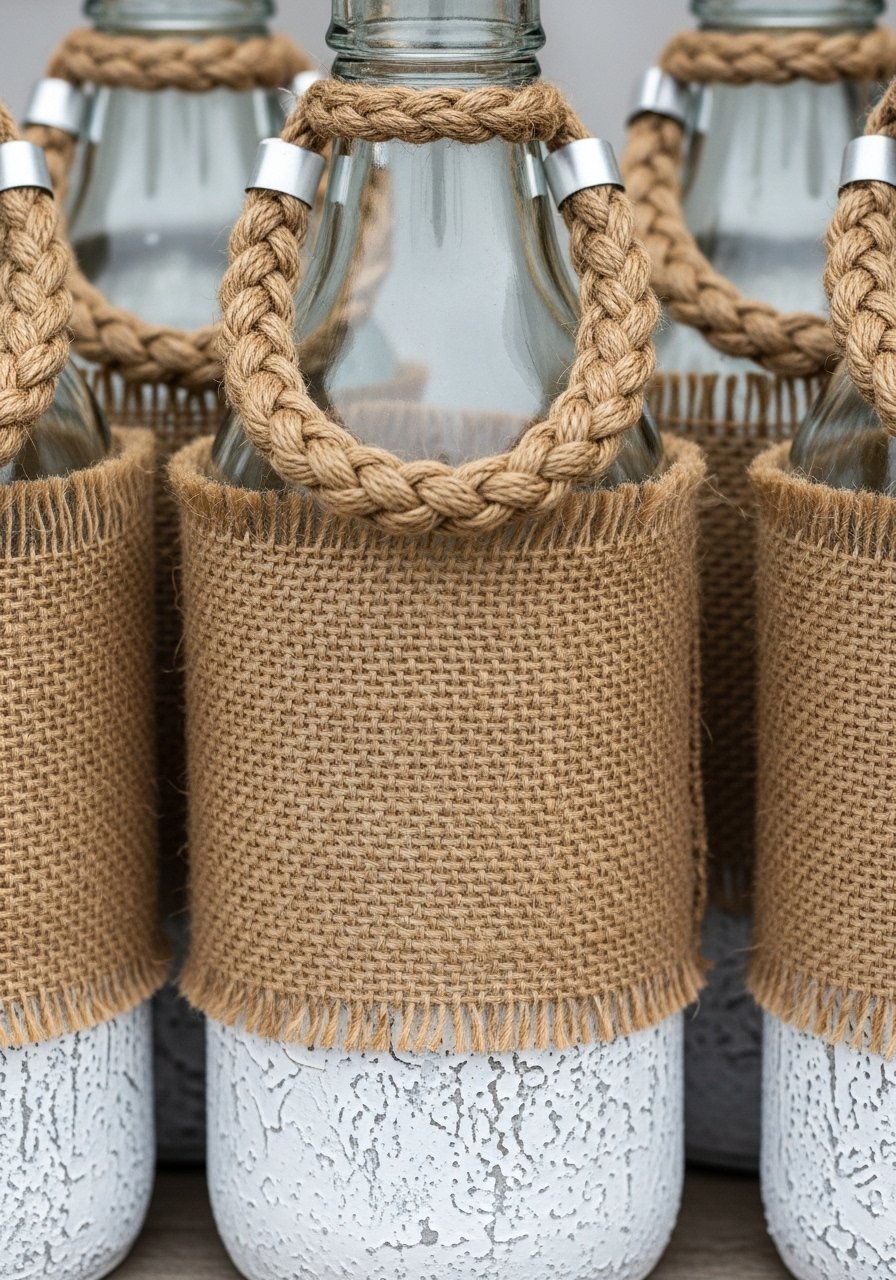
I wrapped old condiment bottles in burlap and added rope handles for a coastal vibe. I initially used thin string and it unravelled—use thicker nautical rope. The texture reads intentionally rustic and anchors a sink or shelf.
They’re great on bathroom vanities holding brushes or faux stems. Keep the burlap edges raw for that worn-in look.
What You’ll Need for This Look
5. Dish Towel Pillow Covers for Seasonal Swaps
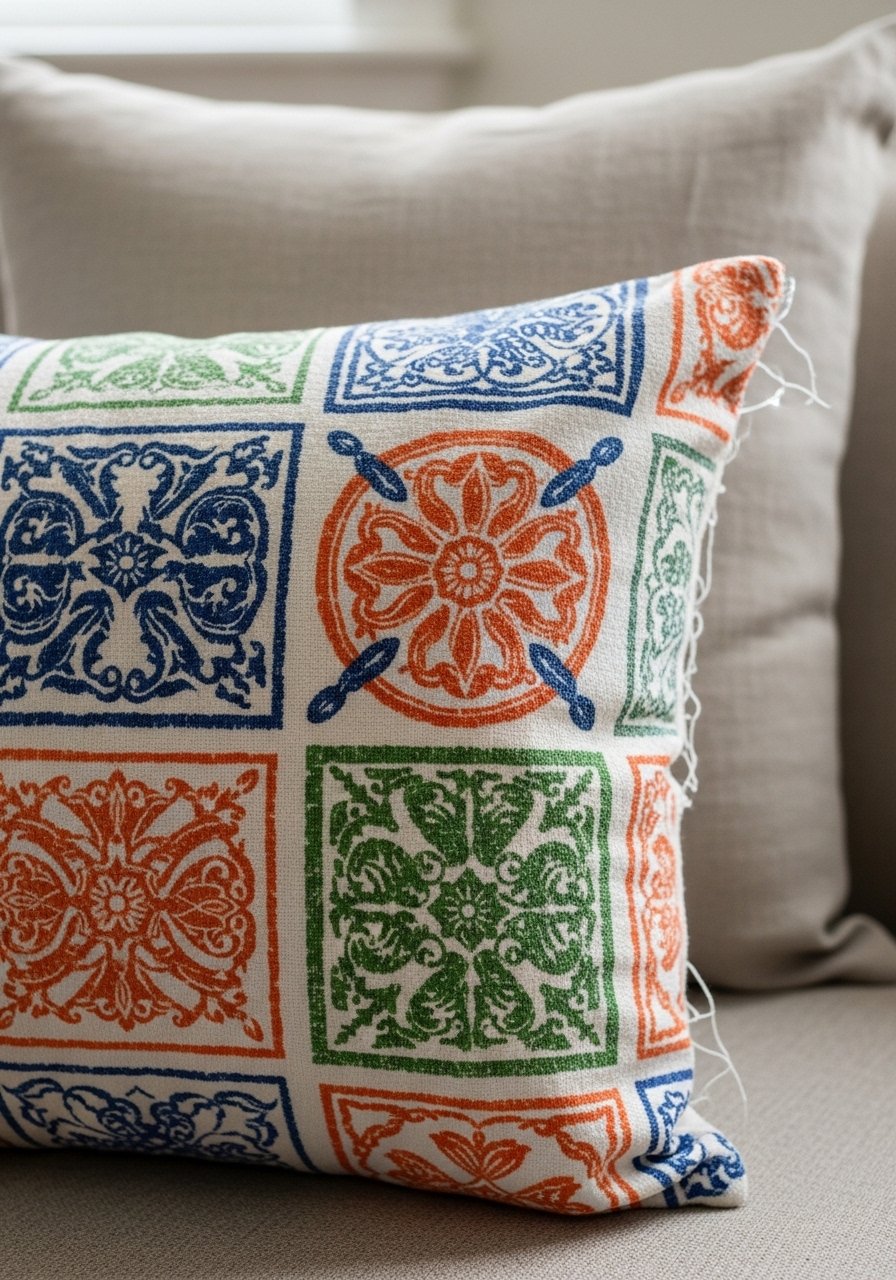
I sewed a square pillow cover from a Dollar Tree dish towel when I needed seasonal color fast. My first pillow flattened after a week—so I switched to high-loft polyfill and a hidden zipper from a thrift store. Now the pillows keep shape and look custom.
This is my go-to for quick couch changes each season. The pattern on a towel reads deliberate when paired with neutrals.
What You’ll Need for This Look
6. Distressed Bath Mat Pillows That Don’t Flop

I turned a soft bath mat into a plush throw pillow. My first attempt used cheap stuffing and the corners collapsed. Buying a proper insert fixed that (and made the pillow feel like a store find). The bath-mat fabric gives a cozy, textured finish.
Make the seam strong—these pillows get used. I sew instead of gluing; it holds up to pets and kids.
What You’ll Need for This Look
7. Rustic Bedspring Faux Planter

I mimicked a vintage bedspring planter using jute cord wrapped into a circle with faux moss tucked inside. My first version sagged—adding a hidden wire ring tightened the shape. The final look is unexpectedly vintage and fills a blank wall or shelf.
It’s perfect for swapping faux greens by season without glue, so nothing is permanent.
What You’ll Need for This Look
8. Wallpaper-Resurfaced Plastic Baskets
I hid ugly plastic with removable peel-and-stick wallpaper inside baskets. The pattern peeks out and instantly feels intentional. My mistake was using wallpaper with a busy pattern; small-scale geometrics read cleaner on shelves.
These work great in open closets and on bookcases. Use a straight edge to smooth seams for a neat finish.
What You’ll Need for This Look
9. Zip-Tied Bamboo Board Rack for Vertical Storage
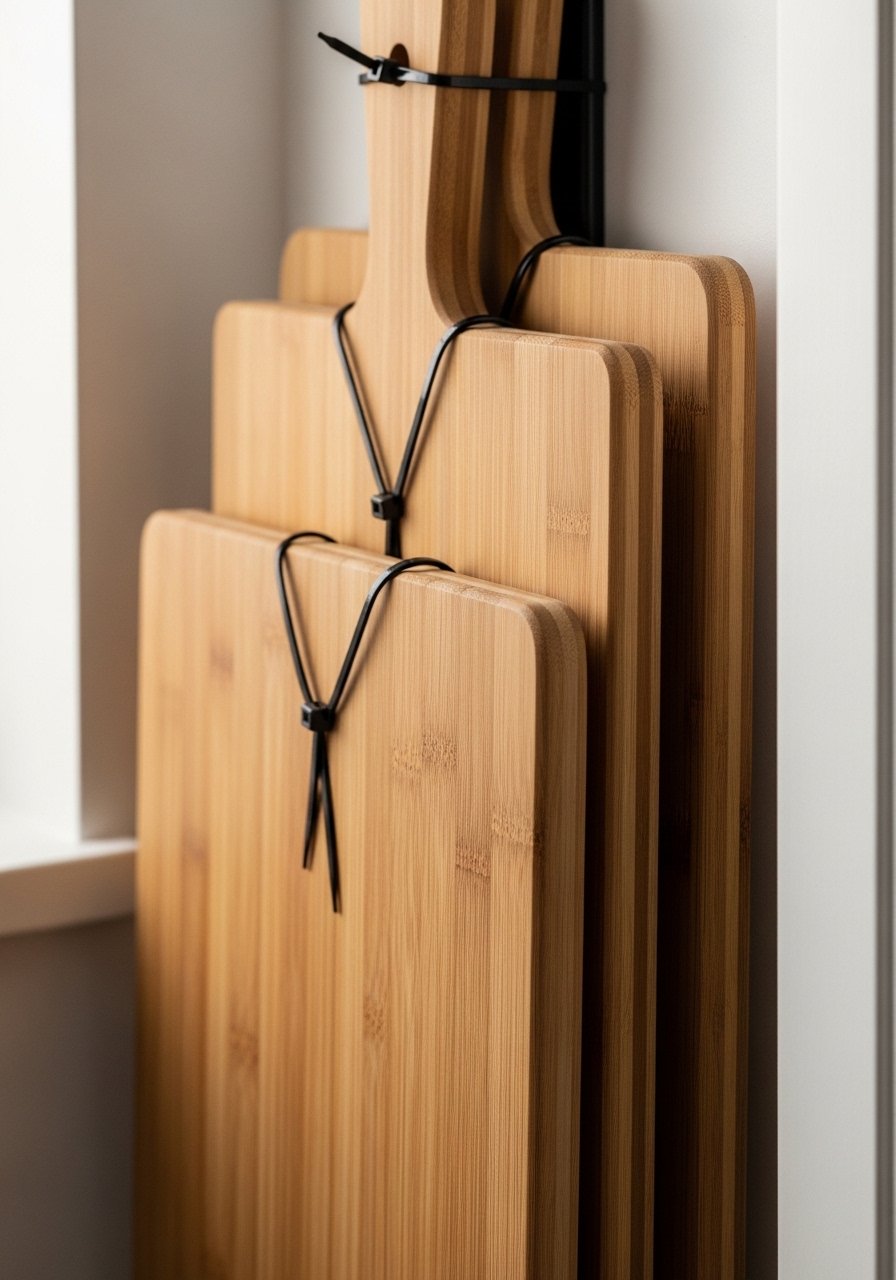
I made a vertical rack from slotted bamboo boards and zip ties to free up counter space. It started wobbly until I doubled the ties and anchored to a stud. The vertical lines visually slim a small kitchen and make tools feel deliberate.
This is my cheap organizer for trays and lids. Use matching ties and sand the bamboo edges for a refined finish.
What You’ll Need for This Look
10. Push Pin Nailhead Gallery Panels
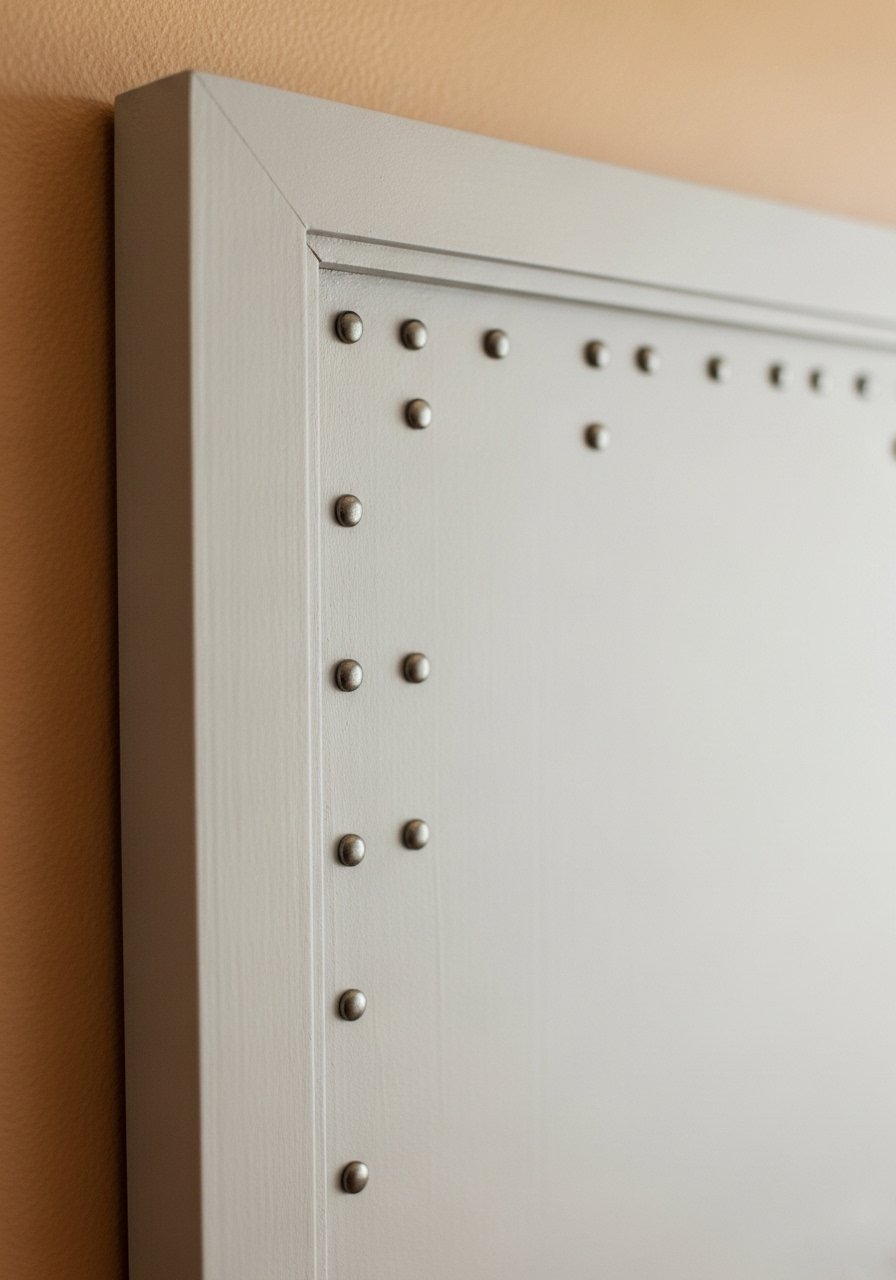
I used colored push pins to mimic nailhead trim on foam board panels. It started cheap-looking until I painted the pins a muted metallic. The panels now read like a textured art piece instead of craft store fare.
Spacing matters—use a ruler. Hang in odd numbers for balance. This is a renter-friendly way to add texture without heavy art.
What You’ll Need for This Look
11. Popsicle Stick Mini Shelf Swing
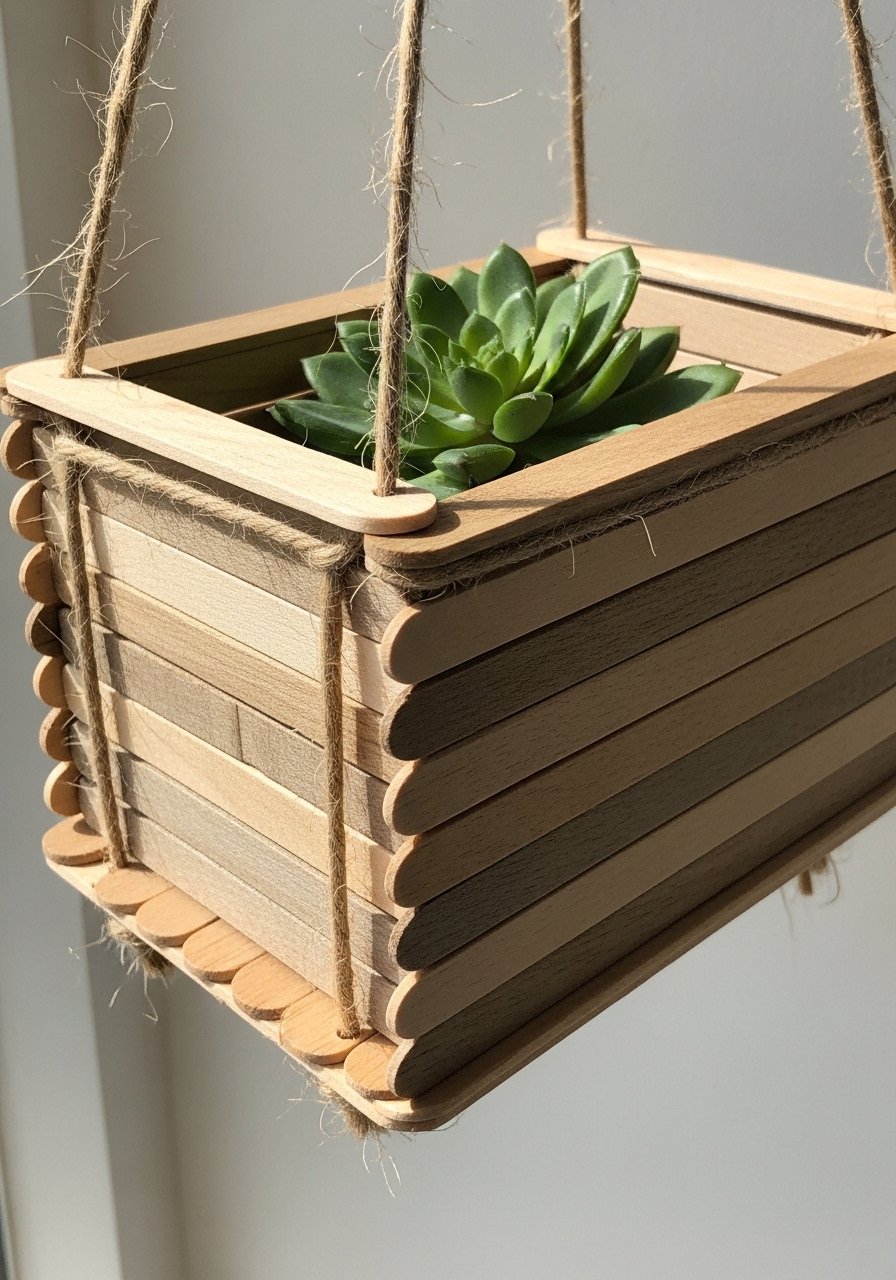
I built a tiny hanging shelf from craft sticks for a small corner plant. It looked flimsy at first because I used too few sticks. Doubling the layers and gluing with a hot glue gun made it sturdy enough for a lightweight pot.
It’s a cute shelf for small plants or candles and fills vertical space without overwhelming.
What You’ll Need for This Look
12. Stackable Drawer Coffee Station Organizer
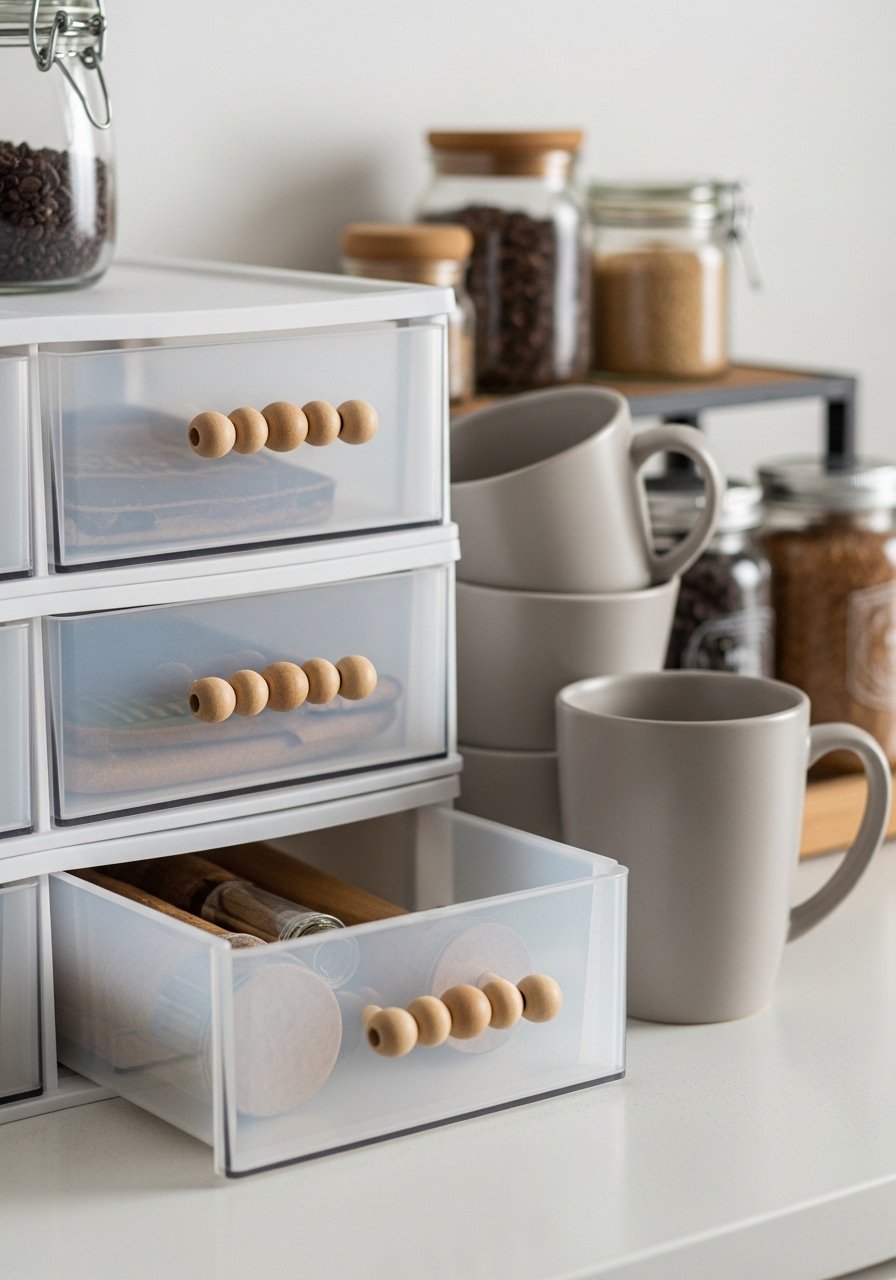
I stacked small drawers and added wooden bead pulls to create a compact coffee station. It hid pods, filters, and sugar packets so the counter looked tidy. My drawer stack shifted until I used double-sided grip pads.
This is perfect for tight kitchens—styling a tray and small jar on top makes it read intentional instead of utilitarian.
What You’ll Need for This Look
13. Contact Paper Bunny Wall Signs (Seasonal)
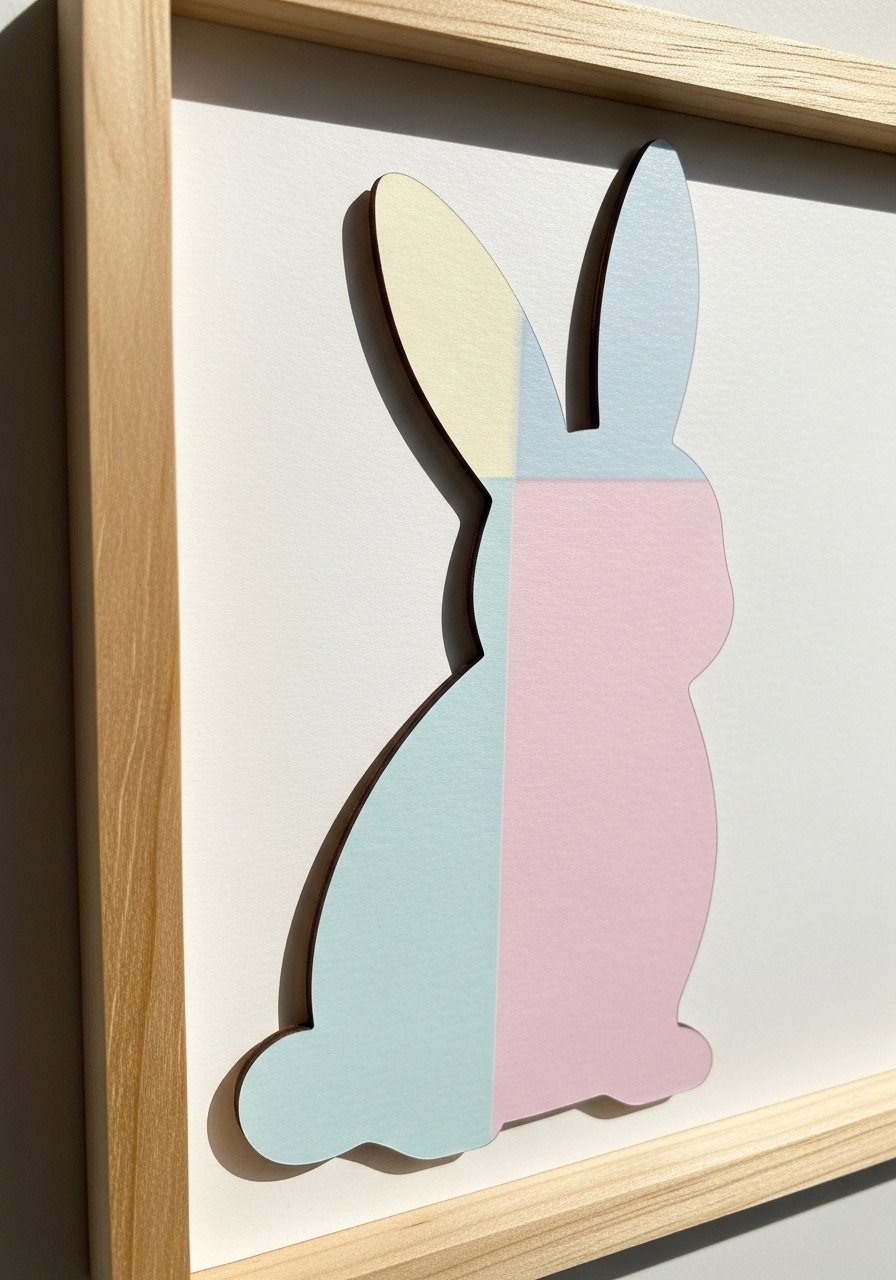
I cut bunny silhouettes from contact paper and layered them on foam board for a seasonal sign that didn’t damage walls. I learned to use transfer tape for clean edges after a messy first cut. The removable nature means I swap it out every spring.
It’s a renter-friendly seasonal pick-me-up that stores flat all year.
What You’ll Need for This Look
14. DIY Nautical Rope Cabinet Handles

I replaced bland knobs with rope loops anchored to cabinet screws. My first knots loosened—so I glued and clamped them tight before trimming. The result is a tactile, coastal detail that looks deliberately chosen.
These suit light-colored cabinets and are surprisingly durable if tied and secured properly.
What You’ll Need for This Look
15. Jute Cord Wall Hanging That Feels Vintage
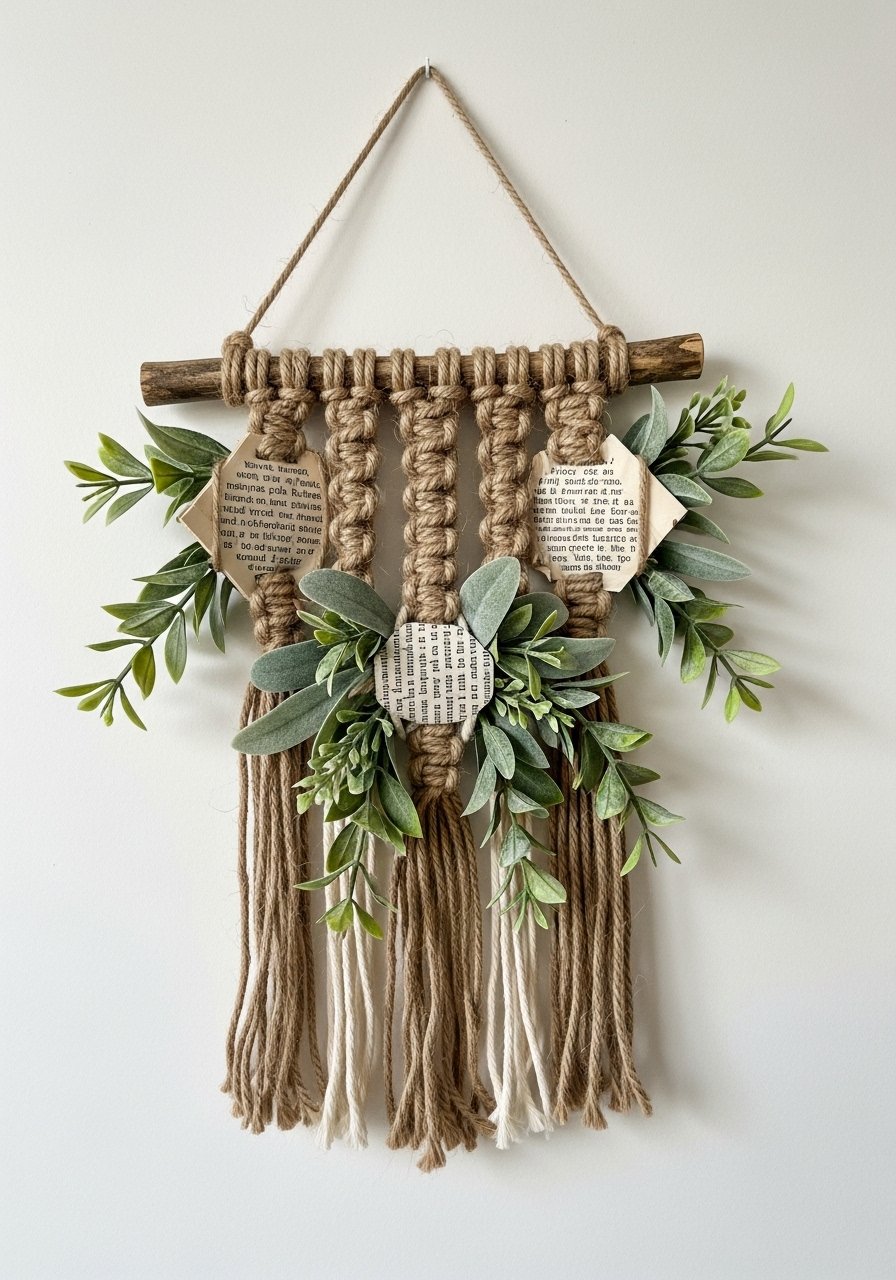
I braided jute into a small wall hanging and added old book pages and faux greens for a vintage feel. I admit I glued too much at first and it looked stiff; removing excess glue softened the piece. It now adds organic texture to a small wall without being fussy.
I like it in a hallway where it reads subtle but purposeful.
What You’ll Need for This Look
16. Wallpaper-Backed Serving Tray (Pool Noodle Rim)
I padded a flat tray rim with a cut pool noodle and covered it in wallpaper to make a cushioned, pretty tray that won’t scratch surfaces. My first noodle was too thick—trim to scale. The wallpaper inside the tray gives a designer pop without effort.
It’s great on counters or coffee tables and feels solid under glasses.
What You’ll Need for This Look
17. DIY Apothecary Jars with Chalk Labels

I painted the insides of clear jars with frosted glass spray and added chalkboard labels. Initially my handwriting was too casual, so I practiced stencils on scrap paper. The finished jars look like they came from a boutique and hold cotton swabs, q-tips, or coffee.
The chalk labels let me change content without looking messy.
What You’ll Need for This Look
18. DIY Wooden Bead Garland on a Tray
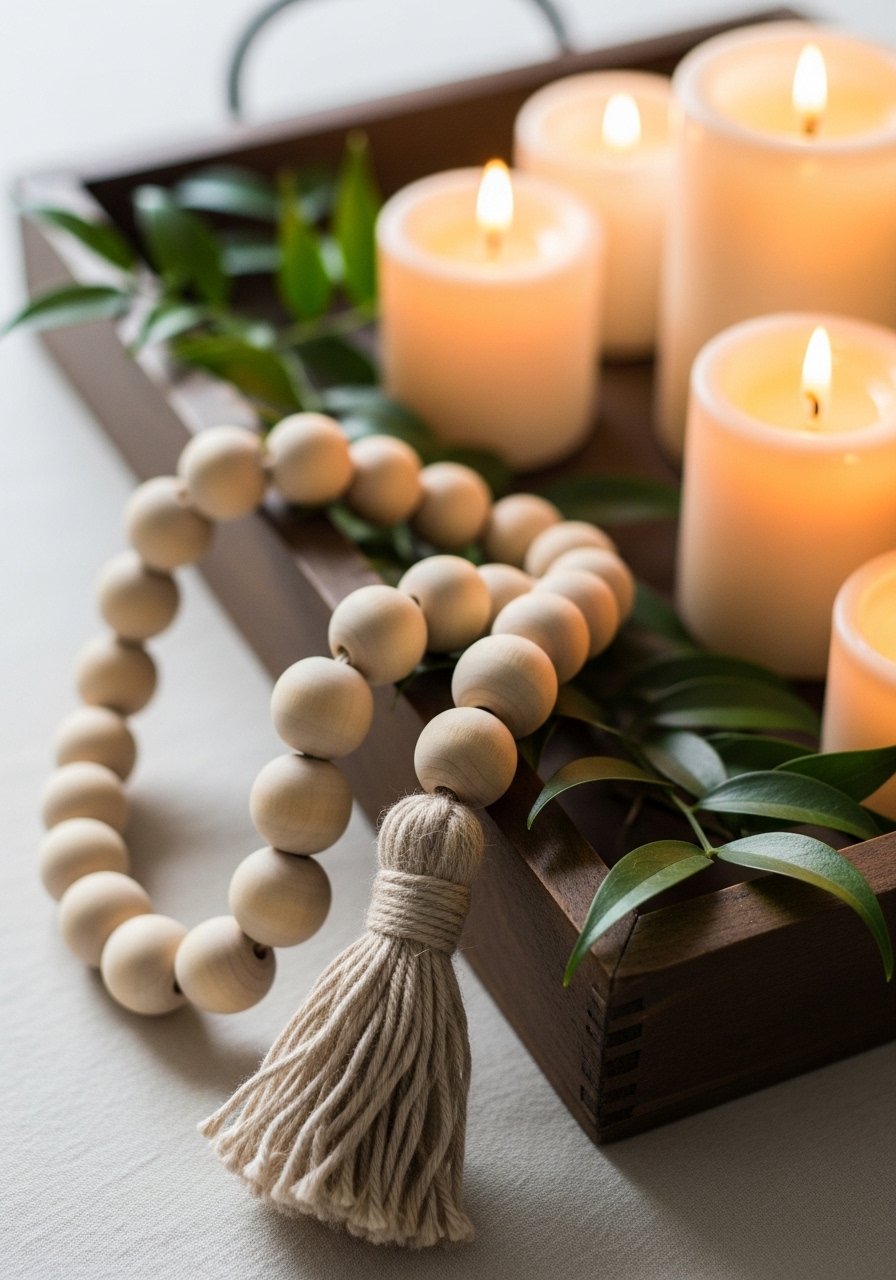
I strung wooden beads for a simple garland and looped it through a tray cluster. At first the cord showed between beads—knot every few beads to hide gaps. It softens hard surfaces and makes groupings feel designed.
I keep one on my coffee table year-round and change the tassel color seasonally.
What You’ll Need for This Look
19. Faux Topiary in Wrapped Tin Can
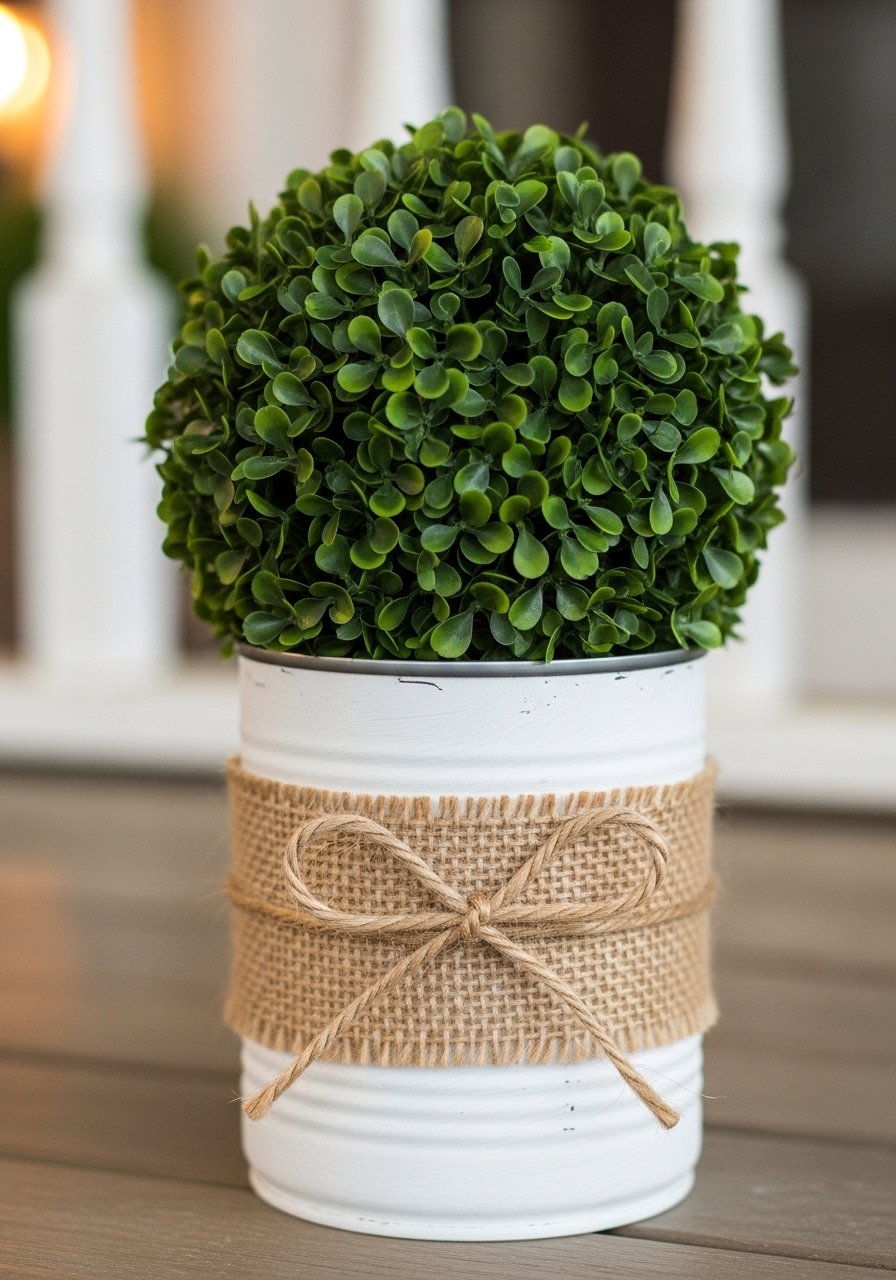
I planted a faux boxwood ball in a decorated tin can for porch symmetry. I initially used too-small filler and the ball wobbled. Adding clean rocks and glue steadied it. Paired in twos, it looks like a bought pair from a garden shop.
This is easy to stash and doesn’t wilt in heat.
What You’ll Need for This Look
20. Contact Paper Faux Leather Placemats
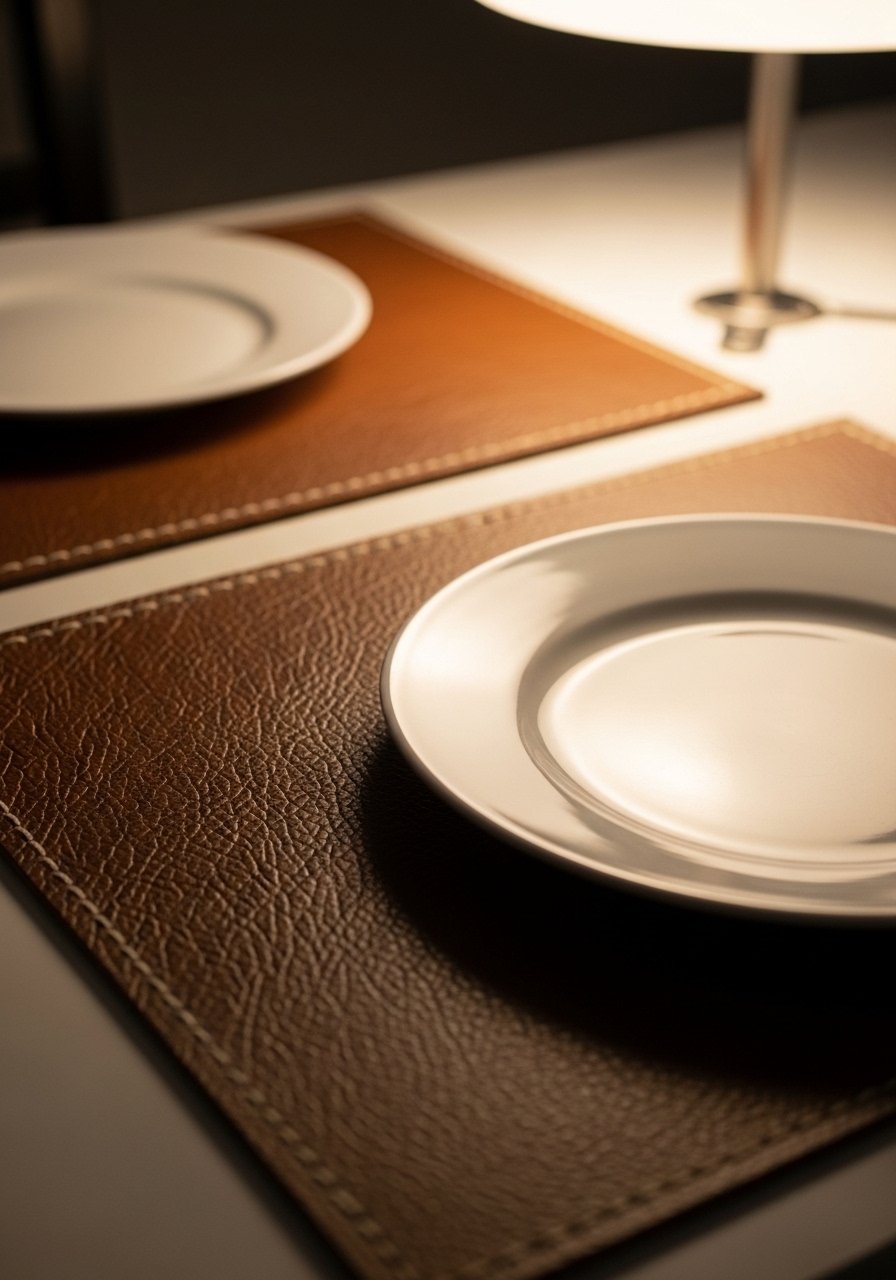
I covered chipboard with textured contact paper to mimic leather placemats. The first edges peeled; I sealed with matching edge tape. They wipe clean and read more expensive than their price.
These are great for casual dining and are easy to store flat when not in use.
What You’ll Need for This Look
21. DIY Candle Holders from Painted Jars
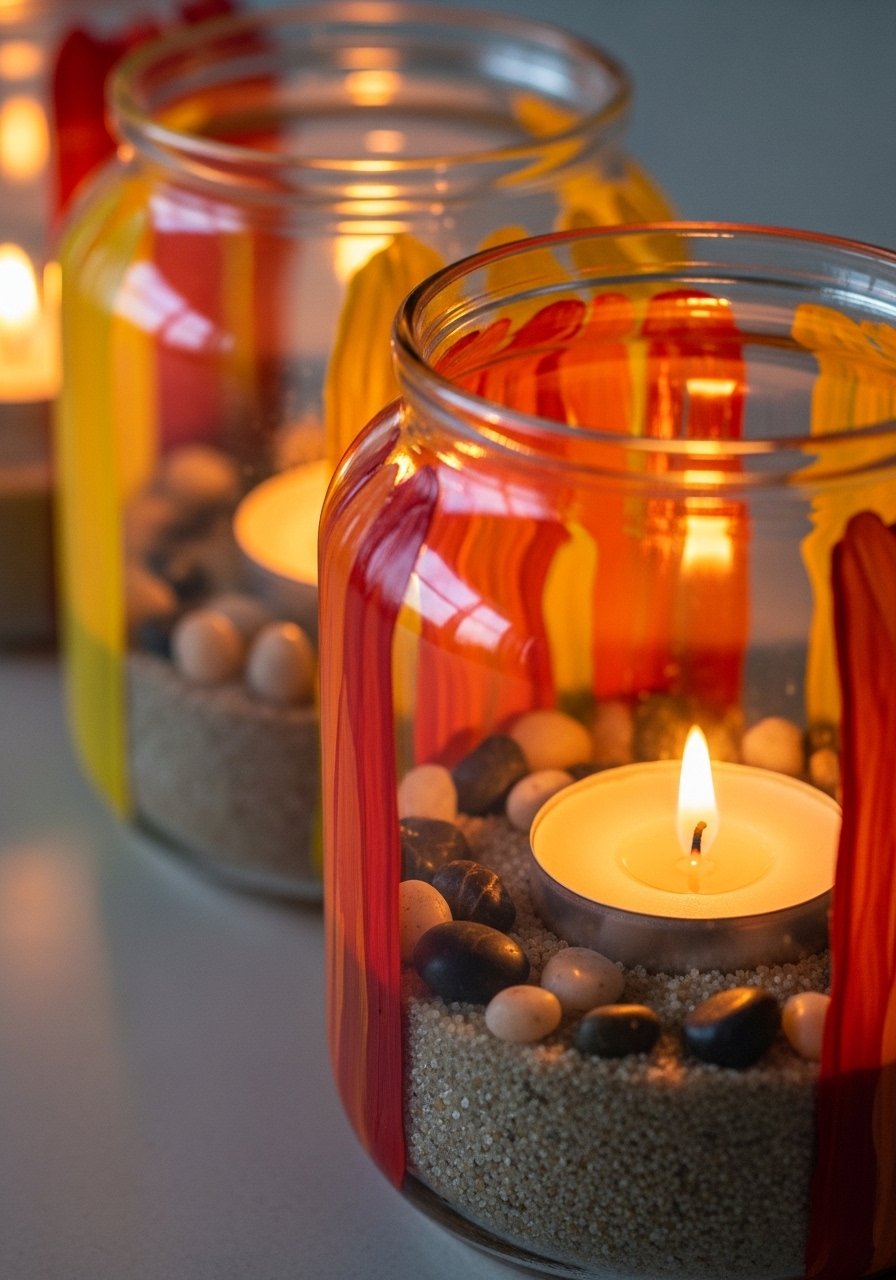
I turned small jars into candle holders by painting the outside and filling the bottom with sand. My first attempt used too much paint so light didn’t glow—thin coats fixed that. They now cast a warm, cozy light and sit on trays for safe groupings.
Use unscented candles in glass for safety and a clean look.
What You’ll Need for This Look
22. Simple Wooden Plank Swing Shelf

I made a small hanging shelf from a thin plank and rope. The first plank bowed under weight—choosing a thicker board or adding a center support solved it. It’s perfect for light plants or picture frames and fills a small wall without nails.
Balance the load and you’ll get a charming spot to show small favorites.
What You’ll Need for This Look
23. DIY Drawer Knobs from Doll Pegs and Beads

I painted wooden doll pegs and glued beads for simple knobs. My first batch had uneven holes—drilling a pilot hole makes a smoother fit. The knobs read custom and add a playful, high-quality detail to a plain dresser.
They’re inexpensive, easy to swap, and kidproofed if sealed well.
What You’ll Need for This Look
24. Faux Greenery Swaps in Reusable Bedsprings
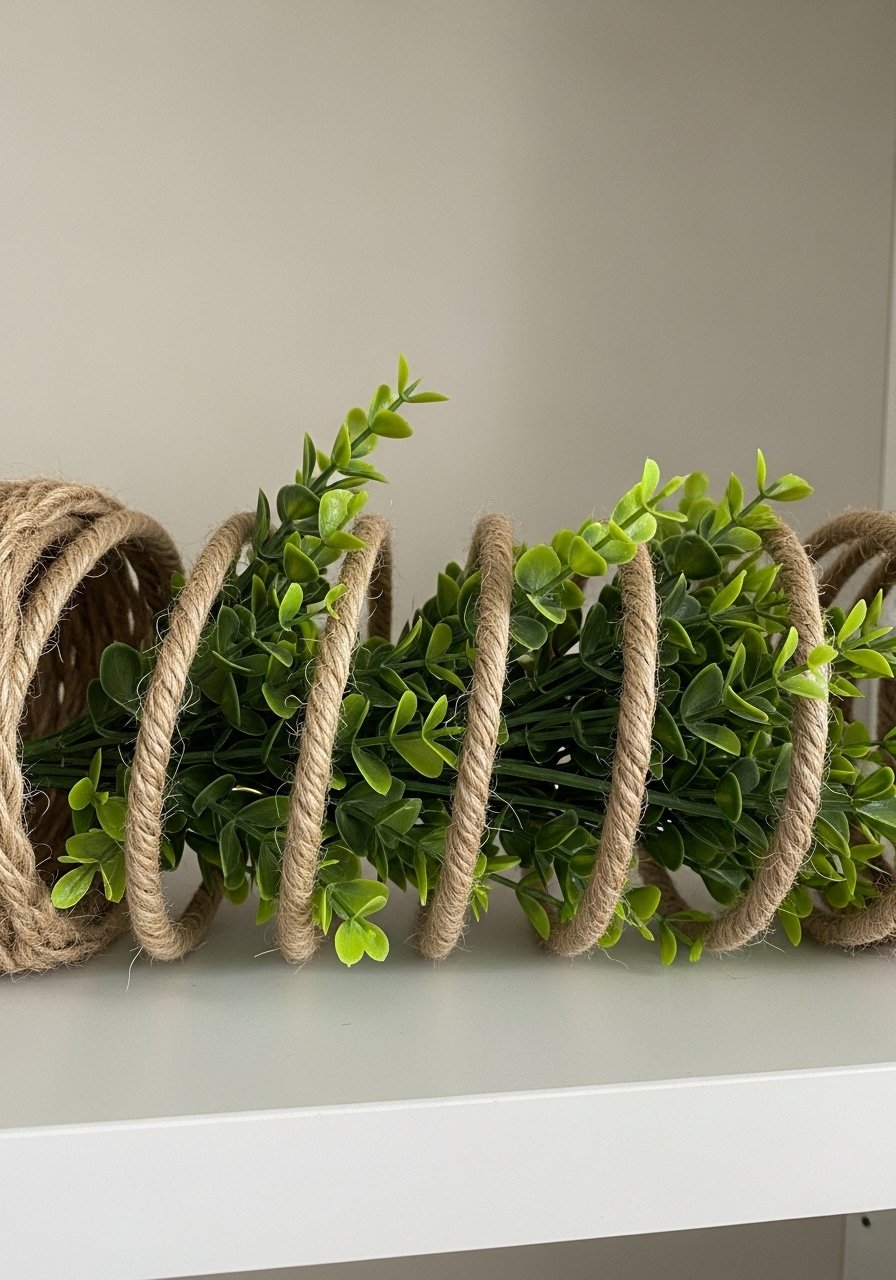
I tuck faux stems into a jute bedspring frame for seasonal swaps. The trick is leaving space to breathe; I used too many stems initially and it read cluttered. Now I use 3–4 stems and a sprig of moss for balance.
It’s easy to update and doesn’t require glue or wire.
What You’ll Need for This Look
25. Painted Charger Plates from Dollar Mirrors
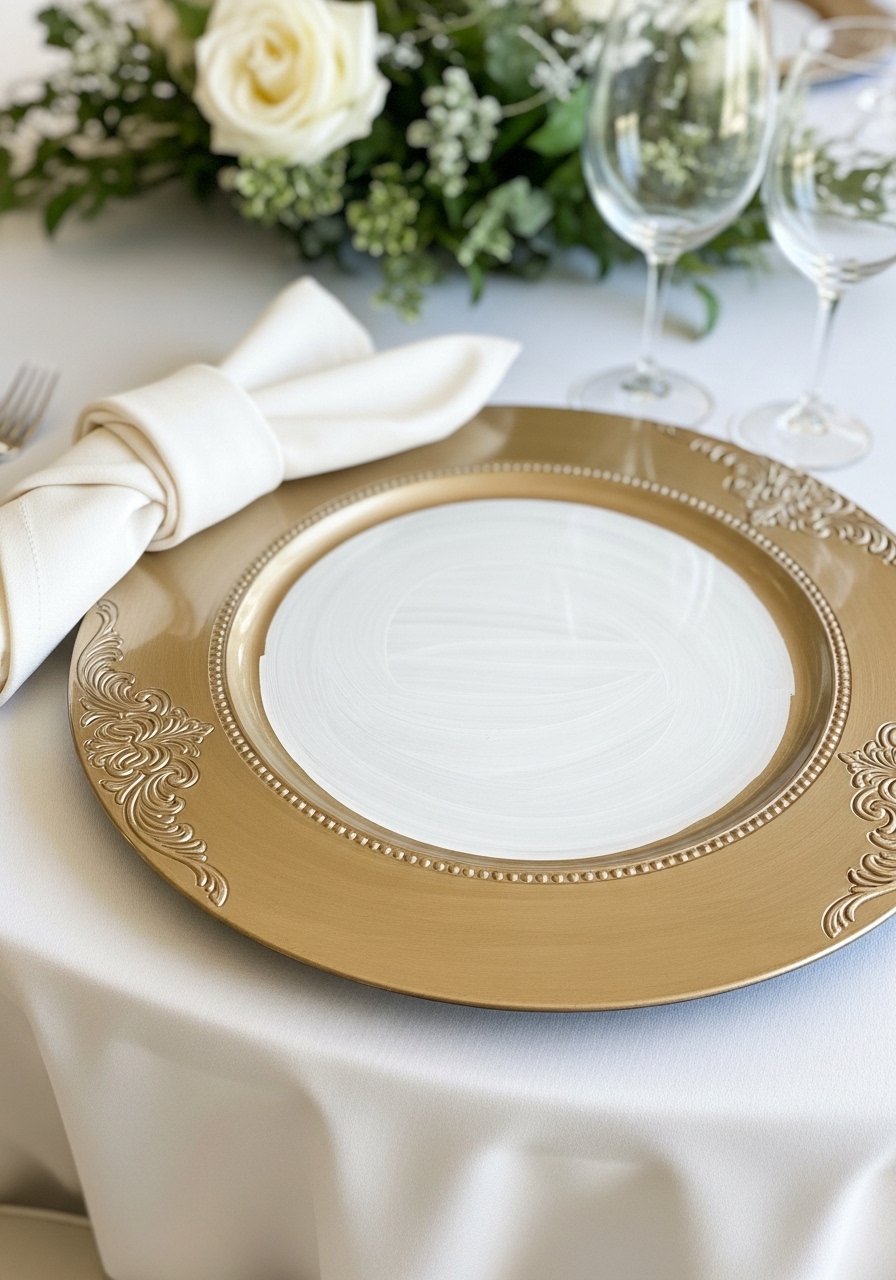
I painted the rim of a cheap round mirror to use as a decorative charger. The mirror’s reflective center adds depth; I masked the glass first and spray painted a soft metallic rim. My mistake was over-sanding before painting—light scuffing is enough for paint grip.
It’s a small detail that makes place settings feel intentional.
What You’ll Need for This Look
26. DIY Simple Macramé Plant Hanger
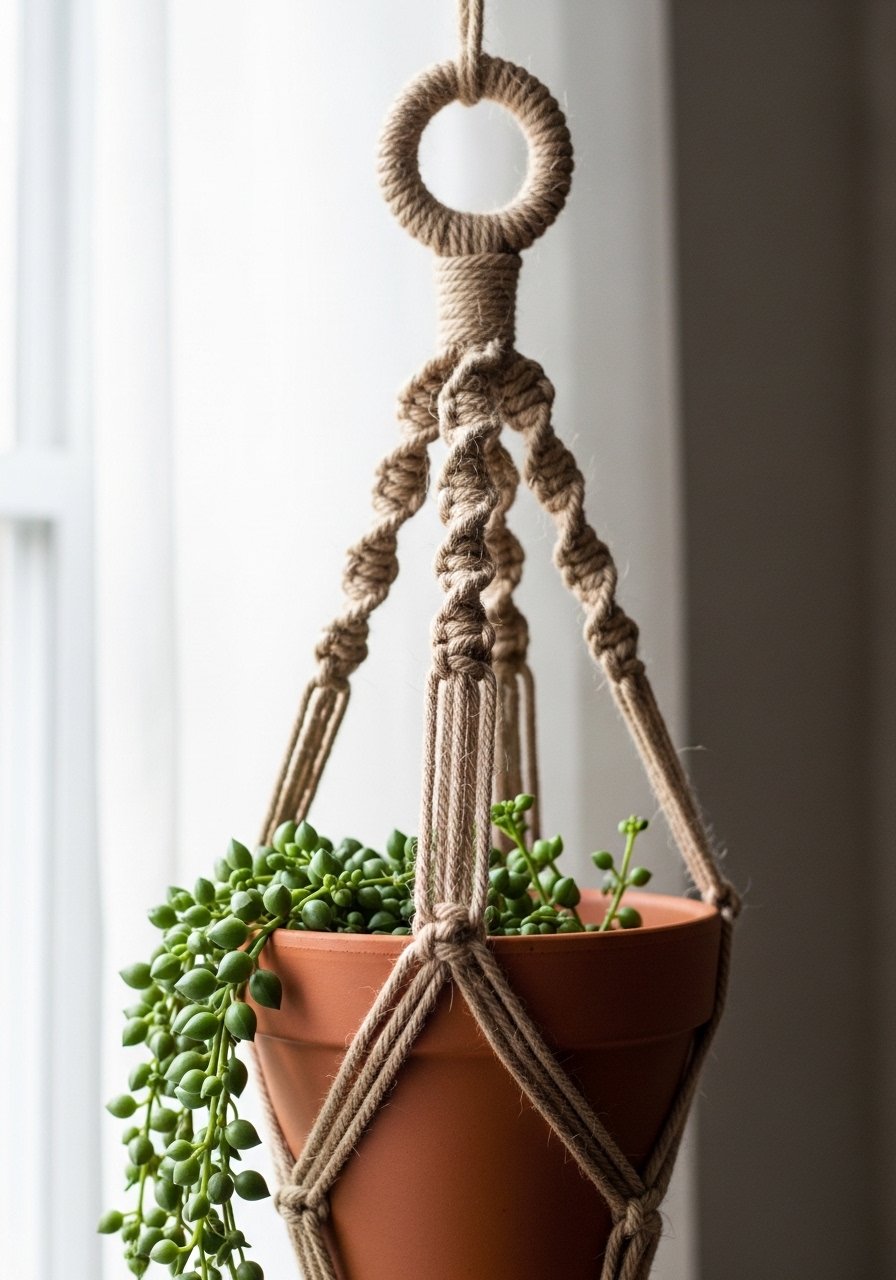
I made a simple macramé hanger from thick jute for a small pot. My first knots were uneven; watching a short tutorial fixed my tension. It’s lightweight, renter-friendly, and adds vertical green without a shelf.
I prefer natural fiber for a lived-in, earthy look.
What You’ll Need for This Look
27. DIY Seasonal Wreath from Dollar Picks
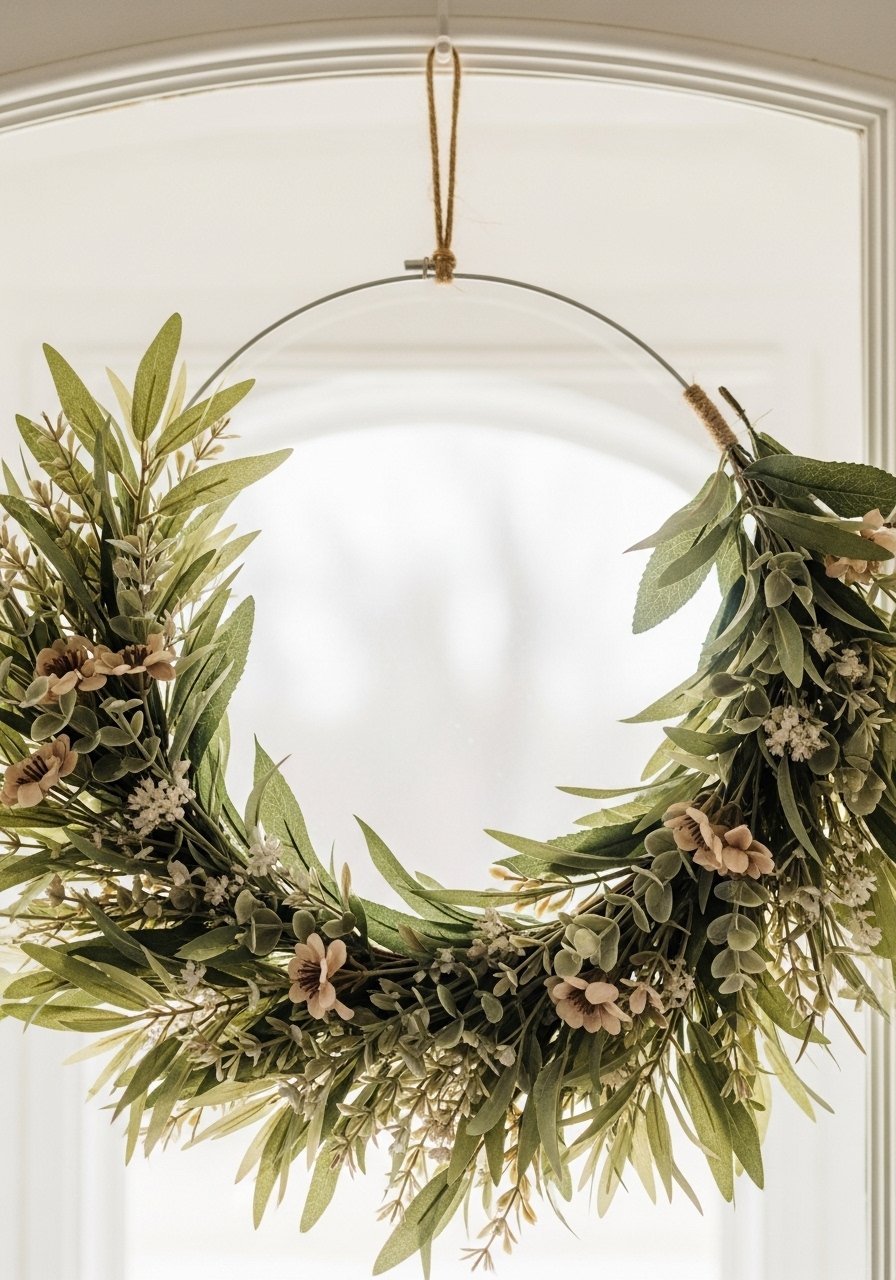
I layered faux floral picks onto a simple wire hoop for a wreath that changes with the season. My first wreath was too busy—limit layers and choose a focal side. Hung low on the door, it reads intentional and warm.
This is my fast door update for each holiday or season.
What You’ll Need for This Look
28. Simple Frame Mirror Makeover with Rope Trim
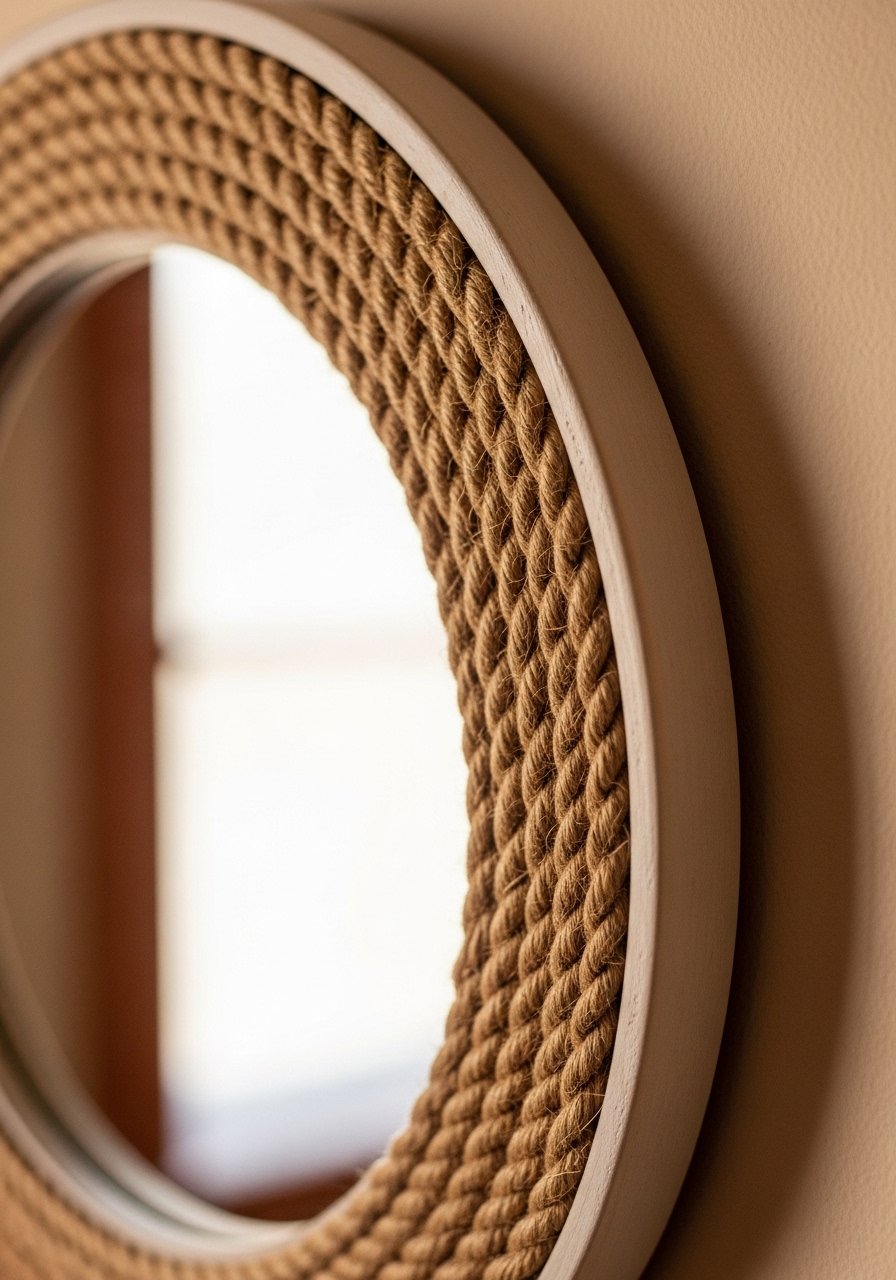
I glued nautical rope around a cheap frame mirror to give it texture. My first glue choice bubbled; clear epoxy made a tidy hold. The rope softens the mirror and works well in bathrooms or entryways for an updated look.
It’s an inexpensive way to add warmth without replacing fixtures.
What You’ll Need for This Look
29. Tabletop Herb Planters from Painted Cans
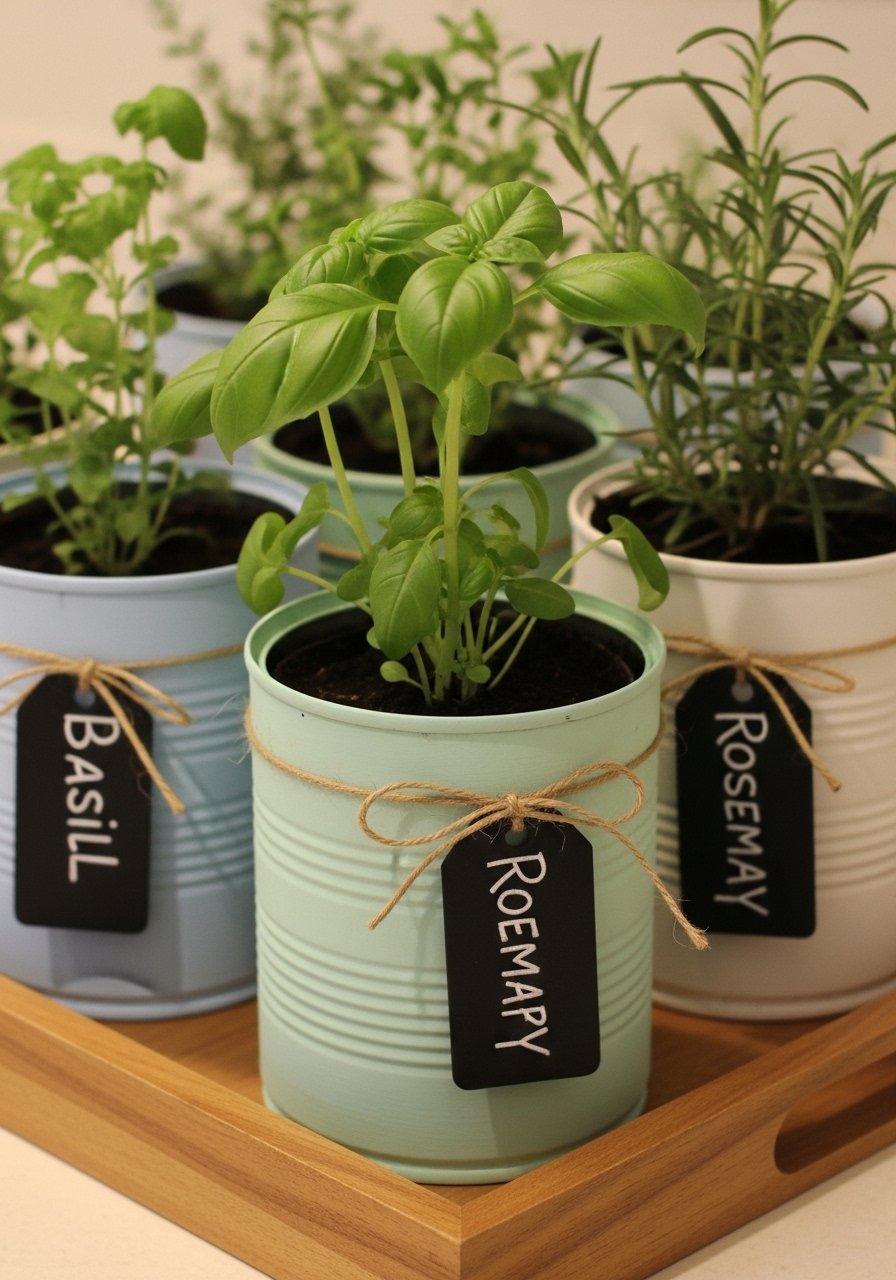
I painted old cans and used them as herb planters on my windowsill. My first cans rusted—line them with a small nursery pot or plastic liner. Chalk labels help me remember which herb is which and keep the look tidy.
It’s an easy way to add greenery and useful fragrance to the kitchen.
What You’ll Need for This Look
30. Easy Ribbon-Tied Napkin Rings on a Tray
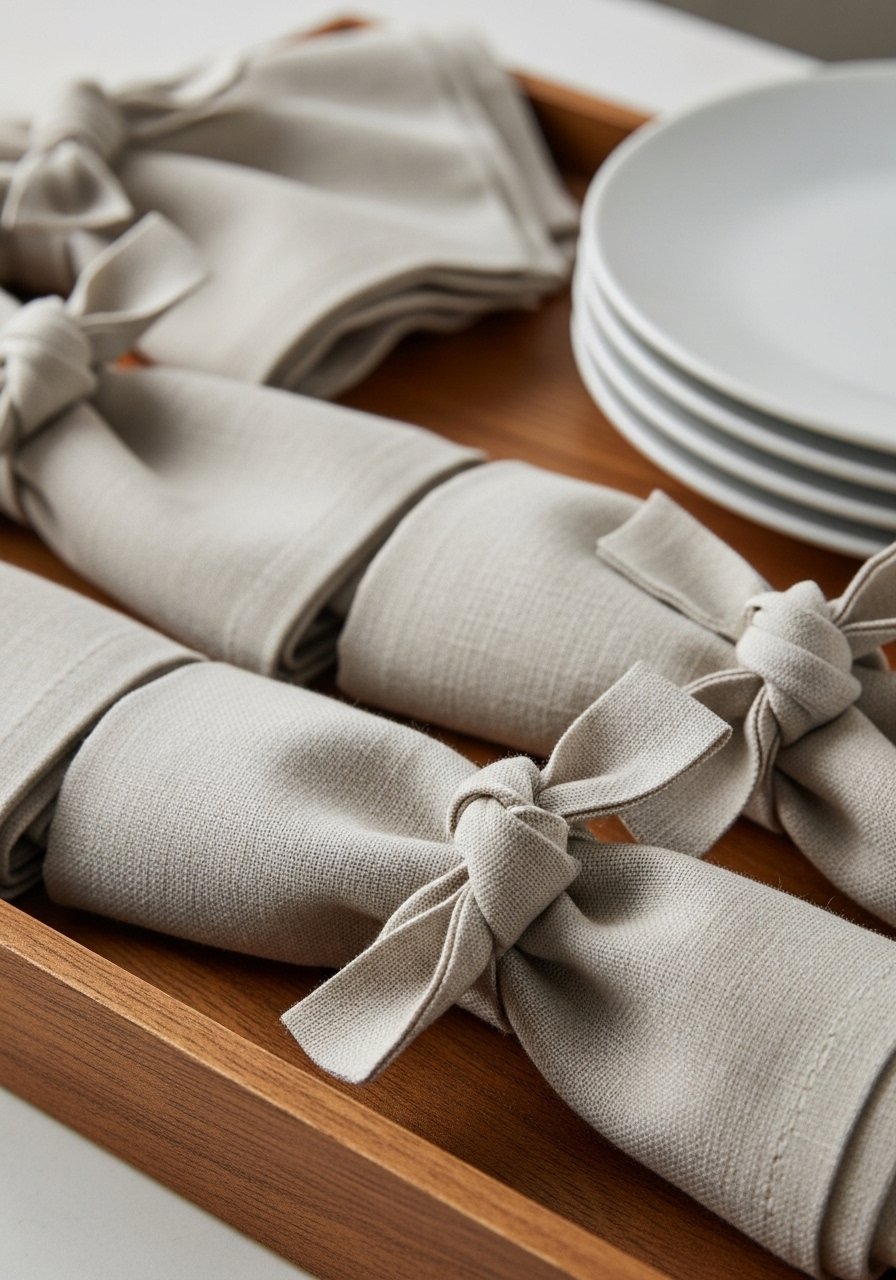
I tied linen napkins with ribbon and tucked them on a tray for a simple table vignette. My first knots came undone; a small dab of glue keeps them neat for guests. The ribbon adds color and texture without buying specialty rings.
I keep a stash of ribbons and swap them by season.
What You’ll Need for This Look
Final Thoughts
You don’t need to do everything. Pick one corner, one shelf, or one drawer and try a single project. Small, repeatable tweaks add up more than a big weekend overhaul.
If something looks off, tweak it. The fixes are usually tiny: a better insert, a different ribbon, or less paint. You’ll live with the result and really know what works.
